- Introduction
- Understand Client Credentials Grant Type
- Before to start
- Solution 1: Use HTTP Connector in Power Automate
- Solution 2: Build your Dataverse Custom API to call the Client credentials Grant type API
- Information
- Custom API C# Code
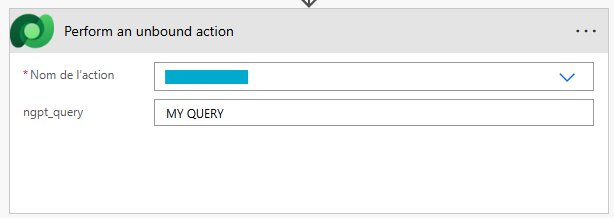
- Using Custom API
1. Introduction
Real case scenario:
« We want our Power Apps to use data from this API. It uses OAuth identity ». Great, let’s build a custom connector.
But he forgot to tell you one thing, it is client credentials grant type, and in fact:

https://learn.microsoft.com/en-us/connectors/custom-connectors/connection-parameters
So, we need to do another way.
2. Understand Client Credentials Grant Type
You can find a whole explanation here: https://learn.microsoft.com/en-us/entra/identity-platform/v2-oauth2-client-creds-grant-flow
But the main idea is, you need to request a token, with a client id and a client secret. Then use this token (most current, a Bearer token) to do you API Call.
So that means, you are going to do two API Call:
- Get your token
- Do your call
Depending on the API, each token can expire. In my case the token expires every 4 seconds. I don’t need to keep it, because I won’t do multiple call in 4 seconds so it will be requested/refresh each time we are going to do an API call. But if in your application you think you going to do multiple call in this timeframe, it might be good to think about a token manager solution.
3. Before to start
You need to ask from the API developers:
- Client ID
- Client Secret
- Token URL
- Headers required to call API
And maybe a scope for the token (not mandatory).
In my scenario, I had a client ID, a client secret, a token URL, a scope, an additional key in header for the API, a specific user-agent header and a content-type header.
4. Solution 1: Use HTTP Connector in Power Automate
4.1. Information
This is the first solution I had in mind. It is easy to implement, but in my scenario, it didn’t work (see Issue part below). But it doesn’t mean it will be your case. It depends on how the security has been implemented on the API.
4.2. Implementation
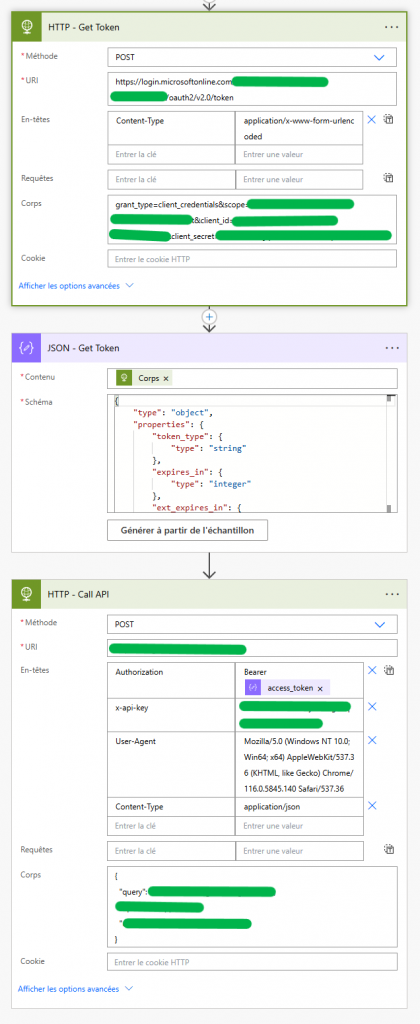
First, you need to get your token.
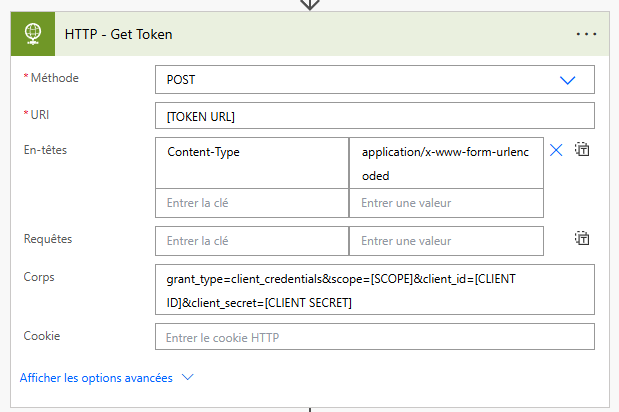
Content-Type is very important at this step. It tells your API that all parameters are URL encoded in the body.
| Key | Value |
|---|---|
| Content-Type | application/x-www-form-urlencoded |
| Body | grant_type=client_credentials&scope=[SCOPE]&client_id=[CLIENT ID]&client_secret=[CLIENT SECRET] |
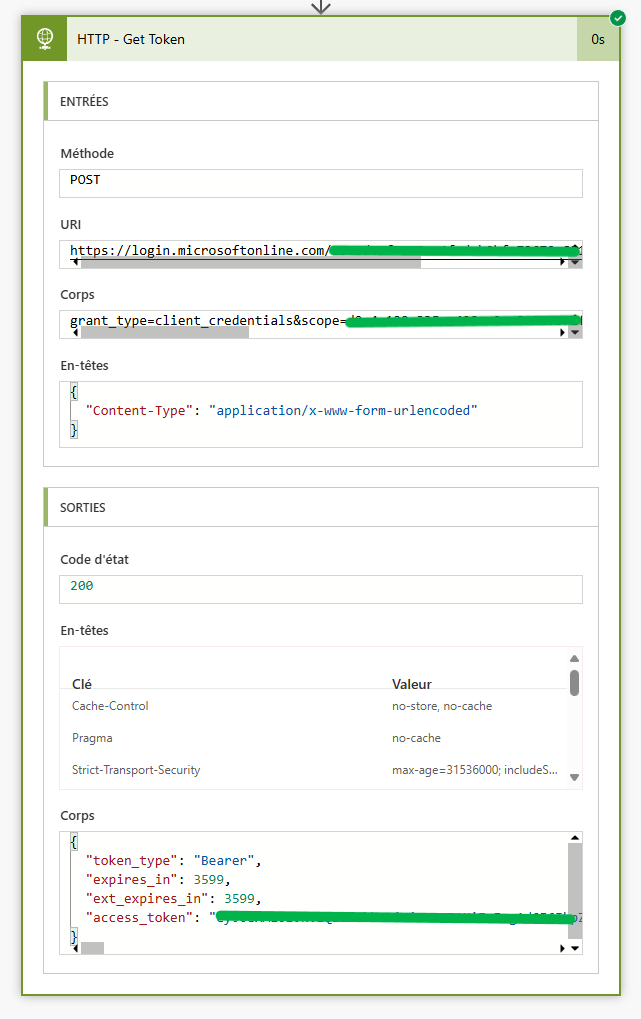
Execute it once to test it, and you can see the token in return, also when it does expire.
So now, you can use the token to call the API. Don’t forget the headers the API Developpers give you and follow their documentation. To use this token, add Authorization in headers.
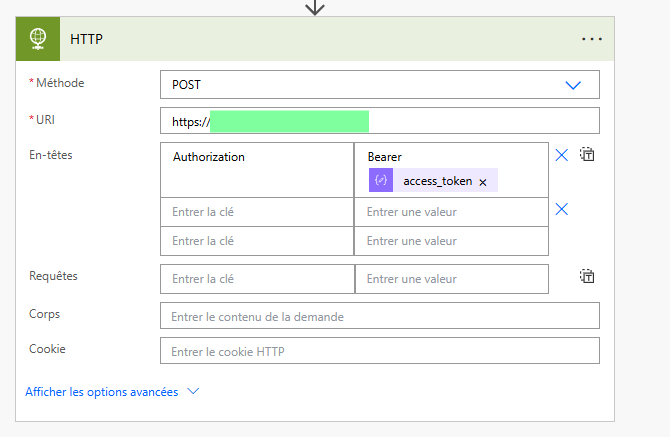
Full flow in my scenario.
4.3. Issue (you might encounter)
While executing my flow I had a 403 Error: The request could not be satisfied. Even if we don’t find the information on internet, we are assuming that the call of the API is made from a MS Cloud server which is not authorized by our API. So, in our scenario this solution didn’t work.
5. Solution 2: Build your Dataverse Custom API to call the Client credentials Grant type API
5.1. Information
This post will not explain how to develop a Dataverse Custom API. But you can easily find tutorials on internet.
The main idea is, with this solution, to call my API from Dataverse which is hold by our Azure tenant. The same tenant which has given us our token.
5.2. Custom API C# Code
using Microsoft.Crm.Sdk.Messages;
using Microsoft.Xrm.Sdk;
using System;
using System.Collections.Generic;
using System.Linq;
using System.Net.Http;
using System.Net.Http.Headers;
using System.Text;
using System.Text.Json;
using System.Threading.Tasks;
using System.Web.UI.WebControls;

namespace Namespace
{
    public class API_ClientCredentialsGrantType : IPlugin
    {
        IOrganizationService service;
        IPluginExecutionContext context;

        public void Execute(IServiceProvider serviceProvider)
        {
            context = (IPluginExecutionContext)serviceProvider.GetService(typeof(IPluginExecutionContext));
            service = ((IOrganizationServiceFactory)serviceProvider.GetService(typeof(IOrganizationServiceFactory))).CreateOrganizationService(context.UserId);
            try
            {
                string query = (string)context.InputParameters["query"]; // Require for my API from developpers in the body

                Body body = new Body()
                {
                    query = query
                };

                string clientid = "[CLIENT ID]";
                string clientsecret = "[CLIENT SECRET]";
                string scope = "[SCOPE]";
                string xapikey = "[X API KEY = Asked by our API Developpers]";
                string tokenurl = "[TOKEN URL]";

                string accesstoken = Task.Run(() => GetAccessToken(tokenurl, clientid, clientsecret, scope)).GetAwaiter().GetResult();

                string response = Task.Run(() => CallApi("[API URL]", accesstoken, xapikey, body)).GetAwaiter().GetResult();

                context.OutputParameters["iserror"] = false;
                context.OutputParameters["errormessage"] = "";
                context.OutputParameters["data"] = response;
            }
            catch (Exception ex)
            {
				// This what I use for error management in PowerApps, you can use your own if needed.
                context.OutputParameters["iserror"] = true;
                context.OutputParameters["errormessage"] = ex.Message;
                context.OutputParameters["data"] = "";
            }
        }

        static async Task<string> GetAccessToken(string tokenUrl, string clientId, string clientSecret, string scope)
        {
            using (HttpClient client = new HttpClient())
            {
                var request = new HttpRequestMessage(HttpMethod.Post, tokenUrl);
                request.Content = new StringContent($"grant_type=client_credentials&scope={scope}&client_id={clientId}&client_secret={clientSecret}", Encoding.UTF8, "application/x-www-form-urlencoded");

                HttpResponseMessage response = await client.SendAsync(request);
                if (response.IsSuccessStatusCode)
                {
                    var jsonResponse = await response.Content.ReadAsStringAsync();

                    dynamic tokenData = JsonSerializer.Deserialize<TokenInfo>(jsonResponse);

                    return tokenData.access_token;
                }
                else
                {
                    throw new InvalidPluginExecutionException($"Error fetching token: {response.StatusCode}");
                }
            }
        }

        static async Task<string> CallApi(string apiUrl, string accessToken, string xapikey, Body body)
        {
            using (HttpClient client = new HttpClient())
            {
                HttpRequestMessage request = new HttpRequestMessage(HttpMethod.Post, apiUrl);
                request.Headers.Authorization = new AuthenticationHeaderValue("Bearer", accessToken);
				// Below are headers required by developpers for the API
                request.Headers.UserAgent.Add(new ProductInfoHeaderValue("Mozilla","5.0"));
                request.Headers.UserAgent.Add(new ProductInfoHeaderValue("AppleWebKit", "537.36"));
                request.Headers.UserAgent.Add(new ProductInfoHeaderValue("Chrome", "116.0.5845.140"));
                request.Headers.UserAgent.Add(new ProductInfoHeaderValue("Safari", "537.36"));
                request.Headers.Add("x-api-key", xapikey);

                request.Content = new StringContent(JsonSerializer.Serialize(body), Encoding.UTF8, "application/json");

                HttpResponseMessage response = await client.SendAsync(request);
                if (response.IsSuccessStatusCode)
                {
                    string apiResponse = await response.Content.ReadAsStringAsync();
                    return apiResponse;
                }
                else
                {
                    throw new InvalidPluginExecutionException($"Error fetching api: {response.StatusCode}");
                }
            }
        }

        private class Body
        {
            public string query { get; set; }
        }

        private class TokenInfo
        {
            public string access_token { get; set; }
            public int expires_in { get;set; }
            public int ext_expires_in { get;set; }
            public string token_type { get; set; }
        }
    }
}
Of course, here everything is hard coded to make it simple for the demo. I recommend using Azure Key Vault to store Client Secret and Environnement Variables for the Client ID and Token URL.
5.3. Using Custom API
The advantage of the Custom API is you can use it through Power Apps such as Power Automate.
In Power Apps :
UpdateContext(
    {
        locCallApi: Environment.customapi_technicalname(
            {
                query: "MY QUERY TO SEND"
            }
        )
    }
);
In Power Automate :