
- Instroduction
- Pre-requisite
- Understand .md file
- Transform your business need into .md file
- Build up your database
- Transform your database into .md file
- Build up your instructions structure
- Initiate your project
- Start Vibe Coding
- Ask your AI to build a .md file with its context
1. Introduction
Code Apps is now generally available, you can hear vibe coding everywhere, and you might have give it a try, but your project has turned to mess. This situation has happened to me a lot of times. The main reason is, as a developer, I focused on coding and producing lines of code with AI.
I needed to go with a plan, look at the Plan designer and inspire myself from the step by step approach.
In this post I am going to explain all the steps which have led me to the success of my Code Apps project with vibe coding. Of course this is my own point of view, you can just use it as a reference and take your own approach.
2. Pre-requisite
You are going to need:
- Git Hub Copilot License
- Visual studio code set and ready for code apps development (Follow Prerequisite of this Microsoft Learn)
- Any more licenses if you are going to use Premium Connector (Ex: I always use Dataverse for my project, so I have a Power Apps premium licence)
3. Understand .md file
.md file is a MarkDown file which is going to be used by AI as instructions. You are going to find rules about how to develop, how to use a particular language or technology, such as the business need of your project. This is the knowledge and the skeleton of your AI for your project.
Please note that each time you are going to ask something to your AI, he is going to check in your .md file.
How many .md files should you do?
🚫 Don’t do a single huge .md file, it is going to give too much context to your AI.
🚫 Don’t do too many short .md files, your AI is going to be lost. Example :
- One for create in Dataverse
- One to get a single element in Dataverse
- One to get multiple elements in Dataverse
- Etc
✅ Do as many files as your project is going to have. Example:
- One for your business need and rules
- One to explain how to set up your code apps project
- One to explain how to CRUD (Create, Read, Update and Delete) Dataverse item
- One to explain MCD of Dataverse
- One per technology to use
4. Transform your business need into .md file
This is, I think one of the most important part. The one which is going to give your business, you and AI, a goal to succeed. For this part, once again, this is my way of doing it, the most important thing is to have a .md file at the end. Also, in my real life project, everything built here will be used as documentation.
4.1. Business need description
You need to identify what to do. And of course, as we are planning to use AI to code, we can use AI to help us out with this task.
Take your favorite AI tools. Start explaining your needs. We are not going to talk about technical or code in that part. Only need and functionalities.
For this post, I am going to take as an example a “Desk Booking” application. I am using this template if you want to use it.
**Role:**
Act as a Senior Business Analyst and Product Manager with expertise in User Experience (UX).

**Task:**
Write a detailed **Functional Specification Document (FSD)** for a web application.

**Constraint:**
**STRICTLY FUNCTIONAL.** Do not include technical implementation details. Do not mention specific programming languages, database schemas, API endpoints, or server architecture. Focus exclusively on business logic, user behavior, feature descriptions, and interface rules.

**Input Context:**
- **App Name:** [INSERT APP NAME]
- **Primary Goal:** [INSERT GOAL]
- **Target Users:** [INSERT USERS]
- **Key Functionalities:** [INSERT FEATURE LIST]

**Output Structure:**
Please organize the response into the following sections using Markdown:

1.  **Project Overview**
    *   **Problem Statement:** What pain point are we solving?
    *   **Solution Summary:** High-level description of the application.
    *   **Glossary:** Definitions of domain-specific terms used in the document.

2.  **User Personas**
    *   Create 2-3 detailed user profiles (Name, Role, Goals, Frustrations).

3.  **User Roles & Permissions (RBAC)**
    *   Define the different access levels (e.g., Guest, Registered User, Admin, Super-Admin).
    *   Create a matrix or list describing exactly what each role can and cannot do.

4.  **Detailed Functional Requirements**
    *   *Instruction:* Break this down by module (e.g., "Module 1: User Onboarding", "Module 2: Search & Discovery").
    *   For each feature, provide:
        *   **ID:** (e.g., REQ-001)
        *   **Description:** What the feature does.
        *   **Acceptance Criteria:** The specific conditions that must be met for the feature to be considered complete (e.g., "User must receive a confirmation email within 5 minutes").
        *   **Error Handling:** What happens if the user makes a mistake (e.g., "If the form is incomplete, highlight missing fields in red").

5.  **User Flows / Use Cases**
    *   Describe the step-by-step journey for key actions (e.g., "The Checkout Flow").
    *   Format: Step 1 -> Step 2 -> Step 3.

6.  **UI/UX Requirements & States**
    *   Describe the necessary screens (e.g., Dashboard, Settings Page).
    *   Describe state changes (e.g., "Empty State: Show a distinct illustration when there is no data to display").

7.  **Business Rules & Logic**
    *   Define the rigid rules of the system (e.g., "A user cannot cancel an order after 30 minutes," or "Premium content is locked until payment is verified").
Here is the one I have used:
**Role:**
Act as a Senior Business Analyst and Product Manager with expertise in User Experience (UX).

**Task:**
Write a detailed **Functional Specification Document (FSD)** for a web application.

**Constraint:**
**STRICTLY FUNCTIONAL.** Do not include technical implementation details. Do not mention specific programming languages, database schemas, API endpoints, or server architecture. Focus exclusively on business logic, user behavior, feature descriptions, and interface rules.

**Input Context:**
- **App Name:** Contoso Desk Booking
- **Primary Goal:** As our company choose remote working, we need to create a Desk booking application. I want people to click on a desk, see when it is available and choose a day to book. Meeting room is not included in the app.
- **Target Users:** Employees of Contoso
- **Key Functionalities:** See desks, which one is available or not, and if not, who booked it. Choose an avialable desk then choose a day to book.

**Output Structure:**
Please organize the response into the following sections using Markdown:

1.  **Project Overview**
    *   **Problem Statement:** What pain point are we solving?
    *   **Solution Summary:** High-level description of the application.
    *   **Glossary:** Definitions of domain-specific terms used in the document.

2.  **User Roles & Permissions (RBAC)**
    *   Define the different access levels (e.g., Guest, Registered User, Admin, Super-Admin).
    *   Create a matrix or list describing exactly what each role can and cannot do.

3.  **Detailed Functional Requirements**
    *   *Instruction:* Break this down by module (e.g., "Module 1: User Onboarding", "Module 2: Search & Discovery").
    *   For each feature, provide:
        *   **ID:** (e.g., REQ-001)
        *   **Description:** What the feature does.
        *   **Acceptance Criteria:** The specific conditions that must be met for the feature to be considered complete (e.g., "User must receive a confirmation email within 5 minutes").
        *   **Error Handling:** What happens if the user makes a mistake (e.g., "If the form is incomplete, highlight missing fields in red").

4.  **User Flows / Use Cases**
    *   Describe the step-by-step journey for key actions (e.g., "The Checkout Flow").
    *   Format: Step 1 -> Step 2 -> Step 3.

5.  **UI/UX Requirements & States**
    *   Describe the necessary screens (e.g., Dashboard, Settings Page).
    *   Describe state changes (e.g., "Empty State: Show a distinct illustration when there is no data to display").

6.  **Business Rules & Logic**
    *   Define the rigid rules of the system (e.g., "A user cannot cancel an order after 30 minutes," or "Premium content is locked until payment is verified").
From now, don’t kill the chat, we want to keep this AI context windows until the end.
It has given you a draft, read it, ask him to change things if needed, we really want to have all the functionalities described and in your AI context window.
You might have a result like this one:
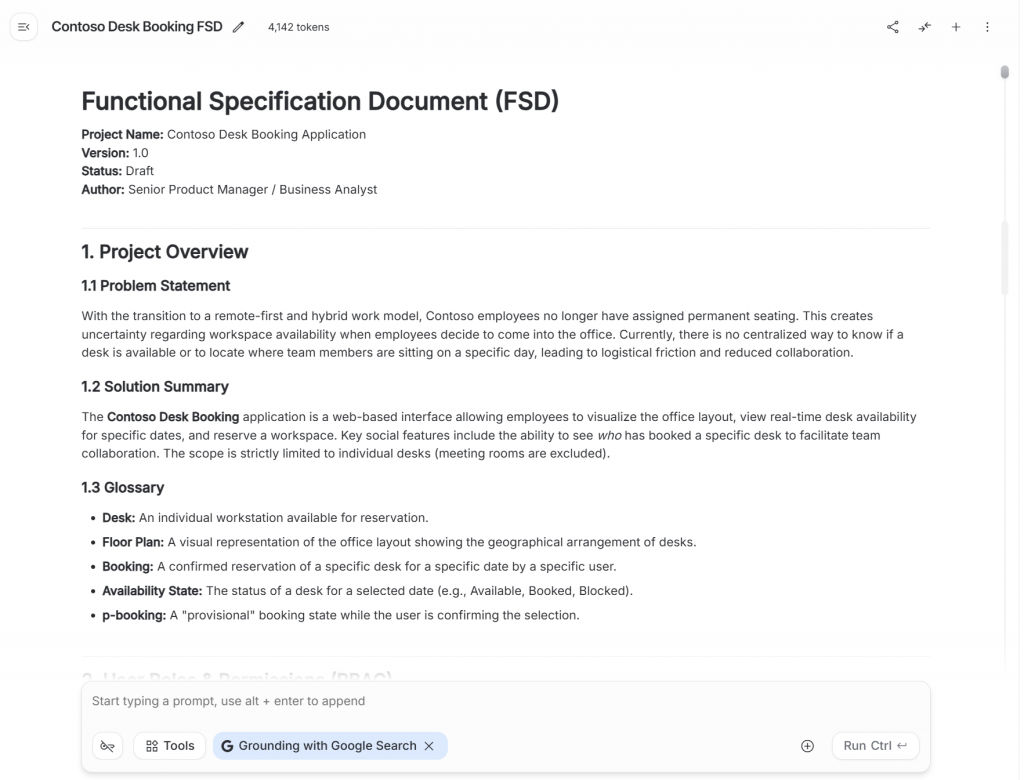
4.2. UI/UX Mockup
Now you and your favorite AI LLM have business need context. Let’s ask your AI to build mockup. I highly recommend using .html or .svg format for your template. For 3 main reasons:
- You can easily edit it yourself
- You can add id tag to elements which can easily match an id into your specification
- AI, especially vibe coding, will easily understand your mockup
Here is on of my prompt as an example (still in the same chat):
Now, take the role of a UI Designer. You need to make a mockup of the screen “SCR-001: The main dashboard”. Return your mockup into a html/css format, only the code. Add a “specification-id” tag on button and any interaction, the value should be a reference of what we have in the specification.
You will probably notice, in the returned html code this:

Of course, your mockup won’t be perfect at first prompt. You might need to ask AI to edit it or edit the html/svg yourself.
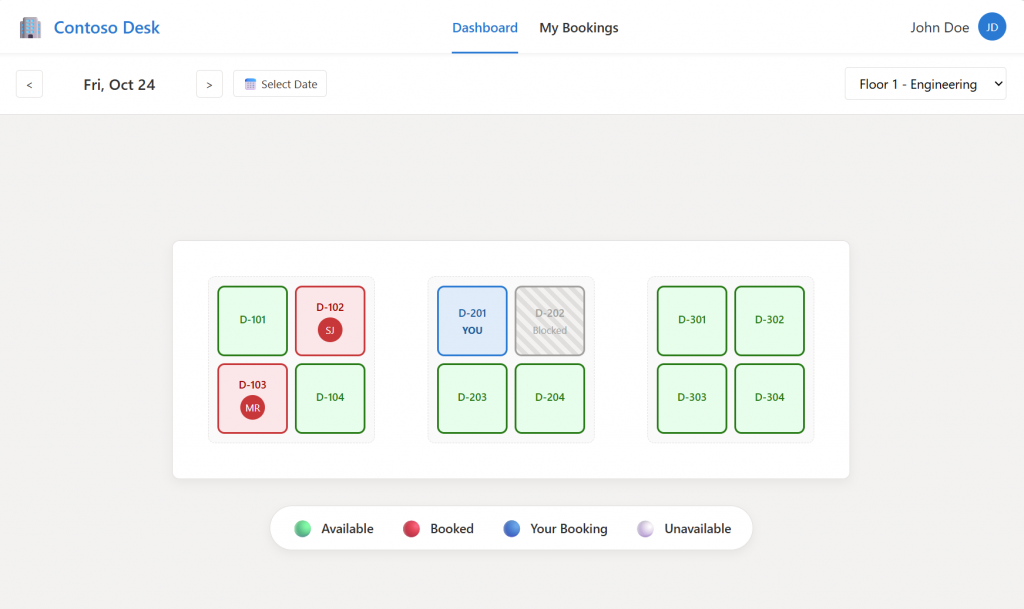
Here are the Mockusp produced for this example.
4.3. Build Business .md file
We need now to transform this specification into a .md file which our AI can understand. What’s better to ask an AI how to talk to another AI!
We are going to use vibe coding, so can you create a specification.md which is going to be used by Github Copilot (for a PowerApps Code Apps). It must contain the description, all the rules, the screen with the reference and an explanation for each specification-id. Alors make a part regarding the chart graphics of the app. You should specify only functionalities, UI and UX in this document. Do not talk about technical parts.
Usually, the specification.md file is not fully ready. Read it, let him know that you have .html mockup with the specification-id tag. Here is the specification.md file from our example.
This document is structured to provide the AI with context, visual constraints, and strict functional logic without dictating the underlying code implementation.
***
# specification.md
**Project:** Contoso Desk Booking Application
**Type:** Model-Driven / Canvas / Custom Page (PowerApps)
**Role:** Product Owner & UI/UX Designer
**Version:** 1.0
---
## 1. Context & Scope
**Goal:** Create a user-centric Desk Booking application for Contoso employees.
**Core Workflow:** Users visualize the office map, check availability for a specific date, identify where colleagues are sitting, and book a desk.
**Primary Constraint:** Strictly functional and UI/UX focused. The interface must look modern, clean, and follow the defined graphic charter.
---
## 2. Graphic Charter & Design System
*All UI components generated must adhere strictly to these visual tokens.*
### 2.1 Color Palette
**Brand Colors:**
* `Primary Blue`: `#0078D4` (Buttons, Active States, Links)
* `Primary Hover`: `#106EBE`
* `Background Body`: `#F3F2F1` (Light Grey)
* `Background Card`: `#FFFFFF` (White)
* `Text Main`: `#323130`
* `Text Muted`: `#605E5C`
* `Border`: `#E1DFDD`
**Status Colors (Functional):**
* **🟢 Available:**
* Background: `#E6FFEC`
* Border/Text: `#107C10`
* **🔴 Booked (Colleague):**
* Background: `#FDE7E9`
* Border/Text: `#A80000` / `#D13438`
* **🔵 Booked (Me):**
* Background: `#DEECF9`
* Border/Text: `#0078D4`
* **⚪ Blocked/Unavailable:**
* Background: `#F3F2F1`
* Border: `#A19F9D` (Hatched pattern preferred)
### 2.2 Typography
* **Font Family:** Segoe UI (Standard Microsoft Stack).
* **Headings:** Semi-Bold (600), Dark Grey.
* **Body:** Regular (400), Standard Grey.
* **Labels:** Medium (500), Muted Grey.
### 2.3 UI Components & Spacing
* **Cards:** White background, 1px Border (`#E1DFDD`), 8px Border Radius, Soft Box Shadow.
* **Buttons:** 4px Border Radius, Padding 10px 20px.
* **Avatars:** Circular, 32px diameter for lists, 48px for details.
* **Layout:** Flexbox/Grid based. Comfortable padding (min 24px).
---
## 3. Business Rules (Logic)
1. **Single Booking:** A user can only have **one** active booking per calendar date.
2. **Booking Window:** Users can only book dates from **Today + 30 days**. Past dates are read-only.
3. **Cancellation:** Users can cancel a booking at any time before the day ends.
4. **Privacy:** Users can see *who* booked a desk (First Name, Last Name, Avatar) to facilitate team collaboration.
5. **Admin Override:** Admins can "Block" desks. A blocked desk cannot be booked by anyone.
---
## 4. Screen Specifications & Reference
*Refer to the Specification IDs (REQ-xxx, SCR-xxx) when generating code.*
### **SCR-001: The Main Dashboard**
**Purpose:** The landing page. Users select a date and visualize the floor plan.
* **Structure:**
* **Header:** Logo, Navigation Links, User Profile.
* **Control Bar (Sticky):**
* Date Picker (Defaults to Today).
* Floor Selector (Dropdown).
* **Workspace (Center):**
* Interactive Map showing desks arranged in clusters (Islands).
* Desks must change color based on their status for the *selected date*.
* **Legend (Bottom):** Explains color codes (Available, Booked, Mine, Blocked).
* **Interactions:**
* Clicking a **Green** desk → Opens `SCR-002` (Booking Flow).
* Clicking a **Red** desk → Opens `SCR-002` (Info Flow).
* Clicking a **Blue** desk → No action (or open My Bookings).
* Clicking a **Grey** desk → No action (Cursor: Not-Allowed).
* **Mockup:**
* File: SCR-001.html
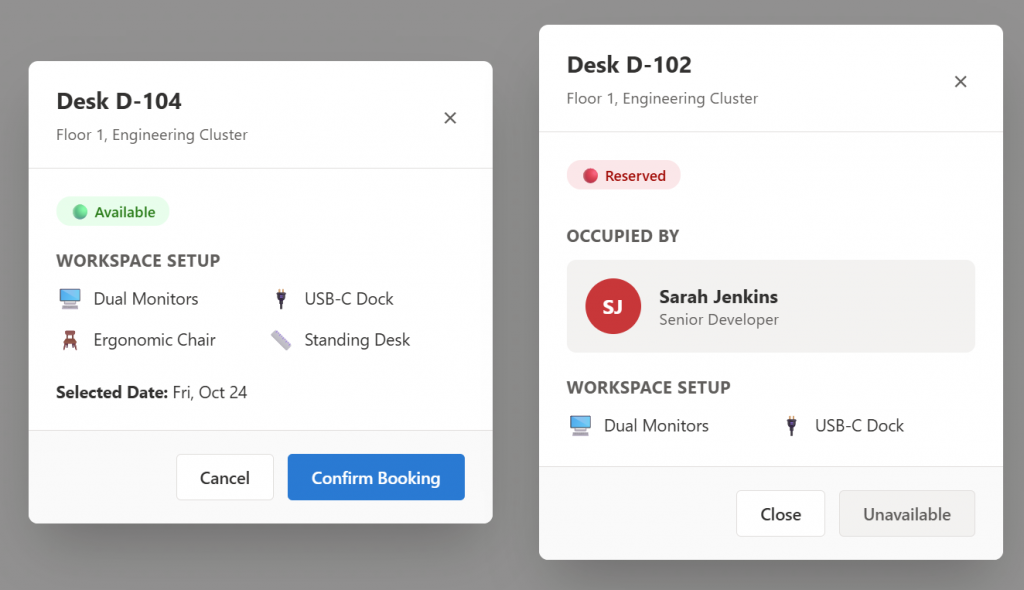
### **SCR-002: Desk Detail Modal**
**Purpose:** Overlay modal providing details and confirmation actions.
* **Visuals:**
* Appears centered with a dark backdrop blur.
* Displays Desk ID (e.g., D-104) and Amenities (Monitor, Dock).
* **State A: Desk is Available**
* Show "Available" Badge (Green).
* Show "Book This Desk" Button (Primary Color).
* **State B: Desk is Booked**
* Show "Reserved" Badge (Red).
* Show User Profile (Avatar + Name) of the occupant.
* "Book" button is disabled or hidden.
* **Mockup:**
* File: SCR-002.html
### **SCR-003: Booking Feedback (Toast)**
**Purpose:** Immediate confirmation after booking on SCR-002.
* **Visuals:**
* Non-intrusive notification (Top Right).
* Text: "Success! Desk [ID] booked for [Date]."
* **State Change:**
* The map on `SCR-001` must refresh instantly. The selected desk turns **Blue** (Booked by Me).
* **Mockup:**
* File: SCR-003.html
### **SCR-004: My Bookings Page**
**Purpose:** List view of user's schedule.
* **Structure:**
* **Tabs:** "Upcoming" (Active) vs "Past History".
* **List Items:** Cards showing Date (bold), Desk ID, and Location.
* **Action:** "Cancel Booking" button (Red text/border) on upcoming items.
* **Empty State:**
* If no bookings exist, show an illustration and a "Find a Desk" button redirecting to `SCR-001`.
* **Mockup:**
* File: SCR-004.html
---
## 5. Specification ID Dictionary
*Use this table to link UI elements to their functional requirements.*
*Also you can find in the mockup the matching specification through the specification-id tag."
| Spec ID | Type | Description |
| :--- | :--- | :--- |
| **SCR-001** | **Screen** | **Main Dashboard.** The primary map interface. |
| **SCR-002** | **Screen** | **Detail Modal.** Pop-up showing desk specifics and "Book" action. |
| **SCR-003** | **State** | **Confirmation State.** Includes the Success Toast and the map updating to Blue. |
| **SCR-004** | **Screen** | **My Bookings.** List view for managing reservations. |
| **REQ-001** | Feature | **Date Selection.** Changing the date updates the map data. Past dates disabled. |
| **REQ-002** | Feature | **Visual Map.** The rendering of desks in clusters using the Design System colors. |
| **REQ-003** | Feature | **Desk Metadata.** Showing availability status, amenities, or the colleague's name/avatar. |
| **REQ-004** | Interaction | **Create Booking.** The action of clicking "Confirm" which saves the record and blocks the desk. |
| **REQ-005** | Feature | **Booking History.** The logic to list future vs past bookings separately. |
| **REQ-006** | Interaction | **Cancel Booking.** The action of removing a reservation, freeing up the desk for others. |
| **REQ-007** | Admin | **Block Desk.** Admin-only status where a desk is marked unavailable (Grey). |
---
## 6. Prompting Guidelines for Copilot
*When generating code based on this file, please follow these instructions:*
1. **Reference IDs:** When creating a button, add a comment or attribute like `<!-- Implements REQ-004 -->`.
2. **Strict Styling:** Do not invent colors. Use the CSS variables defined in Section 2.1.
3. **Mockup Fidelity:** Ensure the layout matches the provided HTML structure references (Navigation bar top, Map center, Legend bottom).
4. **Error Handling:** If a user tries to book a Red desk, the UI should visually prevent it (Disabled button).
5. Build up your database
You are going to use Vibe Coding, but to make Power Apps Code Apps. It does not include your Database. Your Code Apps is a user interface. Of course you can use AI to create it, but here I am going to create everything in Dataverse manually.
I will add description on all my tables and columns (useful for the next part).
I will add Power Automate triggered from my Database and plugin if needed.
And make a nice model driven to supervise all my data.
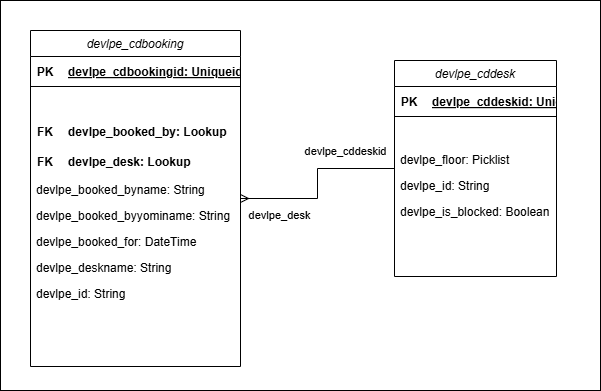
Here is the schema of my Dataverse Database.
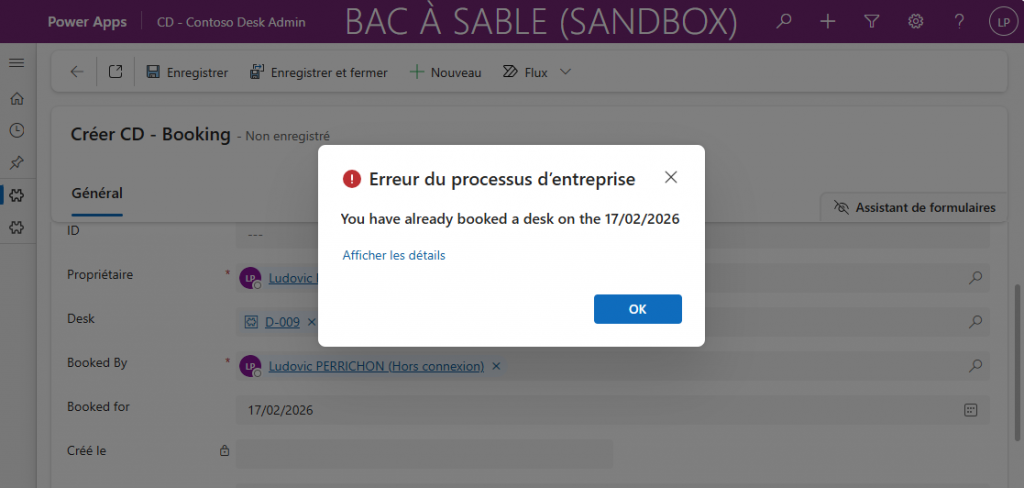
I also have a plugin which:
- Check if the desk is available
- Check if I already have booked a desk for this day (only one desk per person and per day.
6. Transform your database into .md file
Your Dataverse database is set. Now you need to find a way to tell your Github Copilot, all the database information (schema names …).
Well, let’s build a .md file. You can write it with your own hands, or, once again AI was my friend. I have asked him to build me a PowerShell script to transform my Dataverse solution into a DataModel.md file. So, if you are using another system for your Database (SharePoint, SQL…)., ask AI to do the same.
Here is my script:
#Check if module installed
$xrmModule = Get-Module -ListAvailable -Name Microsoft.Xrm.Tooling.CrmConnector.PowerShell
if($xrmModule -eq $null){
    Install-Module -Name Microsoft.Xrm.Tooling.CrmConnector.PowerShell
}

# Parameters
$solutionUniqueName = "contoso_desk" # Schema name of my solution
$outputFile = "D:\Projects\GenerateDatamodelMd\dataModel.md" # Output path

# 1. Connexion (if not already connected, uncomment this line)
$CRMConn = Get-CrmConnection -InteractiveMode

if (-not $CRMConn) {
    Write-Error "You have to connect to Dataverse. Use Get-CrmConnection."
    return
}

Write-Host "Extract data from : $solutionUniqueName..." -ForegroundColor Cyan

# --- 1. Get solution id ---
$solQuery = "<fetch><entity name='solution'><attribute name='solutionid'/><filter><condition attribute='uniquename' operator='eq' value='$solutionUniqueName'/></filter></entity></fetch>"
$solResult = $CRMConn.RetrieveMultiple((New-Object Microsoft.Xrm.Sdk.Query.FetchExpression($solQuery)))

if ($solResult.Entities.Count -eq 0) {
    Write-Error "Solution '$solutionUniqueName' not found."
    return
}
$solutionId = $solResult.Entities[0].Id

# --- 2. Get components ---
$compQuery = @"
<fetch>
  <entity name='solutioncomponent'>
    <attribute name='objectid' />
    <attribute name='componenttype' />
    <filter>
      <condition attribute='solutionid' operator='eq' value='$solutionId' />
      <filter type='or'>
        <condition attribute='componenttype' operator='eq' value='1' />
        <condition attribute='componenttype' operator='eq' value='9' />
      </filter>
    </filter>
  </entity>
</fetch>
"@
$components = $CRMConn.RetrieveMultiple((New-Object Microsoft.Xrm.Sdk.Query.FetchExpression($compQuery)))

$tableIds = $components.Entities | Where-Object { $_.Attributes['componenttype'].Value -eq 1 } | ForEach-Object { $_.Attributes['objectid'].ToString().ToLower() }
$choiceIds = $components.Entities | Where-Object { $_.Attributes['componenttype'].Value -eq 9 } | ForEach-Object { $_.Attributes['objectid'].ToString().ToLower() }

# --- 3. Initialize markdown ---
$md = "# Datamodel - $solutionUniqueName`n`n"
$md += "> Generated : $(Get-Date -Format 'dd/MM/yyyy HH:mm')`n`n---`n`n"

# --- 4. Fetch Tables ---
$md += "## Dataverse Tables`n`n"
Write-Host "Get tables ($($tableIds.Count))..." -ForegroundColor Gray

$allEntitiesReq = New-Object Microsoft.Xrm.Sdk.Messages.RetrieveAllEntitiesRequest
$allEntitiesReq.EntityFilters = [Microsoft.Xrm.Sdk.Metadata.EntityFilters]::Entity
$allEntitiesRes = $CRMConn.Execute($allEntitiesReq)
$targetEntities = $allEntitiesRes.EntityMetadata | Where-Object { $tableIds -contains $_.MetadataId.ToString().ToLower() }

$mermaidRelations = ""
$processedLogicals = @()

foreach ($briefMeta in $targetEntities) {
    $req = New-Object Microsoft.Xrm.Sdk.Messages.RetrieveEntityRequest
    $req.LogicalName = $briefMeta.LogicalName
    $req.EntityFilters = [Microsoft.Xrm.Sdk.Metadata.EntityFilters]::Attributes -bor [Microsoft.Xrm.Sdk.Metadata.EntityFilters]::Relationships
    $meta = ($CRMConn.Execute($req)).EntityMetadata

    $processedLogicals += $meta.LogicalName
    $disp = if ($meta.DisplayName.UserLocalizedLabel.Label) { $meta.DisplayName.UserLocalizedLabel.Label } else { $meta.LogicalName }

    Write-Host " - Table : $disp" -ForegroundColor Yellow
    $md += "### $disp`n"
    $md += "**Schema Name**: ``$($meta.LogicalName)``  `n"
    if ($meta.Description.UserLocalizedLabel.Label) { $md += "**Description**: $($meta.Description.UserLocalizedLabel.Label -replace "`n", " ")  `n" }

    $md += "`n#### Columns`n`n| Display Name | Schema Name | Type | Description |`n|---|---|---|---|`n"
    foreach ($attr in $meta.Attributes | Sort-Object LogicalName) {
        if ($attr.AttributeOf -ne $null -or $attr.AttributeType -eq "Virtual") { continue }
        $aDisp = if ($attr.DisplayName.UserLocalizedLabel.Label) { $attr.DisplayName.UserLocalizedLabel.Label } else { $attr.LogicalName }
        $aDesc = $attr.Description.UserLocalizedLabel.Label -replace "`n", " "
        $md += "| $aDisp | ``$($attr.LogicalName)`` | $($attr.AttributeType) | $aDesc |`n"
    }

    foreach ($rel in $meta.OneToManyRelationships) {
        $mermaidRelations += "    $($rel.ReferencedEntity) ||--o{ $($rel.ReferencingEntity) : `"a`"`n"
    }
    $md += "`n---`n`n"
}

# --- 5. Fetch Choices ---
if ($choiceIds.Count -gt 0) {
    $md += "## Global Choices`n`n"
    Write-Host "Get global choice ($($choiceIds.Count))..." -ForegroundColor Gray

    foreach ($cId in $choiceIds) {
        $choiceReq = New-Object Microsoft.Xrm.Sdk.Messages.RetrieveOptionSetRequest
        $choiceReq.MetadataId = [Guid]$cId
        try {
            $choiceRes = $CRMConn.Execute($choiceReq)
            $optSet = $choiceRes.OptionSetMetadata

            $cDisp = $optSet.DisplayName.UserLocalizedLabel.Label
            $cName = $optSet.Name

            Write-Host " - Choice : $cDisp" -ForegroundColor Green
            $md += "#### Global Choice: $cDisp`n`n"
            $md += "**Technical Name**: ``$cName``  `n`n"
            $md += "| Label | Value |`n|---|---|`n"

            foreach ($opt in $optSet.Options) {
                $md += "| $($opt.Label.UserLocalizedLabel.Label) | $($opt.Value) |`n"
            }
            $md += "`n"
        } catch {
            Write-Warning "Can't read global choice ID $cId"
        }
    }
    $md += "---`n`n"
}

# --- 6. Fetch Plugins ---
Write-Host "RGet plugins..." -ForegroundColor Gray

$pluginFetch = @"
<fetch>
  <entity name='sdkmessageprocessingstep'>
    <attribute name='name' />
    <attribute name='stage' />
    <attribute name='statecode' />
    <link-entity name='sdkmessage' from='sdkmessageid' to='sdkmessageid' alias='msg'>
      <attribute name='name' />
    </link-entity>
    <link-entity name='sdkmessagefilter' from='sdkmessagefilterid' to='sdkmessagefilterid' link-type='outer' alias='filter'>
      <attribute name='primaryobjecttypecode' />
    </link-entity>
    <link-entity name='solutioncomponent' from='objectid' to='sdkmessageprocessingstepid'>
      <filter>
        <condition attribute='solutionid' operator='eq' value='$solutionId' />
        <condition attribute='componenttype' operator='eq' value='92' />
      </filter>
    </link-entity>
  </entity>
</fetch>
"@

$pluginSteps = $CRMConn.RetrieveMultiple((New-Object Microsoft.Xrm.Sdk.Query.FetchExpression($pluginFetch)))

if ($pluginSteps.Entities.Count -gt 0) {
    Write-Host "Number of plugin steps found : $($pluginSteps.Entities.Count)" -ForegroundColor Green

    $md += "## Business logical (Plugins C#)`n`n"
    $md += "| Nom de l'étape | Table | Message | Stage | Statut |`n"
    $md += "|---|---|---|---|---|`n"

    foreach ($step in $pluginSteps.Entities) {
        $stepName = $step.Attributes['name']

        # Extraction des valeurs aliasées (jointures)
        # Dans le SDK, les colonnes aliasées retournent un objet 'AliasedValue'

        $msgName = "-"
        if ($step.Attributes.Contains("msg.name")) {
            $msgName = $step.Attributes["msg.name"].Value
        }

        $tableName = "Global (None)"
        if ($step.Attributes.Contains("filter.primaryobjecttypecode")) {
            $tableName = $step.Attributes["filter.primaryobjecttypecode"].Value
        }

        # Traduction du Stage
        $stageVal = $step.Attributes['stage'].Value
        $stageText = switch($stageVal) {
            10 { "Pre-Validation" }
            20 { "Pre-Operation" }
            40 { "Post-Operation" }
            default { "Stage $stageVal" }
        }

        # État
        $status = if ($step.Attributes['statecode'].Value -eq 0) { "✅ Actif" } else { "❌ Désactivé" }

        $md += "| $stepName | $tableName | $msgName | $stageText | $status |`n"
    }
    $md += "`n---`n`n"
}

# --- 6. MERMAID ---
$md += "## Relations`n`n"
$md += '```mermaid' + "`n"
$md += "erDiagram`n"
$mermaidRelations -split "`n" | Select-Object -Unique | ForEach-Object {
    $line = $_.Trim()
    if ($line) {
        $parts = $line -split " "
        if ($processedLogicals -contains $parts[0] -and $processedLogicals -contains $parts[2]) {
            $md += "    $line`n"
        }
    }
}
$md += '```' + "`n"

# --- EXPORT ---
$md | Out-File -FilePath $outputFile -Encoding utf8
Write-Host "File generated : $outputFile" -ForegroundColor Green
And regarding the example for this post, you can find the .md file here:
# Datamodel - contoso_desk

## Dataverse Tables

### Users
**Schema Name**: `systemuser`
**Description**: Personne ayant accès au système Microsoft CRM et qui possède des objets dans la base de données Microsoft CRM.

#### Columns

| Display Name | Schema Name | Type | Description |
|---|---|---|---|
| Mode d'accès | `accessmode` | Picklist | Type d'utilisateur. |
| GUID Active Directory | `activedirectoryguid` | Uniqueidentifier | GUID de l'objet Active Directory pour l'utilisateur système. |
| Adresse 1 : ID | `address1_addressid` | Uniqueidentifier | Identificateur unique de l'adresse 1. |
| Adresse 1 : Type d'adresse | `address1_addresstypecode` | Picklist | Type de l'adresse 1, tel que l'adresse de facturation, l'adresse d'expédition ou l'adresse principale. |
| Ville | `address1_city` | String | Nom de la ville de l'adresse 1. |
| Adresse | `address1_composite` | Memo | Affiche l'adresse principale complète. |
| Pays/région | `address1_country` | String | Nom du pays ou de la région de l'adresse 1. |
| Adresse 1 : Commune | `address1_county` | String | Nom de la commune de l'adresse 1. |
| Adresse 1 : Télécopie | `address1_fax` | String | Numéro de télécopie de l'adresse 1. |
| Adresse 1 : Latitude | `address1_latitude` | Double | Latitude de l'adresse 1. |
| Rue 1 | `address1_line1` | String | Première ligne de l'adresse 1. |
| Rue 2 | `address1_line2` | String | Deuxième ligne de l'adresse 1. |
| Rue 3 | `address1_line3` | String | Troisième ligne de l'adresse 1. |
| Adresse 1 : Longitude | `address1_longitude` | Double | Longitude de l'adresse 1. |
| Adresse 1 : Nom | `address1_name` | String | Nom à entrer pour l'adresse 1. |
| Code postal | `address1_postalcode` | String | Code postal de l'adresse 1. |
| Adresse 1 : Boîte postale | `address1_postofficebox` | String | Numéro de boîte postale de l'adresse 1. |
| Adresse 1 : Mode de livraison | `address1_shippingmethodcode` | Picklist | Mode de livraison de l'adresse 1. |
| Département/province | `address1_stateorprovince` | String | Département ou province de l'adresse 1. |
| Téléphone principal | `address1_telephone1` | String | Premier numéro de téléphone associé à l'adresse 1. |
| Autre téléphone | `address1_telephone2` | String | Deuxième numéro de téléphone associé à l'adresse 1. |
| Radiomessagerie | `address1_telephone3` | String | Troisième numéro de téléphone associé à l'adresse 1. |
| Adresse 1 : Zone UPS | `address1_upszone` | String | Zone UPS (United Parcel Service) pour l'adresse 1. |
| Adresse 1 : Décalage UTC | `address1_utcoffset` | Integer | Décalage UTC de l'adresse 1. Il s'agit de la différence entre l'heure locale et le temps universel coordonné. |
| Adresse 2 : ID | `address2_addressid` | Uniqueidentifier | Identificateur unique de l'adresse 2. |
| Adresse 2 : Type d'adresse | `address2_addresstypecode` | Picklist | Type de l'adresse 2, tel que l'adresse de facturation, l'adresse d'expédition ou l'adresse principale. |
| Autre ville | `address2_city` | String | Nom de la ville de l'adresse 2. |
| Autre adresse | `address2_composite` | Memo | Affiche l'adresse secondaire complète. |
| Autre pays/région | `address2_country` | String | Nom du pays ou de la région de l'adresse 2. |
| Adresse 2 : Commune | `address2_county` | String | Nom de la commune de l'adresse 2. |
| Adresse 2 : Télécopie | `address2_fax` | String | Numéro de télécopie de l'adresse 2. |
| Adresse 2 : Latitude | `address2_latitude` | Double | Latitude de l'adresse 2. |
| Autre rue 1 | `address2_line1` | String | Première ligne de l'adresse 2. |
| Autre rue 2 | `address2_line2` | String | Deuxième ligne de l'adresse 2. |
| Autre rue 3 | `address2_line3` | String | Troisième ligne de l'adresse 2. |
| Adresse 2 : Longitude | `address2_longitude` | Double | Longitude de l'adresse 2. |
| Adresse 2 : Nom | `address2_name` | String | Nom à entrer pour l'adresse 2. |
| Autre code postal | `address2_postalcode` | String | Code postal de l'adresse 2. |
| Adresse 2 : Boîte postale | `address2_postofficebox` | String | Numéro de boîte postale de l'adresse 2. |
| Adresse 2 : Mode de livraison | `address2_shippingmethodcode` | Picklist | Mode de livraison de l'adresse 2. |
| Autre département/province | `address2_stateorprovince` | String | Département ou province de l'adresse 2. |
| Adresse 2 : Téléphone 1 | `address2_telephone1` | String | Premier numéro de téléphone associé à l'adresse 2. |
| Adresse 2 : Téléphone 2 | `address2_telephone2` | String | Deuxième numéro de téléphone associé à l'adresse 2. |
| Adresse 2 : Téléphone 3 | `address2_telephone3` | String | Troisième numéro de téléphone associé à l'adresse 2. |
| Adresse 2 : Zone UPS | `address2_upszone` | String | Zone UPS (United Parcel Service) pour l'adresse 2. |
| Adresse 2 : Décalage UTC | `address2_utcoffset` | Integer | Décalage UTC de l'adresse 2. Il s'agit de la différence entre l'heure locale et le temps universel coordonné. |
| ID d'application | `applicationid` | Uniqueidentifier | Identificateur de l'application. Il permet d'accéder aux données d'une autre application. |
| URI de l'ID d'application | `applicationiduri` | String | URI utilisé comme identificateur logique unique pour l'application externe. Il permet de valider l'application. |
| ID d'objet Azure AD | `azureactivedirectoryobjectid` | Uniqueidentifier | Il s'agit de l'ID d'objet du répertoire d'application. |
| Azure – Date de suppression | `azuredeletedon` | DateTime | Date et heure de la définition de l’utilisateur comme supprimé temporairement dans Azure. |
| État Azure | `azurestate` | Picklist | État de l′utilisateur Azure |
| Division | `businessunitid` | Lookup | Identificateur unique de la division à laquelle l'utilisateur est associé. |
| Calendrier | `calendarid` | Lookup | Calendrier fiscal associé à l'utilisateur. |
| Type de licence | `caltype` | Picklist | Type de licence de l’utilisateur. Ceci n’est utilisé que dans la version locale du produit. Les licences en ligne sont gérées via le portail de Microsoft 365 Office |
| Créé par | `createdby` | Lookup | Identificateur unique de l'utilisateur qui a créé l'utilisateur. |
| Créé le | `createdon` | DateTime | Date et heure de la création de l'utilisateur. |
| Créé par (délégué) | `createdonbehalfby` | Lookup | Identificateur unique de l’utilisateur délégué qui a créé l’utilisateur système. |
| Filtres par défaut renseignés | `defaultfilterspopulated` | Boolean | Indique si les filtres par défaut ont été renseignés. |
| Boîte aux lettres | `defaultmailbox` | Lookup | Sélectionnez la boîte aux lettres associée à cet utilisateur. |
| Nom du dossier OneDrive Entreprise par défaut | `defaultodbfoldername` | String | Tapez un nom de dossier par défaut pour l'emplacement OneDrive Entreprise de l'utilisateur. |
| État supprimé | `deletedstate` | Picklist | État de suppression de l’utilisateur |
| Raison du statut Désactivé | `disabledreason` | String | Raison de la désactivation de l'utilisateur. |
| Afficher dans les vues Service | `displayinserviceviews` | Boolean | Information indiquant si l'utilisateur doit être affiché dans les vues de services. |
| Nom d'utilisateur | `domainname` | String | Domaine Active Directory dont l'utilisateur est membre. |
| Statut de l’adresse de messagerie principale | `emailrouteraccessapproval` | Picklist | Affiche le statut de l’adresse de messagerie principale. |
| Employé | `employeeid` | String | Identificateur d'employé de l'utilisateur. |
| Code d'image de l'entité | `entityimageid` | Uniqueidentifier | Utilisation interne uniquement. |
| Taux de change | `exchangerate` | Decimal | Taux de change de la devise associée à l’utilisateur système par rapport à la devise de base. |
| Prénom | `firstname` | String | Prénom de l'utilisateur. |
| Nom complet | `fullname` | String | Nom complet de l'utilisateur. |
| Organismes d'état | `governmentid` | String | Identificateur gouvernemental de l'utilisateur. |
| Téléphone personnel | `homephone` | String | Numéro de téléphone personnel de l'utilisateur. |
| ID d'identité d'utilisateur unique | `identityid` | Integer | Utilisation interne uniquement. |
| Numéro séquentiel d'importation | `importsequencenumber` | Integer | Identificateur unique de l'importation ou de la migration de données ayant généré cet enregistrement. |
| Mode de distribution des courriers électroniques entrants | `incomingemaildeliverymethod` | Picklist | Mode de livraison des courriers électroniques entrants pour l'utilisateur. |
| Adresse de messagerie principale | `internalemailaddress` | String | Adresse de messagerie interne de l'utilisateur. |
| Statut de l'invitation | `invitestatuscode` | Picklist | Statut de l'invitation de l'utilisateur. |
| Utilisateur Active Directory | `isactivedirectoryuser` | Boolean | Indique si l'utilisateur est un utilisateur AD. |
| To bypass IP firewall restriction on the user | `isallowedbyipfirewall` | Boolean | Bypasses the selected user from IP firewall restriction |
| Statut | `isdisabled` | Boolean | Information indiquant si l'utilisateur est activé. |
| Statut de l'approbation de l'adresse de messagerie par l'administrateur d'O365 | `isemailaddressapprovedbyo365admin` | Boolean | Affiche le statut de l'approbation de l'adresse de messagerie par l'administrateur d'O365. |
| Mode utilisateur de l’intégration | `isintegrationuser` | Boolean | Vérifie si l’utilisateur est un utilisateur de l’intégration. |
| Utilisateur avec licence | `islicensed` | Boolean | Informations indiquant si une licence est accordée à l’utilisateur. |
| Utilisateur synchronisé | `issyncwithdirectory` | Boolean | Informations sur la synchronisation ou non de l'utilisateur avec le répertoire. |
| Fonction | `jobtitle` | String | Fonction de l'utilisateur. |
| Nom de famille | `lastname` | String | Nom de famille de l’utilisateur. |
| Heure de la dernière mise à jour utilisateur | `latestupdatetime` | DateTime | Horodatage de la dernière mise à jour de l’utilisateur |
| Deuxième prénom | `middlename` | String | Deuxième prénom de l'utilisateur. |
| Message d'alerte mobile | `mobilealertemail` | String | Adresse de messagerie d'alerte mobile de l'utilisateur. |
| Profil Mobile Offline | `mobileofflineprofileid` | Lookup | Éléments contenus par un SystemUser particulier. |
| Téléphone mobile | `mobilephone` | String | Numéro de téléphone mobile de l'utilisateur. |
| Modifié par | `modifiedby` | Lookup | Identificateur unique de l'utilisateur qui a modifié l'utilisateur pour la dernière fois. |
| Modifié le | `modifiedon` | DateTime | Date et heure de la dernière modification de l'utilisateur. |
| Modifié par (délégué) | `modifiedonbehalfby` | Lookup | Identificateur unique de l’utilisateur délégué qui a modifié l’utilisateur système pour la dernière fois. |
| Surnom | `nickname` | String | Surnom de l'utilisateur. |
| Organisation  | `organizationid` | Uniqueidentifier | Identificateur unique de l'organisation associée à l'utilisateur. |
| Mode de livraison des courriers électroniques sortants | `outgoingemaildeliverymethod` | Picklist | Mode de livraison des courriers électroniques sortants pour l'utilisateur. |
| Enregistrement créé le | `overriddencreatedon` | DateTime | Date et heure de la migration de l'enregistrement. |
| Directeur | `parentsystemuserid` | Lookup | Identificateur unique du directeur de l'utilisateur. |
| Passeport max. | `passporthi` | Integer | Utilisation interne uniquement. |
| Passeport min. | `passportlo` | Integer | Utilisation interne uniquement. |
| Adresse de messagerie 2 | `personalemailaddress` | String | Adresse de messagerie personnelle de l'utilisateur. |
| URL de photos | `photourl` | String | URL du site Web sur lequel se trouve une photo de l'utilisateur. |
| Poste | `positionid` | Lookup | Poste de l'utilisateur dans le modèle de sécurité hiérarchique. |
| Adresse privilégiée | `preferredaddresscode` | Picklist | Adresse privilégiée de l'utilisateur. |
| Messagerie privilégiée | `preferredemailcode` | Picklist | Adresse de messagerie privilégiée de l'utilisateur. |
| Téléphone privilégié | `preferredphonecode` | Picklist | Numéro de téléphone privilégié de l'utilisateur. |
| Processus | `processid` | Uniqueidentifier | Affiche l'ID du processus. |
| File d’attente par défaut | `queueid` | Lookup | Identificateur unique de la file d’attente par défaut pour l’utilisateur. |
| Salutations | `salutation` | String | Salutations utilisées dans la correspondance avec l'utilisateur. |
| Mode d'accès restreint | `setupuser` | Boolean | Vérifiez si l'utilisateur est un utilisateur d'installation. |
| Adresse de messagerie SharePoint | `sharepointemailaddress` | String | Adresse de messagerie du travail SharePoint |
| Compétences | `skills` | String | Compétences de l'utilisateur. |
| (Déconseillé) Phase du processus | `stageid` | Uniqueidentifier | Affiche l'ID de la phase. |
| Type d’utilisateur géré par le système | `systemmanagedusertype` | Picklist | Type d’utilisateur |
| Utilisateur | `systemuserid` | Uniqueidentifier | Identificateur unique de l'utilisateur. |
| Secteur de vente | `territoryid` | Lookup | Identificateur unique du secteur de vente auquel l'utilisateur est attribué. |
| Numéro de version de la règle du fuseau horaire | `timezoneruleversionnumber` | Integer | Utilisation interne uniquement. |
| Titre | `title` | String | Titre de l'utilisateur. |
| Devise | `transactioncurrencyid` | Lookup | Identificateur unique de la devise associée à l’utilisateur système. |
| (Déconseillé) Chemin d’accès traversé | `traversedpath` | String | Utilisation interne uniquement. |
| Type de licence utilisateur | `userlicensetype` | Integer | Affiche le type de licence utilisateur. |
| PUID de l’utilisateur | `userpuid` | String |  PUID de l’utilisateur Informations identifiables par l'utilisateur |
| Code de fuseau horaire pour la conversion UTC | `utcconversiontimezonecode` | Integer | Code de fuseau horaire utilisé à la création de l’enregistrement. |
| Numéro de version | `versionnumber` | BigInt | Numéro de version de l’utilisateur. |
| Windows Live ID | `windowsliveid` | String | Windows Live ID |
| Messagerie électronique Yammer | `yammeremailaddress` | String | Adresse de messagerie de l'utilisateur pour la connexion à Yammer |
| ID d'utilisateur Yammer | `yammeruserid` | String | ID Yammer de l'utilisateur |
| Prénom Yomi | `yomifirstname` | String | Prononciation du prénom de l'utilisateur, écrit en caractères phonétiques Hiragana ou Katakana. |
| Nom complet Yomi | `yomifullname` | String | Prononciation du nom complet de l'utilisateur, écrit en caractères phonétiques Hiragana ou Katakana. |
| Nom Yomi | `yomilastname` | String | Prononciation du nom de l'utilisateur, écrit en caractères phonétiques Hiragana ou Katakana. |
| Deuxième prénom Yomi | `yomimiddlename` | String | Prononciation du deuxième prénom de l'utilisateur, écrit en caractères phonétiques Hiragana ou Katakana. |

---

### CD - Desk
**Schema Name**: `devlpe_cddesk`
**Description**: Desks which are available for booking.

#### Columns

| Display Name | Schema Name | Type | Description |
|---|---|---|---|
| Créé par | `createdby` | Lookup | Identificateur unique de l'utilisateur ayant créé l'enregistrement. |
| Créé le | `createdon` | DateTime | Date et heure de création de l'enregistrement. |
| Créé par (délégué) | `createdonbehalfby` | Lookup | Identificateur unique de l'utilisateur délégué ayant créé l'enregistrement. |
| CD - Desk | `devlpe_cddeskid` | Uniqueidentifier | Identificateur unique des instances d'entité |
| Floor | `devlpe_floor` | Picklist | Floor where the desk is |
| ID | `devlpe_id` | String | ID of the Desk. |
| Is blocked | `devlpe_is_blocked` | Boolean | Define if the desk is blocked or unavailable. If true/yes, user can't book the desk. |
| Numéro séquentiel d’importation | `importsequencenumber` | Integer | Numéro séquentiel de l'importation ayant créé cet enregistrement. |
| Modifié par | `modifiedby` | Lookup | Identificateur unique de l'utilisateur ayant modifié l'enregistrement. |
| Modifié le | `modifiedon` | DateTime | Date et heure de modification de l'enregistrement. |
| Modifié par (délégué) | `modifiedonbehalfby` | Lookup | Identificateur unique de l'utilisateur délégué ayant modifié l'enregistrement. |
| Enregistrement créé le | `overriddencreatedon` | DateTime | Date et heure de migration de l'enregistrement. |
| Propriétaire | `ownerid` | Owner | ID du propriétaire |
| Division propriétaire | `owningbusinessunit` | Lookup | Identificateur unique de la division propriétaire de l'enregistrement |
| Équipe propriétaire | `owningteam` | Lookup | Identificateur unique de l'équipe propriétaire de l'enregistrement. |
| Utilisateur propriétaire | `owninguser` | Lookup | Identificateur unique de l'utilisateur propriétaire de l'enregistrement. |
| Statut | `statecode` | State | Statut de l'élément CD - Desk |
| Raison du statut | `statuscode` | Status | Raison du statut de l'élément CD - Desk |
| Numéro de version de la règle du fuseau horaire | `timezoneruleversionnumber` | Integer | Utilisation interne uniquement. |
| Code de fuseau horaire pour la conversion UTC | `utcconversiontimezonecode` | Integer | Code du fuseau horaire utilisé à la création de l'enregistrement. |
| Numéro de version | `versionnumber` | BigInt | Numéro de version |

---

### CD - Booking
**Schema Name**: `devlpe_cdbooking`
**Description**: Table to store user's desk booking

#### Columns

| Display Name | Schema Name | Type | Description |
|---|---|---|---|
| Créé par | `createdby` | Lookup | Identificateur unique de l'utilisateur ayant créé l'enregistrement. |
| Créé le | `createdon` | DateTime | Date et heure de création de l'enregistrement. |
| Créé par (délégué) | `createdonbehalfby` | Lookup | Identificateur unique de l'utilisateur délégué ayant créé l'enregistrement. |
| Booked By | `devlpe_booked_by` | Lookup | User for who the desk has been booked. |
| Booked for | `devlpe_booked_for` | DateTime | Date when the user has booked the desk. |
| CD - Booking | `devlpe_cdbookingid` | Uniqueidentifier | Identificateur unique des instances d'entité |
| Desk | `devlpe_desk` | Lookup | The desk which has been booked |
| ID | `devlpe_id` | String | Booking ID |
| Numéro séquentiel d’importation | `importsequencenumber` | Integer | Numéro séquentiel de l'importation ayant créé cet enregistrement. |
| Modifié par | `modifiedby` | Lookup | Identificateur unique de l'utilisateur ayant modifié l'enregistrement. |
| Modifié le | `modifiedon` | DateTime | Date et heure de modification de l'enregistrement. |
| Modifié par (délégué) | `modifiedonbehalfby` | Lookup | Identificateur unique de l'utilisateur délégué ayant modifié l'enregistrement. |
| Enregistrement créé le | `overriddencreatedon` | DateTime | Date et heure de migration de l'enregistrement. |
| Propriétaire | `ownerid` | Owner | ID du propriétaire |
| Division propriétaire | `owningbusinessunit` | Lookup | Identificateur unique de la division propriétaire de l'enregistrement |
| Équipe propriétaire | `owningteam` | Lookup | Identificateur unique de l'équipe propriétaire de l'enregistrement. |
| Utilisateur propriétaire | `owninguser` | Lookup | Identificateur unique de l'utilisateur propriétaire de l'enregistrement. |
| Statut | `statecode` | State | Statut de l'élément CD - Booking |
| Raison du statut | `statuscode` | Status | Raison du statut de l'élément CD - Booking |
| Numéro de version de la règle du fuseau horaire | `timezoneruleversionnumber` | Integer | Utilisation interne uniquement. |
| Code de fuseau horaire pour la conversion UTC | `utcconversiontimezonecode` | Integer | Code du fuseau horaire utilisé à la création de l'enregistrement. |
| Numéro de version | `versionnumber` | BigInt | Numéro de version |

---

## Global Choices

#### Global Choice: CD - Workspace setup

**Technical Name**: `devlpe_cd_workspacesetup`

| Label | Value |
|---|---|
| 🖥️ Dual Monitors | 0 |
| 🔌USB-C Dock | 1 |
| 🪑Ergonomic Chair | 2 |
| 📏Standing Desk | 3 |

#### Global Choice: CD - Floors

**Technical Name**: `devlpe_cdfloors`

| Label | Value |
|---|---|
| Floor 1 - Engineering | 1 |
| Floor 2 - Marketing | 2 |
| Floor 3 - HR & Admin | 3 |

---

## Business logical (Plugins C#)

| Nom de l'étape | Table | Message | Stage | Statut |
|---|---|---|---|---|
| ContosoDesk.CheckBooking: Create of devlpe_cdbooking | devlpe_cdbooking | Create | Post-Operation | ✅ Actif |

---

## Relations

```mermaid
erDiagram
    systemuser ||--o{ systemuser : "a"
    systemuser ||--o{ devlpe_cddesk : "a"
    systemuser ||--o{ devlpe_cdbooking : "a"
    devlpe_cddesk ||--o{ devlpe_cdbooking : "a"
```
7. Build up your instructions structure
In this part, we are going to put all the .md file together to create a structure of instructions for our AI.
First, get these instructions from Theophile Chin-Nin, where a lot of technical instructions based on Power Platform are : GitHub – tchinnin/powerplatform-vibecoding-samples: This repository provides Samples project and Copilot Instruction for various type of professional development accross Microsoft Power Platform (PCF, Dataverse Plugin, …)
Download it (or clone it) into a new folder.
Open CONTEXT.md and fill each part. For the Description, it is not your SPECIFICATION.md, it’s a short description of your project (few words).
Now these are very important things to do:
- Add CRUD instructions
At the moment, there are no CRUD (Create, Read, Update, Delete) instructions regarding Dataverse items in table. I am talking with Théophile right now to integrate it, but in the meantime, you need to add the one I have created.
Download PowerPlatform-DataverseCRUD.instructions.txt and renamed the .txt extension into .md extension.
From PowerPlatform-DataverseCRUD.instructions.txt to PowerPlatform-DataverseCRUD.instructions.md
Copy it into the folder .github\instructions.
Open .github\copilot-instructions.md file
After line 110, add a new line and paste:
| PowerPlatform-DataverseCRUD.instructions.md | For CRUD (Create, Read Update and Delete) operations with Dataverse items into Dataverse tables.
2. Add dataModel.md instructions
At the root folder of your project, create a new folder named DataverseDesign. In this folder paste your dataModel.md
Note: This structure is the one described in the file copilot-instructions.md. If you want, you can make your own, but I will lead to editing the instructions.md files.
3. Add specifications instructions
At the root folder, create a folder named Specifications. In this folder paste your SPECIFIATION.md file and all the mock-up you have generated at the first part of this post.
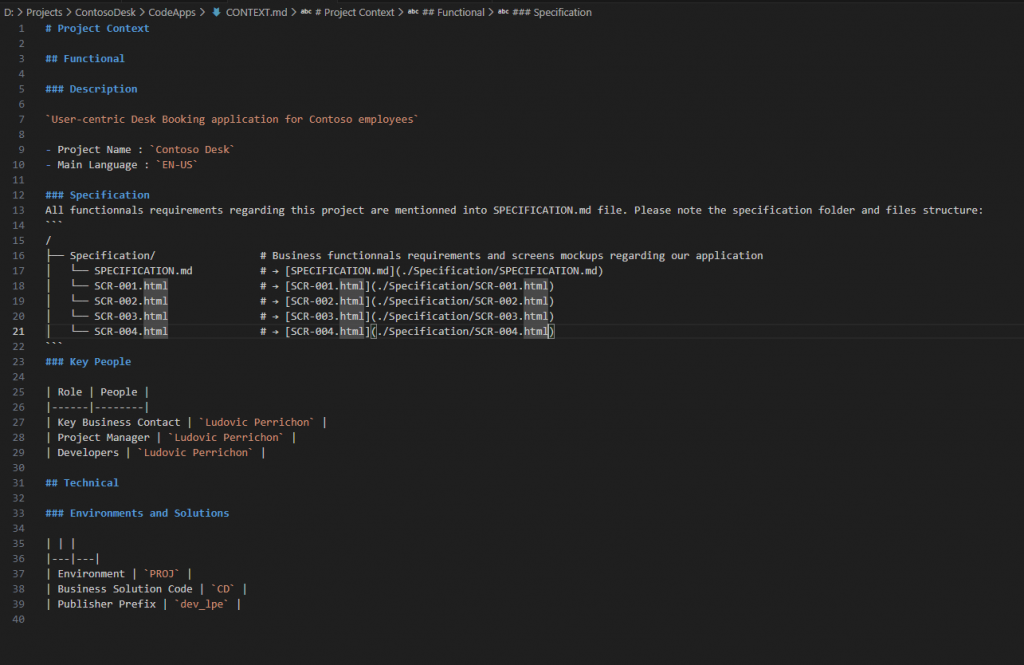
Open CONTEXT.md file and add the specification information.
At line 11 (just before Key People part), add a new part “Specifications”, tell your specification structure and a kick description of all your files.
### Specification
All functionnals requirements regarding this project are mentionned into SPECIFICATION.md file. Please note the specification folder and files structure:
```
/
├── Specification/                 # Business functionnals requirements and screens mockups regarding our application
│   └── SPECIFICATION.md           # → [SPECIFICATION.md](./Specification/SPECIFICATION.md)
│   └── SCR-001.html               # → [SCR-001.html](./Specification/SCR-001.html)
│   └── SCR-002.html               # → [SCR-002.html](./Specification/SCR-002.html)
│   └── SCR-003.html               # → [SCR-003.html](./Specification/SCR-003.html)
│   └── SCR-004.html               # → [SCR-004.html](./Specification/SCR-004.html)
```
Here is what mind looks like:
8. Initiate your project
We are ready to start, open your project with Visual Studio Code.
Please note that context window is limited. If you are asking too much on one prompt, your GitHub Copilot might stop working.
Ask GitHub Copilot to understand and initiate your project:
You are an expert on PowerApps CodeApps development. You need to initiate and create the “Contoso Desk” code app. Start by reading CONTEXT.md information. In the .github folder, you are going to find all technical information regarding how to develop the Code App.
- Start by reading all .md file
- Create all the CodeApps structure and install what is necessary.
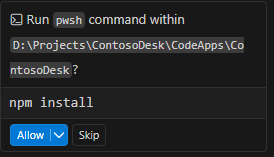
AI will ask you to allow him to execute command in Terminal, so don’t go away from Keyboard, it might get stuck.
When it’s done, now ask him to develop the apps regarding the specifications.
You are an expert on PowerApps CodeApps development. You need to initiate and create the “Contoso Desk” code app. Start by reading CONTEXT.md information. In the .github folder, you are going to find all technical information regarding how to develop the Code App. In DataverseDesign\dataModel.md is all the information regarding the Dataverse Database which already exists. In the specification folder are all the business specifications requirements for the application.
1. Browse all the .md files and use it into your context.
2. Start developing the Code Apps.
Once done, your app is going to be displayed in the dev environment.
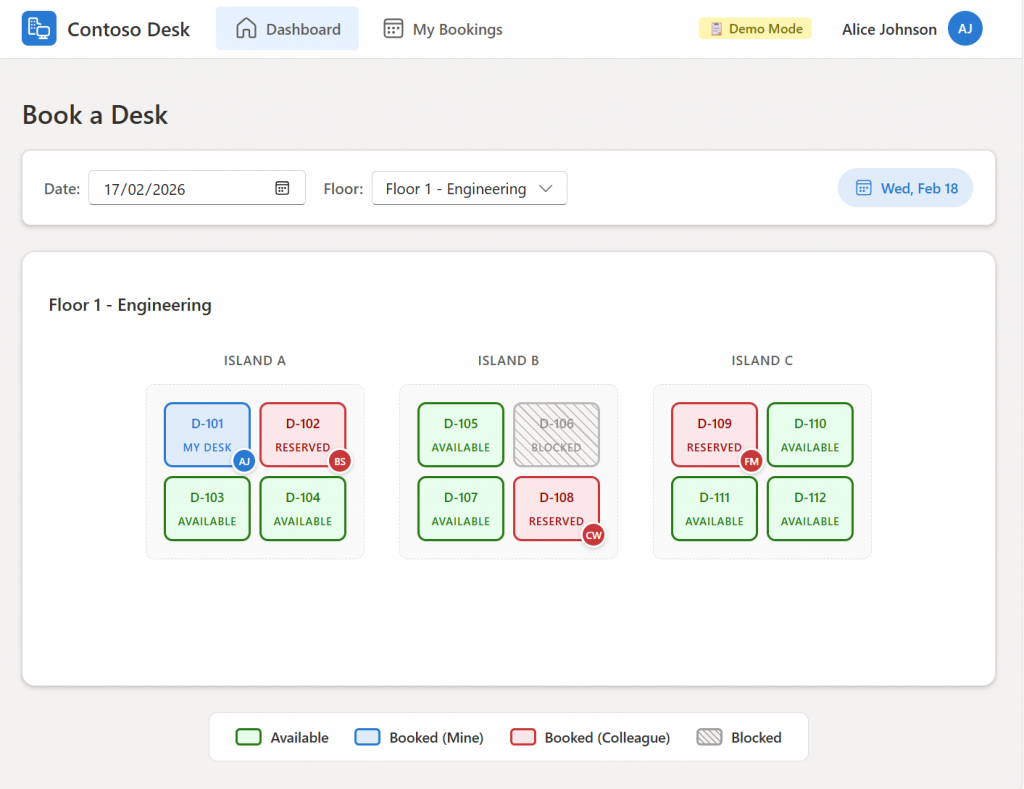
You can play with it and have a look.
Once done ask Github Copilot to add Dataverse Datasaource to your projet and to connect to your application.
Add Dataverse Datasource. You can find the Dataverse tables information into dataModel.md. Then connect each functions in the app to the Dataverse Tables (Read, Create, Update and Delete operations).
Ok, now it’s plugged to Dataverse.
Ask AI to deploy and “Voila”, you have a base for vibe coding!
Can you deploy the App into Dataverse? Solution Contoso Desk
Now you have a Code App project with an AI who understands what you try to do and few screen plugged with Dataverse.
Please Note: Here the project isn’t difficult, two tables, a couple of screens. So, my prompts were straight forward. With a more complex project, make smaller prompts.
9. Start Vibe Coding
9.1. Go step by step
Of course, you try and it won’t work straight ahead. New you really need to go step by step, screen by screen, functionality by functionality.
For example, in my scenario, when I can’t see the current booking, the idea is to catch the error through the Browser console, tell AI what you did and paste your error message if you have one. If needed, you can add a screenshot as well.
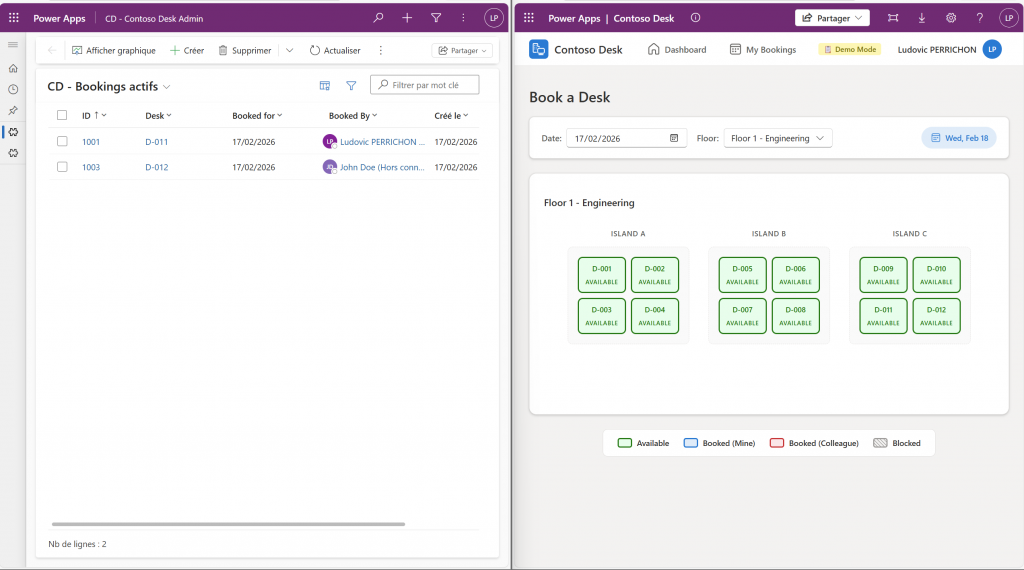
When I load the application online, I can’t see the actual booking on Dataverse. As you can see from the screenshot, there are two desks booked on this day. Focus on the loading data from Dataverse. Change desk status depending on the Dataverse Data from Booking table.
Sometimes it is going to add console log, ask you to run the code with browser console to give him the logs. Don’t forget, reload with an empty cache!
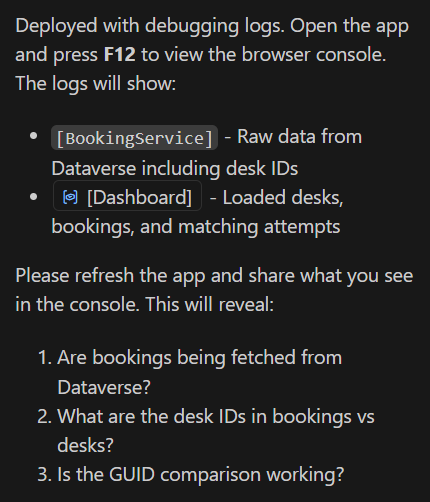
And if you do so, it will fix errors:
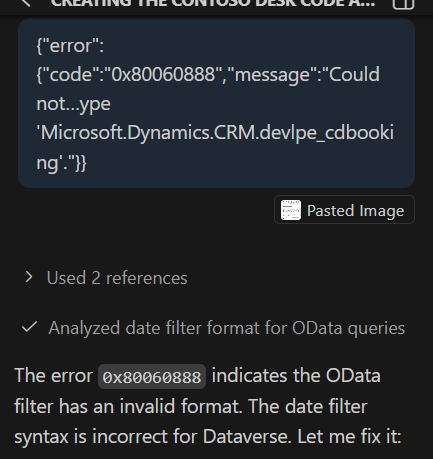
You should analyze errors and give him some clues. On one project I must tell him to target systemuser Dataverse table by requesting on domainname column. So yes, Vibe Coding is for someone who at least is interested in development from my point of view.
9.2. Deploy frequently
I would suggest, as soon as a step is done, to deploy it and test it with Dataverse values. Because in a dev, it simulates your Dataverse environment, but once connected, it might not work or issue might be different.
9.3. Git is your best friend
AI is great, but sometimes it might loop on an error, and it might (with your order and without you noticing it) destroy your whole project.
So to make sure I am not losing my project due to a mistake. Each time a functionality/step is done, git push. And it is easy, ask AI to do it.
9.4. Demo from Example
With all we have this step, here is the final demo of the example I have used in this post.
10. Ask your AI to build a .md file with its context
One last tip, AI has made a Readme.md at the root of your Code Apps project. When your project is done and you still have your context, ask AI to fill this Readme.md file with all the information needed for maintaining the app.
In ContosoDesk/README.md, can you add all the information requested to know for you or another person regarding the maintenance of the app.