Are you wondering how to create a document set through Power Automate? It seems like you are at the right place.
Be aware: As I am writing this post, it is January 2020, at this time there is no other solution than using SharePoint API.
Summary
Prerequisites
As a Prerequisites you have to be able to create Document sets mannually into your SharePoint site.
For that the “Document Sets” feature needs to be activated at the site collection level of your SharePoint site.
Also you need to add the Document Set content type to your library.
If you need a quick introduction to Document Sets on SharePoint online, you can see this article from Gowtham Rajamanickam (https://www.c-sharpcorner.com/article/create-a-document-set-in-sharepoint-online-office-365/).
Active it mannually
You need to go to site settings > Site collection features > Enable Document Sets feature.
Then go to the Library you want to add Document Sets > Library Settings.
If you don’t see the content types here,click on Advanced settings > Enable content type > OK
On library settings page, Add from an existing content type > Add Document Sets > OK
Using PnP
Here is the code, if you want to using PnP : (https://docs.microsoft.com/fr-fr/powershell/module/sharepoint-pnp/?view=sharepoint-ps).
Connect-PnPOnline -Url https://[My SharePoint site url]/ -UseWebLogin
$libraryName = "Documents"
$ctDocSet = Get-PnPContentType -Identity "0x0120D520"
#Document set: Be careful if you want to add more columns you need to create your own content type based on this one
#Example with a new field comments:
#$newCt = Add-PnPContentType -Name "My new document set" -Description "" -ParentContentType $ctDocSet
#Add-PnPFieldToContentType -Field "Comments" -ContentType "My new document set"

Enable-PnPFeature -Identity "3bae86a2-776d-499d-9db8-fa4cdc7884f8" -Scope Site
Add-PnPContentTypeToList -List $libraryName -ContentType $ctDocSet
The raw API call
So if you are famillar with code, you might have already see this before. By the way, I think we should explain this to understand how we will build it into Power Automate.
If you want the whole code for creating a document set by code, you can check this article from Julie Turner (https://julieturner.net/2016/11/create-sharepoint-document-set-and-set-metadata-using-rest/).
So basically, the part of code that we need to have a look is:
var createDocSet = function(listName, folderName, folderContentTypeId){
    var listUrl = webUrl + "/" + listName;
    var folderPayload = {
        'Title' : folderName,
        'Path' : listUrl
    };

    return $.ajax({
        url: webUrl + "/_vti_bin/listdata.svc/" + listName,
        method: "POST",
        contentType: "application/json;odata=verbose",
        data: JSON.stringify(folderPayload),
        headers: {
            "Accept": "application/json;odata=verbose",
            "Slug": listUrl + "/" + folderName + "|" + folderContentTypeId
        }
    });
};
So what do we have to notice from this code:
- The call is made from the listdata.svc API
- The name of our list is required
- The url of our list is required
- The content type id is required
- The request contains headears
- The request contains a body content (see as data)
Create Document Set
I am creating a flow which I will run manually.
First, I am going to initialize variables such as the code just above.
- webUrl : Your SharePoint site
- listName : The library name where you want to create your document set, and where you applied the prerequisites
- folderContentTypeId : The id of the Document set content type
- folderName : The name of the Document set I want to create
- listUrl : The url of the Library where you want to add your document set
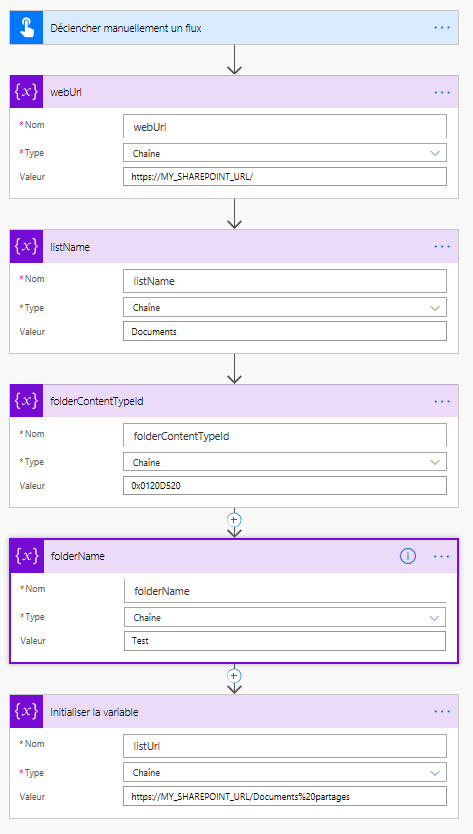
FYI : “Chaîne” means String in French
If you don’t know how to get the content type id, it is quite easy:
– Go to site settings
– Go to Content types
– Click on the content type you want to get the id for
– Check the url in parameter ctype
– Example: https: //MY_SHAREPOINT_URL/_layouts/15/ManageContentType.aspx?ctype=0x0120D520&Source=https%3A%2F%2FMY_SHAREPOINT_URL%2F%5Flayouts%2F15%2Fmngctype%2Easpx
Now, add a new step in your flow “Send an http Request to SharePoint”.
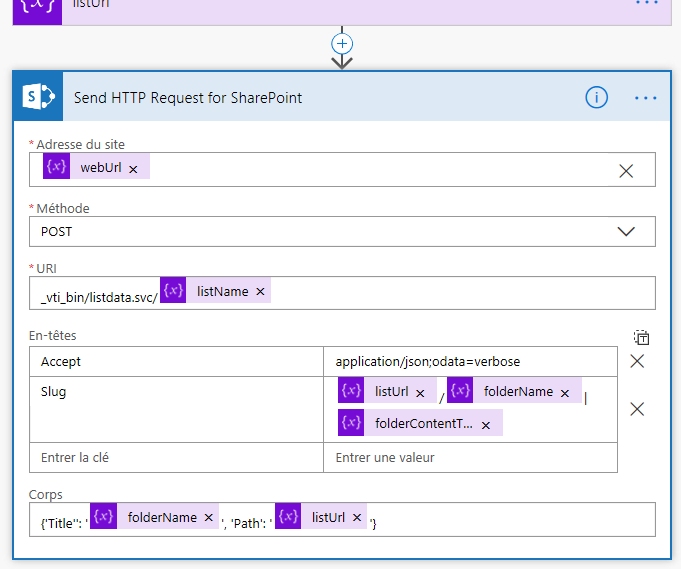
If you have a closer look, you can see it looks exactly the same as the code.
Not sure if it is showed properly in the screenshot, but you have to be carefful at the pipe in the Header Slug and the simple quotes in the body.
To help you out a copy paste from Power Automate:
| Input | Value |
|---|---|
| Site url | @variables(‘webUrl’) |
| URI | _vti_bin/listdata.svc/@{variables(‘listName’)} |
| Header: Accept | application/json;odata=verbose |
| Header: Slug | @{variables(‘listUrl’)}/@{variables(‘folderName’)}|@{variables(‘folderContentTypeId’)} |
| Body | {‘Title”: ‘@{variables(‘folderName’)}’, ‘Path’: ‘@{variables(‘listUrl’)}’} |
Demo:
Update Document set
To update a document set, it is just an Update file properties.
The only difficult, and what I am going to show you, is how to do it right after the Send HTTP Request to SharePoint action to create your document set, because you need to get the ID from the result.
To do it, we are going to get the result from the request, which is a JSON as String, and we are going to parse this JSON to get the ID.
So I am initialize a variable where I put the result from my request.

Please note : Chaîne means String in French and Corps means Body, so if you are using an English version, you should have String and Body instead.
To convert the string to JSON we are going to use the Parse JSON action. But, to do so, you need the JSON schema.
To generate it:
- Save and run the flow as it is
- Execute it and once done, check the execution
- Copy the strJson variable content
Now go back and edit your flow.
Add the parse JSON action, as Content put your string, then click on Generate from sample and paste the JSON result copied just below.
Now you can add an Update file properties action, and easily find the ID of the document set just created.
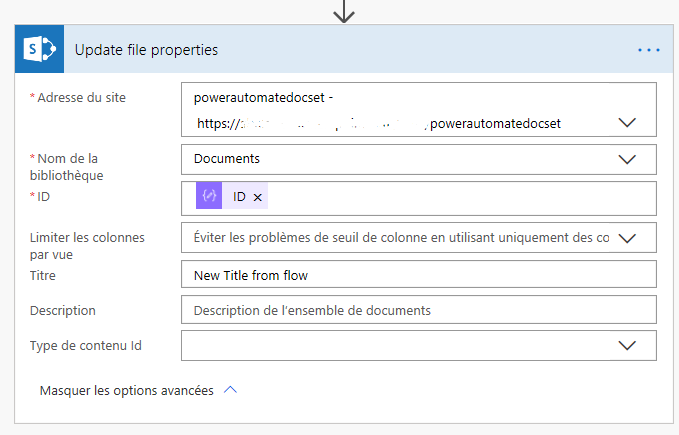
Demo: