
Why not create your own word document from scratch with OpenXml and C# ?
On internet you will find how to transform a html web page into docx. But when you have got a complex css style, your word document doesn’t really look like what you exepected.
1. Discover OpenXml
2. Create your docx with OpenXml and C#
2.1. Set your nuget package
2.2. Create your .docx file
2.3. Create a Paragraph
2.4. Create a Paragraph with styles
2.5. Create a Paragraph with justification
2.6. Create Heading
2.7. Create Table
2.8. Create List
2.9. Create Picture
2.10. Create Link
Discover OpenXml
From : https://en.wikipedia.org/wiki/Office_Open_XML
Office Open XML (also informally known as OOXML or OpenXML or earlier as MOX) is a zipped, XML-based file format developed by Microsoft for representing spreadsheets, charts, presentations and word processing documents.
In other words, we are going to build a XML which is going to make our docx file.
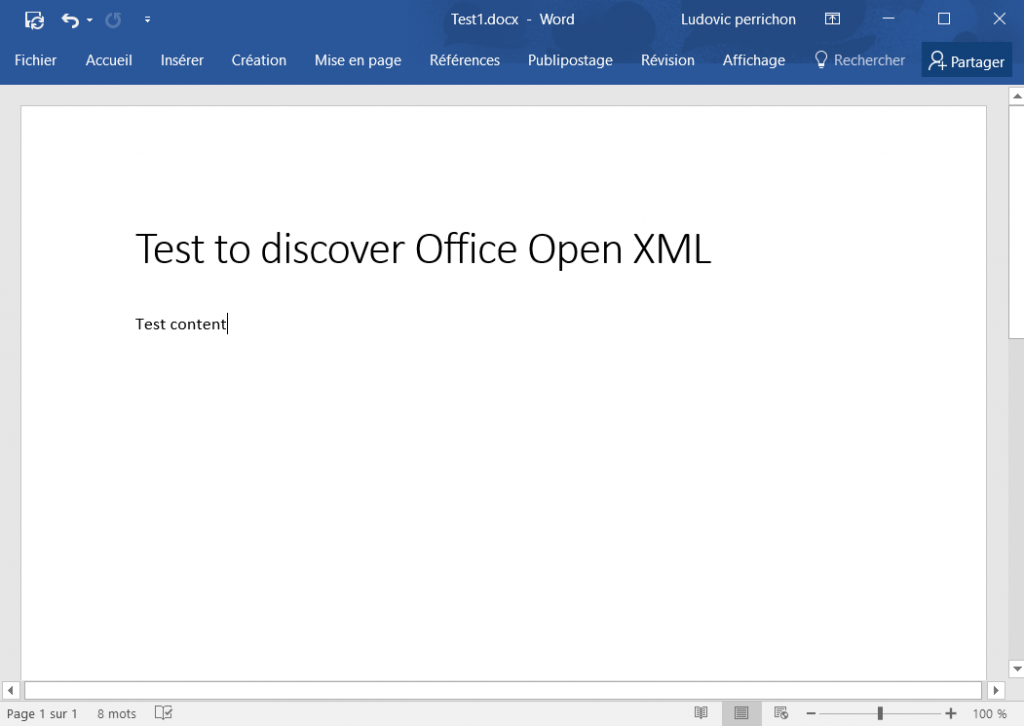
Here is an example of a docx document.
If you change the extension of your .docx file into a .zip file. You can see few xml inside.
Example : Test.docx into Test.zip
You are going to find a lot of xml files. We espacially have a look at word\document.xml.


Let’s open document.xml :
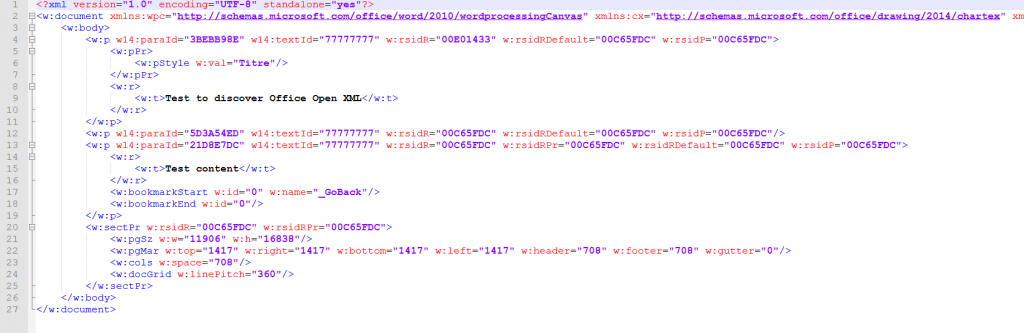
We have at the top a document tag, inside the body tag then some Pragraph tags. You can also find a Table or a Numbering (list like ul or ol for html).
Let’s have a look at the Paragraph tag :
<w:p w14:paraId="3BEBB98E" w14:textId="77777777" w:rsidR="00E01433" w:rsidRDefault="00C65FDC" w:rsidP="00C65FDC">
	<w:pPr>
		<w:pStyle w:val="Titre"/>
	</w:pPr>
	<w:r>
		<w:t>Test to discover Office Open XML</w:t>
	</w:r>
</w:p>
Paragraph (p tag) contains a Paragraph Properties (pPr tag) and one or more Run (r tag). Each Run contains a Text (t tag) and sometimes a Run Properties (rPr tag).
What you have to keep in mind here, is you have got a paragrapg or run properties tag then the paragraph or run tag, which is very important.
For me, the best way to discover each tag is to create a docx and have a look at the document.xml to see what it looks like.
Create your docx with OpenXml and C#
MSDN Link : https://msdn.microsoft.com/en-us/library/dd440953(v=office.12).aspx
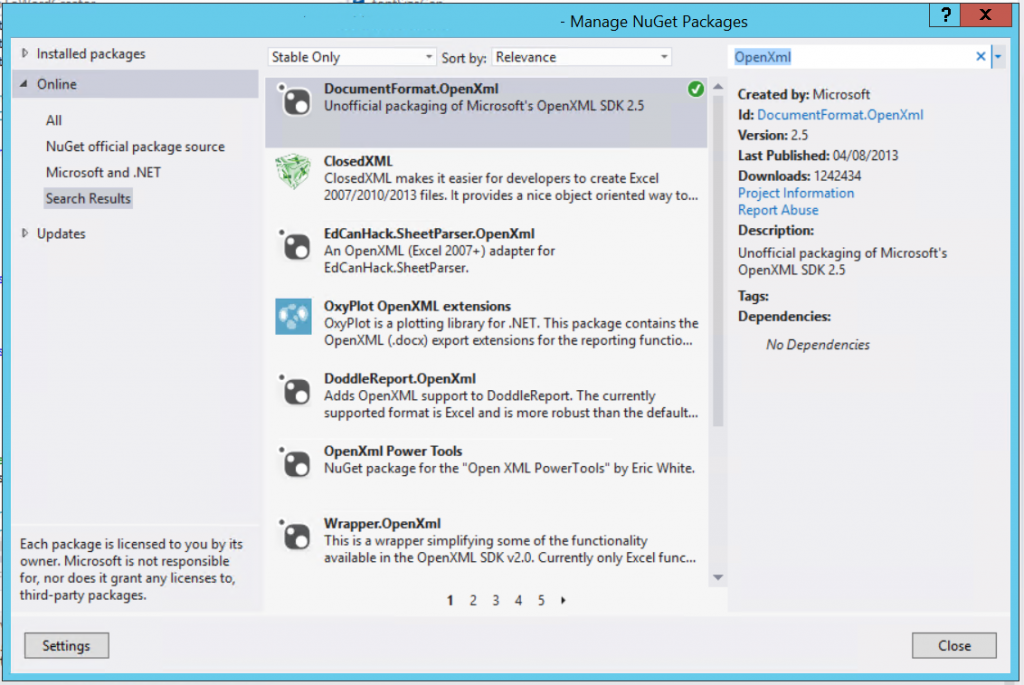
Set your nuget package
Before to go into the code, let’s set your environnement. Add the nuget package DocumentFormat.OpenXml. Right click on references > Manage NugetPackage. Search DocumentFormat.OpenXml and install it.

Create your .docx file
We are going to create the following docx document.
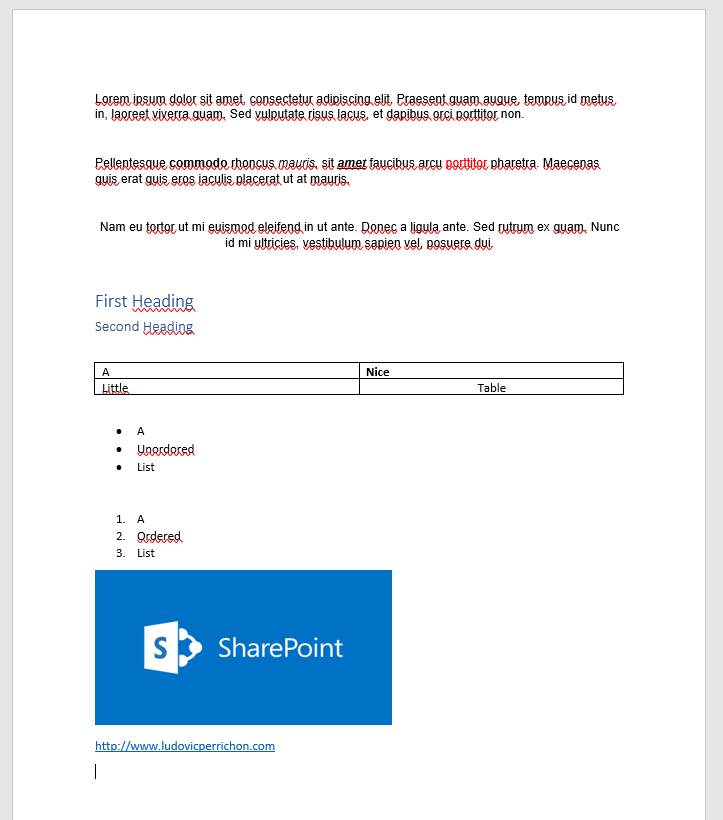
This one has been generated with Microsoft Word. If you have a look at the word\document.xml, you can see that is not really clean.
Download zip example
Why do I use Microsoft Word instead of directly create my docx with OpenXml ? Because for me :
The best way to create your content is to create first a docx based on what your xml should look like.
Like this you will have a look at how to create your xml.
Now, let’s code !
using DocumentFormat.OpenXml;
The following code is going to create and download your docx file. Below I will describe how to add content.
// Create Stream
using (MemoryStream mem = new MemoryStream())
{
    // Create Document
    using (WordprocessingDocument wordDocument =
        WordprocessingDocument.Create(mem, WordprocessingDocumentType.Document, true))
    {
        // Add a main document part.
        MainDocumentPart mainPart = wordDocument.AddMainDocumentPart();

        // Create the document structure and add some text.
        mainPart.Document = new Document();
        Body docBody = new Body();

        // Add your docx content here
    }

    // Download File
    Context.Response.AppendHeader("Content-Disposition", String.Format("attachment;filename=\"0}.docx\"", MyDocxTitle));
    mem.Position = 0;
    mem.CopyTo(Context.Response.OutputStream);
    Context.Response.Flush();
    Context.Response.End();
}
Create a Paragraph
Let’s create our first Paragraph. In the code above, I have a comment which said “Add your docx content here”. That’s where you have to put the following code.
Paragraph p = new Paragraph();
Run r = new Run();
Text t = new Text("Lorem ipsum dolor sit amet, consectetur adipiscing elit. Praesent quam augue, tempus id metus in, laoreet viverra quam. Sed vulputate risus lacus, et dapibus orci porttitor non.");
r.Append(t) ;
p.Append(r) ;
docBody.Append(p);
Well it’s that simple. This sample it’s to show you step by step to understand that we have a class for each tag. But you can use the shortest way :
docBody.Append(new Paragraph(new Run(new text("Lorem ipsum dolor sit amet, consectetur adipiscing elit. Praesent quam augue, tempus id metus in, laoreet viverra quam. Sed vulputate risus lacus, et dapibus orci porttitor non."))));
Create a Paragraph with styles
About the second paragraph, you can see some words are normal, some words are bold, some italic and bold and some words are red. To do that you have to split your paragraph in different runs with different run properties.
So we are going to have a Paragraph, with different runs and inside each runs, a run properties.
Paragraph p = new Paragraph();
// Run 1
Run r1 = new Run();
Text t1 = new Text("Pellentesque "){ Space = SpaceProcessingModeValues.Preserve };
// The Space attribute preserve white space before and after your text
r1.Append(t1) ;
p.Append(r1) ;

// Run 2 - Bold
Run r2 = new Run();
RunProperties rp2 = new RunProperties();
rp2.Bold = new Bold();
// Always add properties first
r2.Append(rp2) ;
Text t2 = new Text("commodo "){ Space = SpaceProcessingModeValues.Preserve };
r2.Append(t2) ;
p.Append(r2) ;

// Run 3
Run r3 = new Run();
Text t3 = new Text("rhoncus "){ Space = SpaceProcessingModeValues.Preserve };
r3.Append(t3) ;
p.Append(r3) ;

// Run 4 – Italic
Run r4 = new Run();
RunProperties rp4 = new RunProperties();
rp4.Italic = new Italic();
// Always add properties first
r4.Append(rp4) ;
Text t4 = new Text("mauris"){ Space = SpaceProcessingModeValues.Preserve };
r4.Append(t4) ;
p.Append(r4) ;

// Run 5
Run r5 = new Run();
Text t5 = new Text(", sit "){ Space = SpaceProcessingModeValues.Preserve };
r5.Append(t5);
p.Append(r5);

// Run 6 – Italic , bold and underlined
Run r6 = new Run();
RunProperties rp6 = new RunProperties();
rp6.Italic = new Italic();
rp6.Bold = new Bold();
rp6.Underline = new Underline();
// Always add properties first
r6.Append(rp6) ;
Text t6 = new Text("amet "){ Space = SpaceProcessingModeValues.Preserve };
r6.Append(t6) ;
p.Append(r6) ;

// Run 7
Run r7 = new Run();
Text t7 = new Text("faucibus arcu "){ Space = SpaceProcessingModeValues.Preserve };
r7.Append(t7);
p.Append(r7);

// Run 8 – Red color
Run r8 = new Run();
RunProperties rp8 = new RunProperties();
rp8.Color = = new Color() { Val = "FF0000" };
// Always add properties first
r8.Append(rp8) ;
Text t8 = new Text("porttitor "){ Space = SpaceProcessingModeValues.Preserve };
r8.Append(t8) ;
p.Append(r8) ;

// Run 9
Run r9 = new Run();
Text t9 = new Text("pharetra. Maecenas quis erat quis eros iaculis placerat ut at mauris."){ Space = SpaceProcessingModeValues.Preserve };
r9.Append(t9);
p.Append(r9);
// Add your paragraph to docx body
docBody.Append(p);
Create a Paragraph with justification
To deal with the justification we have to work with the paragraph properties.
Paragraph p = new Paragraph();
ParagraphProperties pp = new ParagraphProperties();
pp.Justification = new Justification() { Val = JustificationValues.Center };
// Add paragraph properties to your paragraph
p.Append(pp);
// Run
Run r = new Run();
Text t = new Text("Nam eu tortor ut mi euismod eleifend in ut ante. Donec a ligula ante. Sed rutrum ex quam. Nunc id mi ultricies, vestibulum sapien vel, posuere dui."){ Space = SpaceProcessingModeValues.Preserve };
r.Append(t);
p.Append(r);
// Add your paragraph to docx body
docBody.Append(p);
Create Heading
To add heading, you have to insert into your docx a heading style. I used the following article and change few things : https://msdn.microsoft.com/en-us/library/cc850838.aspx
So You gonna have few methods in your code :
// Apply a style to a paragraph.
public static void AddStyleToDoc(MainDocumentPart mainPart, string styleid, string stylename, StyleRunProperties styleRunProperties)
{

    // Get the Styles part for this document.
    StyleDefinitionsPart part =
        mainPart.StyleDefinitionsPart;

    // If the Styles part does not exist, add it and then add the style.
    if (part == null)
    {
        part = AddStylesPartToPackage(mainPart);
        AddNewStyle(part, styleid, stylename, styleRunProperties);
    }
    else
    {
        // If the style is not in the document, add it.
        if (IsStyleIdInDocument(mainPart, styleid) != true)
        {
            // No match on styleid, so let's try style name.
            string styleidFromName = GetStyleIdFromStyleName(mainPart, stylename);
            if (styleidFromName == null)
            {
                AddNewStyle(part, styleid, stylename, styleRunProperties);
            }
            else
                styleid = styleidFromName;
        }
    }

}

// Add a StylesDefinitionsPart to the document.  Returns a reference to it.
public static StyleDefinitionsPart AddStylesPartToPackage(MainDocumentPart mainPart)
{
    StyleDefinitionsPart part;
    part = mainPart.AddNewPart<StyleDefinitionsPart>();
    DocumentFormat.OpenXml.Wordprocessing.Styles root = new DocumentFormat.OpenXml.Wordprocessing.Styles();
    root.Save(part);
    return part;
}

public static bool IsStyleIdInDocument(MainDocumentPart mainPart, string styleid)
{
    // Get access to the Styles element for this document.
    DocumentFormat.OpenXml.Wordprocessing.Styles s = mainPart.StyleDefinitionsPart.Styles;

    // Check that there are styles and how many.
    int n = s.Elements<DocumentFormat.OpenXml.Wordprocessing.Style>().Count();
    if (n == 0)
        return false;

    // Look for a match on styleid.
    DocumentFormat.OpenXml.Wordprocessing.Style style = s.Elements<DocumentFormat.OpenXml.Wordprocessing.Style>()
        .Where(st => (st.StyleId == styleid) && (st.Type == StyleValues.Paragraph))
        .FirstOrDefault();
    if (style == null)
        return false;

    return true;
}

// Create a new style with the specified styleid and stylename and add it to the specified style definitions part.
 private static void AddNewStyle(StyleDefinitionsPart styleDefinitionsPart, string styleid, string stylename, StyleRunProperties styleRunProperties)
{
    // Get access to the root element of the styles part.
    DocumentFormat.OpenXml.Wordprocessing.Styles styles = styleDefinitionsPart.Styles;

    // Create a new paragraph style and specify some of the properties.
    DocumentFormat.OpenXml.Wordprocessing.Style style = new DocumentFormat.OpenXml.Wordprocessing.Style()
    {
        Type = StyleValues.Paragraph,
        StyleId = styleid,
        CustomStyle = true
    };
    style.Append(new StyleName() { Val = stylename });
    style.Append(new BasedOn() { Val = "Normal" });
    style.Append(new NextParagraphStyle() { Val = "Normal" });
    style.Append(new UIPriority() { Val = 900 });

    // Create the StyleRunProperties object and specify some of the run properties.


    // Add the run properties to the style.
    // --- Here we use the OuterXml. If you are using the same var twice, you will get an error. So to be sure just insert the xml and you will get through the error.
    style.Append(styleRunProperties.OuterXml);

    // Add the style to the styles part.
    styles.Append(style);
}
And then to add and use your new style :
// Heading 1
StyleRunProperties styleRunPropertiesH1 = new StyleRunProperties();
Color color1 = new Color() { Val = "2F5496" };
// Specify a 16 point size. 16x2 because it’s half-point size
DocumentFormat.OpenXml.Wordprocessing.FontSize fontSize1 = new DocumentFormat.OpenXml.Wordprocessing.FontSize();
fontSize1.Val = new StringValue("32");

styleRunPropertiesH1.Append(color1);
styleRunPropertiesH1.Append(fontSize1);
// Check above at the begining of the word creation to check where mainPart come from
AddStyleToDoc(mainPart, "heading1", "heading 1", styleRunPropertiesH1);

// Heading 2
StyleRunProperties styleRunPropertiesH2 = new StyleRunProperties();
Color color2 = new Color() { Val = "2F5496" };
// Specify a 13 point size. 16x2 because it’s half-point size
DocumentFormat.OpenXml.Wordprocessing.FontSize fontSize1 = new DocumentFormat.OpenXml.Wordprocessing.FontSize();
fontSize1.Val = new StringValue("26");

styleRunPropertiesH1.Append(color1);
styleRunPropertiesH1.Append(fontSize1);
AddStyleToDoc(mainPart, "heading2", "heading 2", styleRunPropertiesH1);

// Create your heading1 into docx
Paragraph pH1 = new Paragraph();
ParagraphProperties ppH1 = new ParagraphProperties();
ppH1.ParagraphStyleId = new ParagraphStyleId() { Val = "heading1" };
ppH1.SpacingBetweenLines = new SpacingBetweenLines() { After = "0" };
pH1.Append(ppH1);
// Run Heading1
Run rH1 = new Run();
Text tH1 = new Text("First Heading"){ Space = SpaceProcessingModeValues.Preserve };
rH1.Append(tH1);
pH1.Append(rH1);
// Add your heading to docx body
docBody.Append(pH1);

// Create your heading2 into docx
Paragraph pH2 = new Paragraph();
ParagraphProperties ppH2 = new ParagraphProperties();
ppH2.ParagraphStyleId = new ParagraphStyleId() { Val = "heading2" };
ppH2.SpacingBetweenLines = new SpacingBetweenLines() { After = "0" };
pH2.Append(ppH2);
// Run Heading2
Run rH2 = new Run();
Text tH2 = new Text("Second Heading"){ Space = SpaceProcessingModeValues.Preserve };
rH2.Append(tH2);
pH2.Append(rH2);
// Add your heading2 to docx body
docBody.Append(pH2);
Create Table
Tables in OpenXml isn’t much more difficult. In order you have to create a table, then rows, then cells and add paragraphs to your cells.
Table table = new Table();

TableRow tr1 = new TableRow();

TableCell tc11 = new TableCell();
Paragraph p11 = new Paragraph(new Run(new text("A")));
tc11.Append(p11);
tr1.Append(tc11);

TableCell tc12 = new TableCell();
Paragraph p12 = new Paragraph();
Run r12 = new Run();
RunProperties rp12 = new RunProperties();
rp12.Bold = new Bold();
r12.Append(rp12);
r12.Append(new Text("Nice"));
p12.Append(r12);
tc12.Append(p12);

tr1.Append(tc12);
table.Append(tr1);

TableRow tr2 = new TableRow();

TableCell tc21 = new TableCell();
Paragraph p21 = new Paragraph(new Run(new text("Little")));
tc21.Append(p21);
tr2.Append(tc21);

TableCell tc22 = new TableCell();
Paragraph p22 = new Paragraph();
ParagraphProperties pp22 = new ParagraphProperties();
pp22.Justification = new Justification() { Val = JustificationValues.Center };
p22.Append(pp22);
p22.Append(new Run(new Text("Table")));
tc22.Append(p22);

tr2.Append(tc22);
table.Append(tr2);

// Add your table to docx body
docBody.Append(table);
Create List
A list (bullet or ordered lists) is a set of paragraph. Which means each bullet or each number is a pragraph with a specific parapgraph properties.
// Paragraph properties
SpacingBetweenLines sblUl = new SpacingBetweenLines() { After = "0" }; // Get rid of space between bullets
Indentation iUl = new Indentation() { Left = indentation, Hanging = "360" }; // correct indentation
NumberingProperties npUl = new NumberingProperties(
new NumberingLevelReference() { Val = 1 },
new NumberingId() { Val = 2 }
);
ParagraphProperties ppUnordered = new ParagraphProperties(npUl, sblUl, iUl);
ppUnordered.ParagraphStyleId = new ParagraphStyleId() { Val = "ListParagraph" };

// Pargraph
Paragraph p1 = new Paragraph();
p1.ParagraphProperties = new ParagraphProperties(ppUnordered.OuterXml);
p1.Append(new Run(new Text("A"))) ;
docBody.Append(p1) ;
Paragraph p2 = new Paragraph();
p2.ParagraphProperties = new ParagraphProperties(ppUnordered.OuterXml);
p2.Append(new Run(new Text("Unordored")));
docBody.Append(p2) ;
Paragraph p3 = new Paragraph();
p3.ParagraphProperties = new ParagraphProperties(ppUnordered.OuterXml);
p3.Append(new Run(new Text("List")));
docBody.Append(p3);
The ordered list is a bit the same. The difference will be the NumberingLevelReference and the NumberingId.
// Paragraph properties
SpacingBetweenLines sblOl = new SpacingBetweenLines() { After = "0" }; // Get rid of space between bullets
Indentation iOl = new Indentation() { Left = indentation, Hanging = "360" }; // correct indentation
NumberingProperties npOl = new NumberingProperties(
new NumberingLevelReference() { Val = 2 },
new NumberingId() { Val = 1 }
);
ParagraphProperties ppOrdered = new ParagraphProperties(npOl, sblOl, iOl);
ppOrdered.ParagraphStyleId = new ParagraphStyleId() { Val = "ListParagraph" };

// Paragraph
Paragraph p1 = new Paragraph();
p1.ParagraphProperties = new ParagraphProperties(ppUnordered.OuterXml);
p1.Append(new Run(new Text("A"))) ;
docBody.Append(p1) ;
Paragraph p2 = new Paragraph();
p2.ParagraphProperties = new ParagraphProperties(ppUnordered.OuterXml);
p2.Append(new Run(new Text("Ordored"))) ;
docBody.Append(p2) ;
Paragraph p3 = new Paragraph();
p3.ParagraphProperties = new ParagraphProperties(ppUnordered.OuterXml);
p3.Append(new Run(new Text("List")));
docBody.Append(p3);
Create Picture
You have to create a drawing from a stream of your picture and then insert it into a paragraph.
I have started with the following link, and I have made mine : https://msdn.microsoft.com/en-us/library/office/bb497430.aspx
For that we need the following methods :
private static Stream FromImageUrlToStream(string imgUrl)
{
    HttpWebRequest req = (HttpWebRequest)WebRequest.Create(imgUrl);
    req.UseDefaultCredentials = true;
    req.PreAuthenticate = true;
    req.Credentials = CredentialCache.DefaultCredentials;
    HttpWebResponse resp = (HttpWebResponse)req.GetResponse();
    return resp.GetResponseStream();
}

// To insert the picture
private static Drawing DrawingManager(string relationshipId, string name, Int64Value cxVal, Int64Value cyVal, string impPosition)
{
    string haPosition = impPosition;
    if (string.IsNullOrEmpty(haPosition))
    {
        haPosition = "left";
    }
    // Define the reference of the image.
    DW.Anchor anchor = new DW.Anchor();
    anchor.Append(new DW.SimplePosition() { X = 0L, Y = 0L });
    anchor.Append(
        new DW.HorizontalPosition(
            new DW.HorizontalAlignment(haPosition)
        )
        {
            RelativeFrom =
              DW.HorizontalRelativePositionValues.Margin
        }
    );
    anchor.Append(
        new DW.VerticalPosition(
            new DW.PositionOffset("0")
        )
        {
            RelativeFrom =
            DW.VerticalRelativePositionValues.Paragraph
        }
    );
    anchor.Append(
        new DW.Extent()
        {
            Cx = cxVal,
            Cy = cyVal
        }
    );
    anchor.Append(
        new DW.EffectExtent()
        {
            LeftEdge = 0L,
            TopEdge = 0L,
            RightEdge = 0L,
            BottomEdge = 0L
        }
    );
    if (!string.IsNullOrEmpty(impPosition))
    {
        anchor.Append(new DW.WrapSquare() { WrapText = DW.WrapTextValues.BothSides });
    }
    else
    {
        anchor.Append(new DW.WrapTopBottom());
    }
    anchor.Append(
        new DW.DocProperties()
        {
            Id = (UInt32Value)1U,
            Name = name
        }
    );
    anchor.Append(
        new DW.NonVisualGraphicFrameDrawingProperties(
              new A.GraphicFrameLocks() { NoChangeAspect = true })
    );
    anchor.Append(
        new A.Graphic(
              new A.GraphicData(
                new PIC.Picture(

                  new PIC.NonVisualPictureProperties(
                    new PIC.NonVisualDrawingProperties()
                    {
                        Id = (UInt32Value)0U,
                        Name = name + ".jpg"
                    },
                    new PIC.NonVisualPictureDrawingProperties()),

                    new PIC.BlipFill(
                        new A.Blip(
                            new A.BlipExtensionList(
                                new A.BlipExtension()
                                {
                                    Uri =
                                    "{28A0092B-C50C-407E-A947-70E740481C1C}"
                                })
                        )
                        {
                            Embed = relationshipId,
                            CompressionState =
                            A.BlipCompressionValues.Print
                        },
                        new A.Stretch(
                            new A.FillRectangle())),

                  new PIC.ShapeProperties(

                    new A.Transform2D(
                      new A.Offset() { X = 0L, Y = 0L },

                      new A.Extents()
                      {
                          Cx = cxVal,
                          Cy = cyVal
                      }),

                    new A.PresetGeometry(
                      new A.AdjustValueList()
                    ) { Preset = A.ShapeTypeValues.Rectangle }
                  )
                )
          ) { Uri = "http://schemas.openxmlformats.org/drawingml/2006/picture" })
    );

    anchor.DistanceFromTop = (UInt32Value)0U;
    anchor.DistanceFromBottom = (UInt32Value)0U;
    anchor.DistanceFromLeft = (UInt32Value)114300U;
    anchor.DistanceFromRight = (UInt32Value)114300U;
    anchor.SimplePos = false;
    anchor.RelativeHeight = (UInt32Value)251658240U;
    anchor.BehindDoc = true;
    anchor.Locked = false;
    anchor.LayoutInCell = true;
    anchor.AllowOverlap = true;

    Drawing element = new Drawing();
    element.Append(anchor);

    return element;
}
And now to insert picture :
Paragraph pImg = new Paragraph();
ImagePart imagePart = mainPart.AddImagePart(ImagePartType.Jpeg);
string imgPath = "Absolute/URL/Of/picture.png";
HttpWebRequest req = (HttpWebRequest)WebRequest.Create(imgPath);
req.UseDefaultCredentials = true;
req.PreAuthenticate = true;
req.Credentials = CredentialCache.DefaultCredentials;
HttpWebResponse resp = (HttpWebResponse)req.GetResponse();
imagePart.FeedData(resp.GetResponseStream());

// 1500000 and 1092000 are img width and height
Run rImg = new Run(DrawingManager(mainPart.GetIdOfPart(imagePart), "PictureName", 1500000, 1092000, string.Empty));
pImg.Append(rImg);
docBody.Append(pImg);
Create Link
To insert a link you need to add a Hyerlink element between your run and your paragraph.
To make it simple I have made a method which return an Hyperlink element.
private static Hyperlink HyperLinkManager(string url, string text, MainDocumentPart mainPart)
{

    HyperlinkRelationship hr = mainPart.AddHyperlinkRelationship(new Uri(url), true);
    string hrContactId = hr.Id;
    return
        new Hyperlink(
            new ProofError() { Type = ProofingErrorValues.GrammarStart },
            new Run(
                new RunProperties(
                    new RunStyle() { Val = "Hyperlink" },
                    new Color { ThemeColor = ThemeColorValues.Hyperlink }),
                new Text(text) { Space = SpaceProcessingModeValues.Preserve }
            )) { History = OnOffValue.FromBoolean(true), Id = hrContactId };
}
Then
Paragraph pLink = new Paragraph();
// For the mainpart see above
pLink.Append(HyperLinkManager("http://YourLink", "My awesome link", mainPart) ;
docBody.Append(pLink);
That’s it !
Keep in mind. Create your docx with Microsoft Word and then go have a look at the document.xml to see which xml your C# has to create. It makes things easier.