I am going to explain how to go a bit further than the classic Power Automate steps by showing you how to use the main SharePoint REST API call with Power Automate.
- Short introduction to SharePoint REST API
- Note and Update
- Site Columns
- SharePoint List
- SharePoint List fields
- SharePoint List Views
- Content types
- Navigation – Quick launch
1. Short introduction to SharePoint REST API
The SharePoint REST API is provided by Microsoft with SharePoint. It allows developpers to do basics SharePoint operation without coding on server side. You can check the Microsot document regarding the REST API.
This REST API can be used with Power Automate to perform multiple tasks. In this post I will show you how to use this tool with Power Automate. Don’t worry if you don’t have a developper background.
All of this call in REST API SharePoint are using the “Send HTTP request to SharePoint” step.
2. Note and Update
2.A. Header whilde building REST API call
While writing this post, I have realized that the way to enter headers has been changed. So in case of you don’t have the right screenshot, it turns from lines to a JSON.
Example:
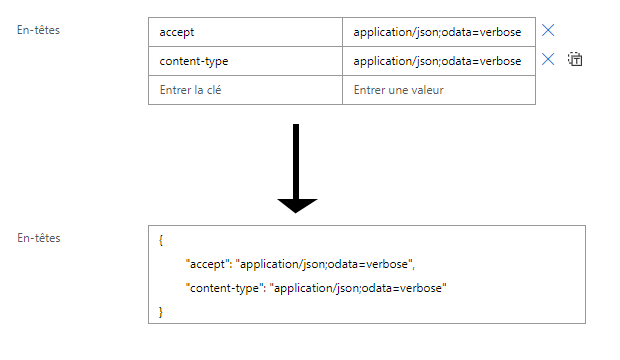
So if you need to switch, don’t forget the brackets and the double quote.
3. Site columns
3.A. Get Site column info
Add an step “Send HTTP Request to SharePoint” and enter the parameters as following:
Here in this example, I am going to check if the column Meteo at Site level.
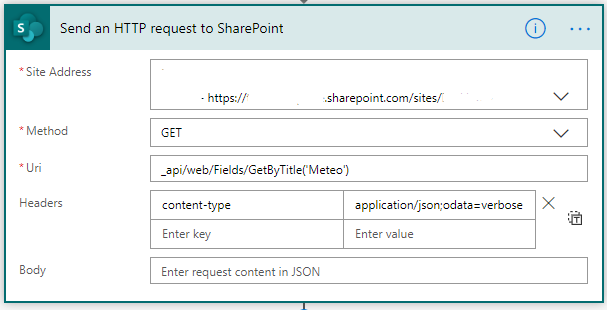
Copy/Paste helper:
| Entry | Value |
|---|---|
| URI | _api/web/Fields/GetByTitle(‘[MY COLUMN TITLE]’) |
| content-type | application/json;odata=verbose |
| Header JSON | { “content-type”: “application/json;odata=verbose” } |
Please note:
If field doesn’t exist, this action will fail (see below).
The return is going to be as JSON, so you can use parse JSON step, but the schema might be different depending of the type of the column, text and choice are going to be different for example. I highly recommend if you want to use the returned schema, to run a test of your workflow and copy paste the result to generate the right schema (see below).
Check if Site column exist
It is quite simple, just need to configure my Run after parameter. Example with a column AAA which of course doesn”t exist.

Parse my result as JSON
Execute your flow once, copy the result, edit your flow and copy the result into to generate a schema into the parse JSON step.
3.B. Create Site columns
In these example, I am going to use the schema xml to create a text field.
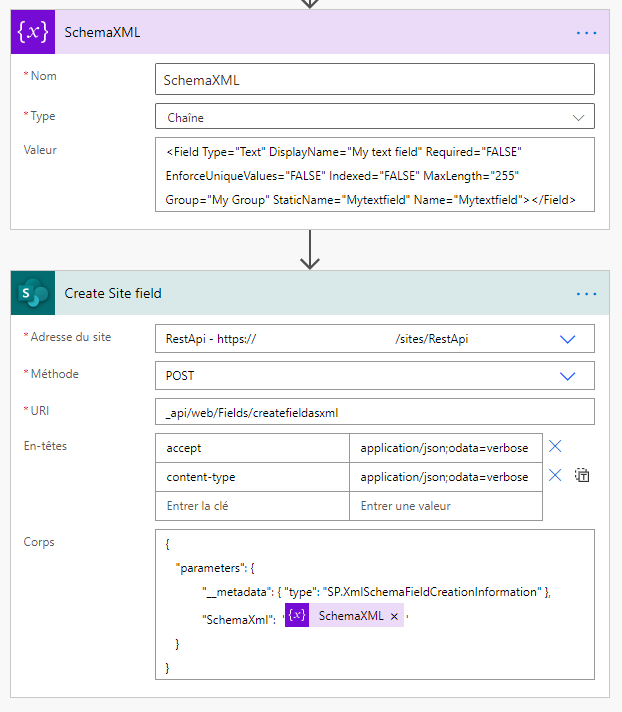
Schema XML of my field is saved into a var called SchemaXML.
Copy/Paste?
| Entry | Value |
|---|---|
| URI | _api/web/Fields/createfieldasxml |
| accept | application/json;odata=verbose |
| content-type | application/json;odata=verbose |
| Header JSON | { “accept”: “application/json;odata=verbose”, “content-type”: “application/json;odata=verbose” } |
| Body | { “parameters”: { “__metadata”: { “type”: “SP.XmlSchemaFieldCreationInformation” }, “SchemaXml”: ‘@{variables(‘SchemaXML’)}’ } } |
Schema XML: Text field
XML
<Field Type="Text" DisplayName="[MY FIELD DISPLAY NAME]" Description="[MY DESCRIPTION]" Required="FALSE" EnforceUniqueValues="FALSE" Indexed="FALSE" MaxLength="255" Group="[MY FIELD GROUP]" StaticName="[MY_FIELD_STATIC_NAME]" Name="[MY_FIELD_NAME]"></Field>
Replace:
- [MY FIELD DISPALY NAME] with your display name.
- [MY DESCRIPTION] with your description, can be empty
- [MY FIELD GROUP] with the group name you want your field belong. If it doesn’t exist, it will be created automatically.
- [MY_FIELD_STATIC_NAME] with yout field static name (No spaces, No special char).
- [MY_FIELD_NAME] with your field internal name (No spaces, No special char).
- You can change Required from FALSE to TRUE
Schema XML: Number
XML
<Field Type="Number" DisplayName="[MY FIELD DISPLAY NAME]" Description="[MY DESCRIPTION]" Required="FALSE" EnforceUniqueValues="FALSE" Group="[MY FIELD GROUP]" Indexed="FALSE" StaticName="[MY_FIELD_STATIC_NAME]" Name="[MY_FIELD_NAME]" Percentage="FALSE" />
Replace:
- [MY FIELD DISPALY NAME] with your display name.
- [MY DESCRIPTION] with your description, can be empty
- [MY FIELD GROUP] with the group name you want your field belong. If it doesn’t exist, it will be created automatically.
- [MY_FIELD_STATIC_NAME] with your field static name (No spaces, No special char).
- [MY_FIELD_NAME] with yout field internal name (No spaces, No special char).
- You can change Required from FALSE to TRUE
Schema XML: Note
XML
<Field Type="Note" DisplayName="[MY FIELD DISPLAY NAME]" Description="[MY DESCRIPTION]" Required="TRUE" RichText="TRUE" Group="[MY FIELD GROUP]" StaticName="[MY_FIELD_STATIC_NAME]" Name="[MY_FIELD_NAME]" EnforceUniqueValues="FALSE" Indexed="FALSE" NumLines="6" RestrictedMode="TRUE" RichTextMode="Compatible" IsolateStyles="FALSE" AppendOnly="FALSE" />
Replace:
- [MY FIELD DISPALY NAME] with your display name.
- [MY DESCRIPTION] with your description, can be empty
- [MY FIELD GROUP] with the group name you want your field belong. If it doesn’t exist, it will be created automatically.
- [MY_FIELD_STATIC_NAME] with your field static name (No spaces, No special char).
- [MY_FIELD_NAME] with yout field internal name (No spaces, No special char).
- You can change Required from FALSE to TRUE
- You can change RichText from FALSE to TRUE to enable Rich Text
- You can change AppendOnly from FALSE to TRUE to enable Append Changes to Existing Text
Schema XML: DateTime
XML
<Field Name="[MY_FIELD_NAME]" StaticName="[MY_FIELD_STATIC_NAME]" FromBaseType="FALSE" Type="DateTime" DisplayName="[MY FIELD DISPLAY NAME]" Description="[MY DESCRIPTION]" Group="[MY FIELD GROUP]" Required="FALSE" EnforceUniqueValues="FALSE" Indexed="FALSE" Format="DateOnly" FriendlyDisplayFormat="Disabled" />
Replace:
- [MY FIELD DISPALY NAME] with your display name.
- [MY DESCRIPTION] with your description, can be empty
- [MY FIELD GROUP] with the group name you want your field belong. If it doesn’t exist, it will be created automatically.
- [MY_FIELD_STATIC_NAME] with your field static name (No spaces, No special char).
- [MY_FIELD_NAME] with yout field internal name (No spaces, No special char).
- You can change Required from FALSE to TRUE
- You can change Format from DateOnly to DateTime
Schema XML : URL
XML
<Field Type="URL" DisplayName="[MY FIELD DISPLAY NAME]" Required="FALSE" EnforceUniqueValues="FALSE" Indexed="FALSE" Format="Hyperlink" Group="[MY FIELD GROUP]" StaticName="[MY_FIELD_STATIC_NAME]" Name="[MY_FIELD_NAME]" Description="[MY DESCRIPTION]"></Field>
Replace:
- [MY FIELD DISPALY NAME] with your display name.
- [MY DESCRIPTION] with your description, can be empty
- [MY FIELD GROUP] with the group name you want your field belong. If it doesn’t exist, it will be created automatically.
- [MY_FIELD_STATIC_NAME] with your field static name (No spaces, No special char).
- [MY_FIELD_NAME] with yout field internal name (No spaces, No special char).
- You can change Required from FALSE to TRUE.
- You can change Format from HyperLink to Image.
Schema XML : Choice
XML
<Field Type="Choice" DisplayName="[MY FIELD DISPLAY NAME]" Description="[MY DESCRIPTION]" Required="FALSE" EnforceUniqueValues="FALSE" Indexed="FALSE" Format="Dropdown" FillInChoice="FALSE" Group="[MY FIELD GROUP]" StaticName="[MY_FIELD_STATIC_NAME]" Name="[MY_FIELD_NAME]">
    <Default>[CHOICE YOU WANT TO DEFAULT FROM CHOICE BELOW]</Default>
    <CHOICES>
        <CHOICE>[CHOICE 1]</CHOICE>
        <CHOICE>[CHOICE 2]</CHOICE>
        <CHOICE>[CHOICE 3]</CHOICE>
    </CHOICES>
</Field>
Replace:
- [MY FIELD DISPALY NAME] with your display name.
- [MY DESCRIPTION] with your description, can be empty
- [MY FIELD GROUP] with the group name you want your field belong. If it doesn’t exist, it will be created automatically.
- [MY_FIELD_STATIC_NAME] with yout field static name (No spaces, No special char).
- [MY_FIELD_NAME] with your field internal name (No spaces, No special char).
- [CHOICE 1] to [CHOICE X] with your choice values.
- [CHOICE YOU WANT TO DEFAULT FROM CHOICE BELOW] with your default choice from [CHOICE 1] to [CHOICE X] values.
- You can change Required from FALSE to TRUE.
- You can change Format from Dropdown to RadioButtons.
Schema XML : User
XML
<Field Type="User" DisplayName="[MY FIELD DISPLAY NAME]" Required="TRUE" EnforceUniqueValues="FALSE" ShowField="ImnName" UserSelectionMode="0" UserSelectionScope="0" Group="[MY FIELD GROUP]" StaticName="[MY_FIELD_STATIC_NAME]" Name="[MY_FIELD_NAME]" Description="[MY DESCRIPTION]"/>
Replace:
- [MY FIELD DISPALY NAME] with your display name.
- [MY DESCRIPTION] with your description, can be empty
- [MY FIELD GROUP] with the group name you want your field belong. If it doesn’t exist, it will be created automatically.
- [MY_FIELD_STATIC_NAME] with yout field static name (No spaces, No special char).
- [MY_FIELD_NAME] with your field internal name (No spaces, No special char).
- You can change Required from FALSE to TRUE.
- You can change UserSelectionMode from 0 to 1. 0 is People only and 1 is group.
- You can change UserSelectionScope from 0 to an ID of a group.
Schema XML : User Multi
XML
<Field Type="UserMulti" DisplayName="[MY FIELD DISPLAY NAME]" List="UserInfo" Required="TRUE" EnforceUniqueValues="FALSE" ShowField="ImnName" UserSelectionMode="0" UserSelectionScope="0" Mult="TRUE" Sortable="FALSE" Group="[MY FIELD GROUP]" StaticName="[MY_FIELD_STATIC_NAME]" Name="[MY_FIELD_NAME]" Description="[MY DESCRIPTION]"/>
Replace:
- [MY FIELD DISPALY NAME] with your display name.
- [MY DESCRIPTION] with your description, can be empty
- [MY FIELD GROUP] with the group name you want your field belong. If it doesn’t exist, it will be created automatically.
- [MY_FIELD_STATIC_NAME] with yout field static name (No spaces, No special char).
- [MY_FIELD_NAME] with your field internal name (No spaces, No special char).
- You can change Required from FALSE to TRUE.
- You can change UserSelectionMode from 0 to 1. 0 is People only and 1 is group.
- You can change UserSelectionScope from 0 to an ID of a group.
Schema XML : Calculated
XML
<Field Type="Calculated" DisplayName="[MY FIELD DISPLAY NAME]" EnforceUniqueValues="FALSE" Indexed="FALSE" Format="DateOnly" Decimals="0" LCID="1036" ResultType="Number" ReadOnly="TRUE" Group="[MY FIELD GROUP]" StaticName="[MY_FIELD_STATIC_NAME]" Name="[MY_FIELD_NAME]" Description="[MY DESCRIPTION]" Required="FALSE" Percentage="FALSE">
    <Formula>=[MY FORMULA]</Formula>
</Field>
Replace:
- [MY FIELD DISPALY NAME] with your display name.
- [MY DESCRIPTION] with your description, can be empty
- [MY FIELD GROUP] with the group name you want your field belong. If it doesn’t exist, it will be created automatically.
- [MY_FIELD_STATIC_NAME] with yout field static name (No spaces, No special char).
- [MY_FIELD_NAME] with your field internal name (No spaces, No special char).
- [MY FORMULA]with the formula you want to use. If you add other field, use the Display Name, Example [Modified] – [Created]
Schema XML : Look up
XML
<Field Type="Lookup" List="[LIST_GUID]" DisplayName="[MY FIELD DISPLAY NAME]" Required="FALSE" EnforceUniqueValues="FALSE" ShowField="[FIELD TO LOOKUP]" UnlimitedLengthInDocumentLibrary="FALSE" RelationshipDeleteBehavior="None" Group="[MY FIELD GROUP]" StaticName="[MY_FIELD_STATIC_NAME]" Name="[MY_FIELD_NAME]" Description="[MY DESCRIPTION]" />
Replace:
- [LIST_GUID] with the GUID of the list you want to lookup with.
- [FIELD TO LOOKUP] with the Internal name of the field you want to lookup.
- [MY FIELD DISPALY NAME] with your display name.
- [MY DESCRIPTION] with your description, can be empty
- [MY FIELD GROUP] with the group name you want your field belong. If it doesn’t exist, it will be created automatically.
- [MY_FIELD_STATIC_NAME] with yout field static name (No spaces, No special char).
- [MY_FIELD_NAME] with your field internal name (No spaces, No special char).
- You can change Required from FALSE to TRUE.
Schema XML : Look up Multi
XML
<Field Type="LookupMulti" DisplayName="[MY FIELD DISPLAY NAME]" Required="FALSE" EnforceUniqueValues="FALSE" List="[LIST_GUID]" ShowField="[FIELD TO LOOKUP]" Mult="TRUE" Sortable="FALSE" Group="[MY FIELD GROUP]" StaticName="[MY_FIELD_STATIC_NAME]" Name="[MY_FIELD_NAME]" Description="[MY DESCRIPTION]" />
- [LIST_GUID] with the GUID of the list you want to lookup with.
- [FIELD TO LOOKUP] with the Internal name of the field you want to lookup.
- [MY FIELD DISPALY NAME] with your display name.
- [MY DESCRIPTION] with your description, can be empty
- [MY FIELD GROUP] with the group name you want your field belong. If it doesn’t exist, it will be created automatically.
- [MY_FIELD_STATIC_NAME] with yout field static name (No spaces, No special char).
- [MY_FIELD_NAME] with your field internal name (No spaces, No special char).
- You can change Required from FALSE to TRUE.
The schema xml isn’t the only way to create field. Below I will give you an example of creating a field without using the shcema xml.
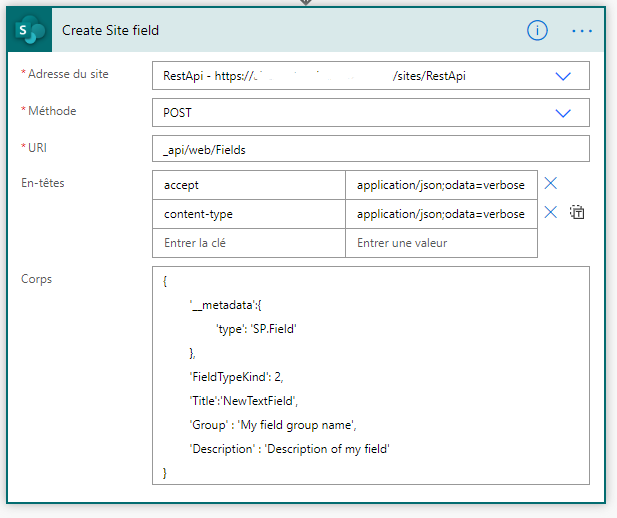
Not using Schema xml : Text
What will change with the schema xml call ? The URI and the body of your request:
| Entry | Value |
|---|---|
| URI | _api/web/Fields |
| accept | application/json;odata=verbose |
| content-type | application/json;odata=verbose |
| Header JSON | { “accept”: “application/json;odata=verbose”, “content-type”: “application/json;odata=verbose” } |
| Body | { ‘__metadata’:{ ‘type’: ‘SP.Field’ }, ‘FieldTypeKind’: 2, ‘Title’:’NewTextField’, ‘Group’ : ‘My field group name’, ‘Description’ : ‘Description of my field’ } |
Go further with field creation and rest api
In this post made by Olaf Didszun you can have a look at multiple example with field xml.
In this post made by Brent Ely and this post of Code SharePoint you can go a bit forward about how to create field without Schema XML
And of course, the Microsoft documentation regarding fields.
3.C. Update site columns
I will show you below an example on a Text field, if it is another field, you need to use another type in the body. Check Microsoft site to identify your SP.[VALUE OF TYPE] : https://docs.microsoft.com/en-us/previous-versions/office/sharepoint-visio/jj246597(v%3Doffice.15)
All the steps are realized with a “Send HTTP Request to SharePoint” object.
Text field example
In API you need to target the field you want to update (by its display name), and in the body add the new value:

Need a copy/paste?
| Entry | Value |
|---|---|
| URI | _api/web/Fields/getbytitle(‘[MY FIELD DISPLAY NAME TO CHANGE]’) |
| accept | application/json;odata=verbose |
| content-type | application/json;odata=verbose |
| IF-MATCH | * |
| X-HTTP-Method | MERGE |
| Header JSON | { “accept”: “application/json;odata=verbose”, “content-type”: “application/json;odata=verbose”, “IF-MATCH” : “*”, “X-HTTP-Method” : “MERGE” } |
| Body | { ‘__metadata’: { ‘type’: ‘SP.FieldText’ }, ‘Title’: ‘New Display Name’, ‘Required’ : ‘FALSE’, ‘Description’ : ‘New description’ } |
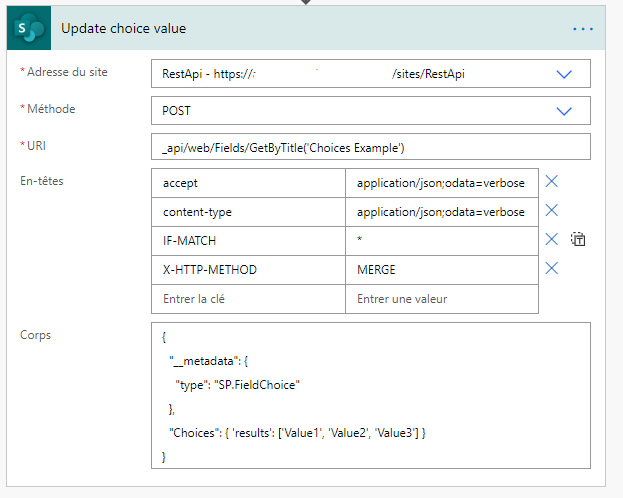
Update choices values of a field
Unfortunately, you will have to change all values, you can’t just add or remove.
In this example, the new value of my field ‘Choices Example’ are going to be Value1, Value2 and Value3.
Need a copy/paste?
| Entry | Value |
|---|---|
| URI | _api/web/Fields/getbytitle(‘[MY FIELD DISPLAY NAME TO CHANGE]’) |
| accept | application/json;odata=verbose |
| content-type | application/json;odata=verbose |
| IF-MATCH | * |
| X-HTTP-Method | MERGE |
| Header JSON | { “accept”: “application/json;odata=verbose”, “content-type”: “application/json;odata=verbose”, “IF-MATCH” : “*”, “X-HTTP-Method” : “MERGE” } |
| Body | { “__metadata”: { “type”: “SP.FieldChoice” }, “Choices”: { ‘results’: [‘Value1’, ‘Value2’, ‘Value3’] } } |
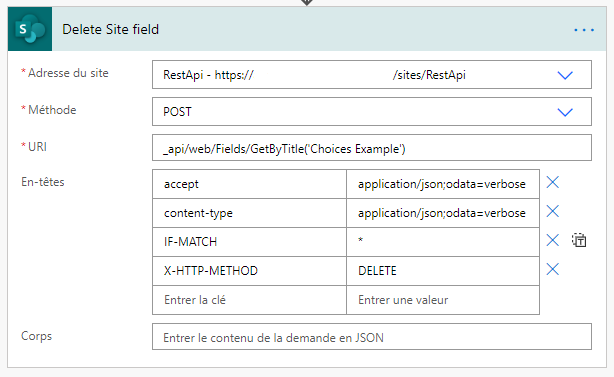
3.D. Delete site columns
Let say I want to delete the site field with the display name ‘Choices Example’:
Need a copy/paste?
| Entry | Value |
|---|---|
| URI | _api/web/Fields/getbytitle(‘[MY FIELD DISPLAY NAME TO DELETE]’) |
| accept | application/json;odata=verbose |
| content-type | application/json;odata=verbose |
| IF-MATCH | * |
| X-HTTP-Method | DELETE |
| Header JSON | { “accept”: “application/json;odata=verbose”, “content-type”: “application/json;odata=verbose”, “IF-MATCH” : “*”, “X-HTTP-Method” : “DELETE” } |
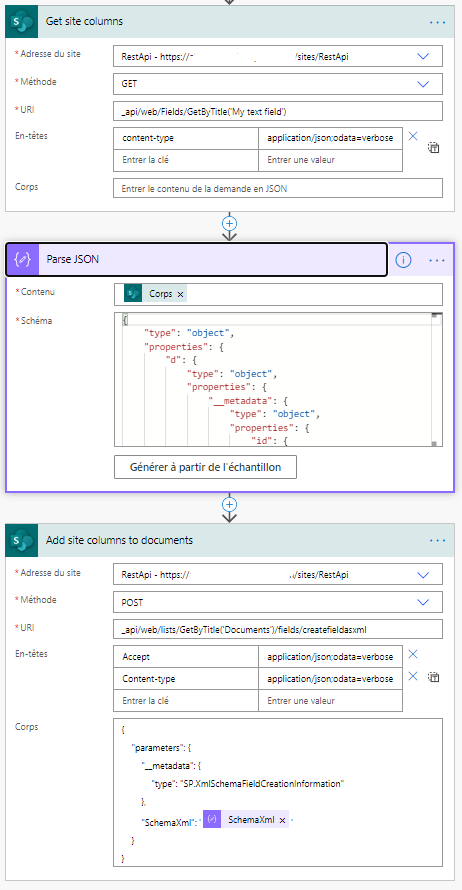
3.E. Add Site columns to SharePoint List
Basically, there is no difference on add a site columns or create a field into a library with rest API, we just need the schema xml we have created. You can get schema xml using getting site columns.
In this example I am to get a field named “My text field” and adding it to Documents library.
Need a copy/paste regarding adding field to List or Library?
| Entry | Value |
|---|---|
| URI | _api/web/lists/GetByTitle(‘[MY LIBRARY OR LIST TITLE]’)/fields/createfieldasxml |
| accept | application/json;odata=verbose |
| content-type | application/json;odata=verbose |
| Header JSON | { “accept”: “application/json;odata=verbose”, “content-type”: “application/json;odata=verbose” } |
| Body | { “parameters”: { “__metadata”: { “type”: “SP.XmlSchemaFieldCreationInformation” }, “SchemaXml”: ‘@{body(‘Parse_JSON’)?[‘d’]?[‘SchemaXml’]}’ } } |
4. SharePoint List
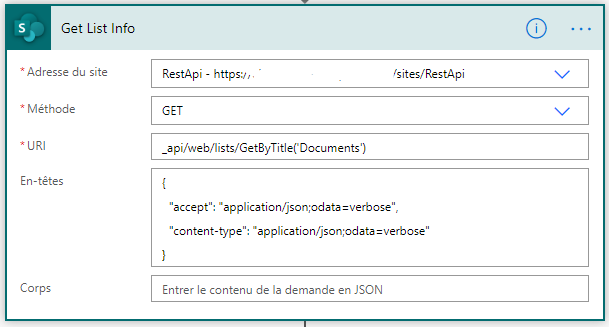
4.A. Get SharePoint List or Library info
Getting a List or a Library is quite easy, you just need its display name:
Need a copy/paste ?
| Entry | Value |
|---|---|
| URI | _api/web/lists/GetByTitle(‘[MY LIST OR LIBRARY TITLE]’) |
| accept | application/json;odata=verbose |
| content-type | application/json;odata=verbose |
| Header JSON | { “accept”: “application/json;odata=verbose”, “content-type”: “application/json;odata=verbose” } |
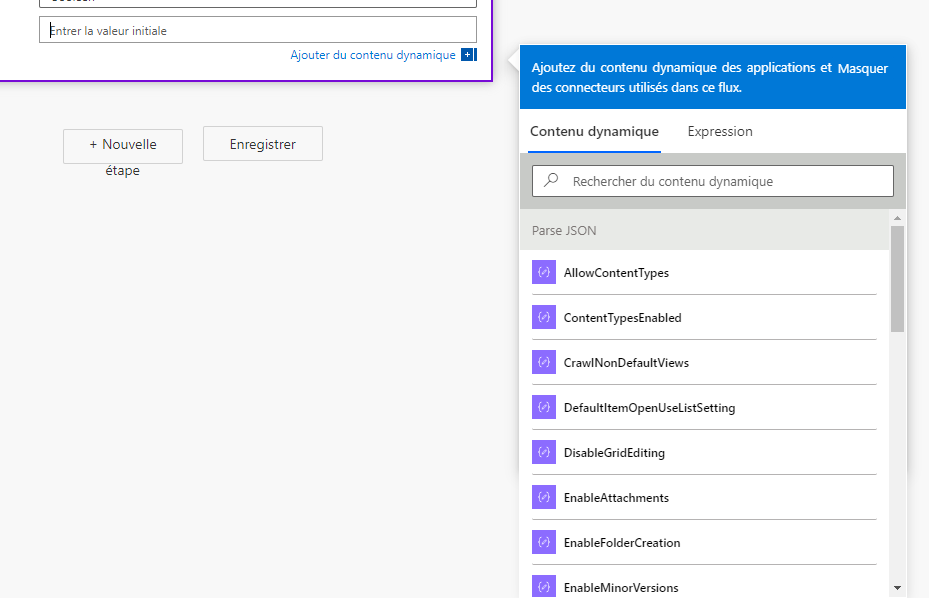
Of course it is pretty hard to use it as it is. For that run one time you flow, copy the result and use this result in a parse json step.

It will easier to use the List or Library info.
4.B. Check if list or library exist
The request remains the same as getting the list. But the output is going to change, including the JSON. In the following example I will start from the previous example of getting list info and try to search a List or Library which doesn’t exist. The idea is to have a look if the error returned is 404, which is not found error.
4.C. Create SharePoint List or Library
To create a list, you are going to put the name of the list you want to create, a description and a BaseTemplate.
BaseTemplate is a number which describe the template of your list (example, 100 for a generic list, 101 for a library, 201 for an calendar…).
You can find all these numbers in the following Microsoft page: https://docs.microsoft.com/en-us/dotnet/api/microsoft.sharepoint.splisttemplatetype?view=sharepoint-server
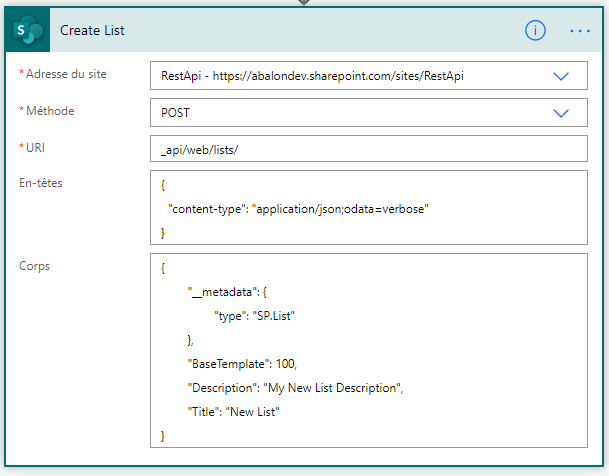
Need to Copy/Paste ?
| Entry | Value |
|---|---|
| URI | _api/web/lists |
| content-type | application/json;odata=verbose |
| Header JSON | { “content-type”: “application/json;odata=verbose” } |
| Body | { “__metadata”: { “type”: “SP.List” }, “BaseTemplate”: [BASE TEMPLATE NUMBER], “Description”: “[LIST DESCRIPTION]”, “Title”: “[LIST TITLE]” } |
4.D. Update SharePoint List or Library
In this example I will update the Title of my List from “New List” to “Edit Title of New List”. Of course you can also change the Description of your list. If you don’t want to Update the title or the document, just remove the line in body (be careful of coma).
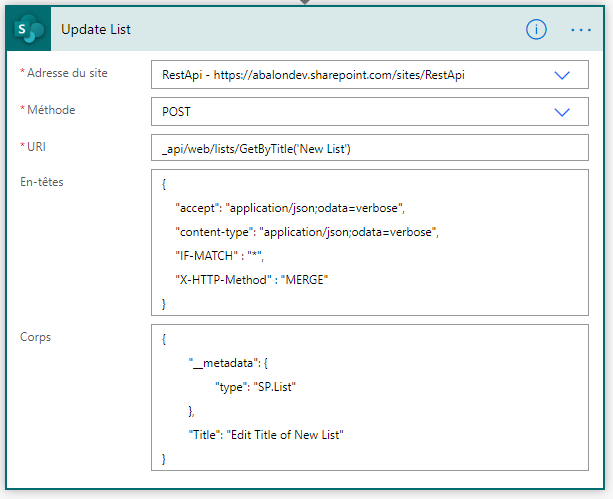
Need a copy/paste ?
| Entry | Value |
|---|---|
| URI | _api/web/lists/GetByTitle(‘[MY LIST OR LIBRARY TITLE]’) |
| accept | application/json;odata=verbose |
| content-type | application/json;odata=verbose |
| IF-MATCH | * |
| X-HTTP-Method | MERGE |
| Header JSON | { “accept”: “application/json;odata=verbose”, “content-type”: “application/json;odata=verbose”, “IF-MATCH” : “*”, “X-HTTP-Method” : “MERGE” } |
| Body to update Title only | { “__metadata”: { “type”: “SP.List” }, “Title”: “[MY LIST TITLE TO UPDATE]” } |
| Body to update Description only | { “__metadata”: { “type”: “SP.List” }, “Description”: “[MY DESCRIPTION TO UPDATE]” } |
| Body to update Title and Description | { “__metadata”: { “type”: “SP.List” }, “Title”: “[MY LIST TITLE TO UPDATE]”, “Description”: “[MY DESCRIPTION TO UPDATE]” } |
4.E. Delete SharePoint List or Library
In this example I am going to delete a list named “List to Delete”.
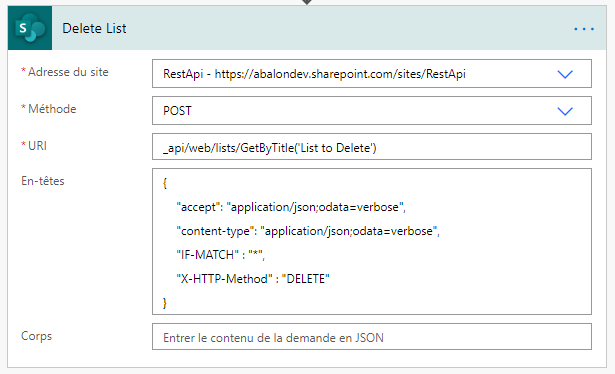
Need a copy/paste ?
| Entry | Value |
|---|---|
| URI | _api/web/lists/GetByTitle(‘[MY LIST OR LIBRARY TITLE TO DELETE]’) |
| accept | application/json;odata=verbose |
| content-type | application/json;odata=verbose |
| IF-MATCH | * |
| X-HTTP-Method | DELETE |
| Header JSON | { “accept”: “application/json;odata=verbose”, “content-type”: “application/json;odata=verbose”, “IF-MATCH” : “*”, “X-HTTP-Method” : “DELETE” } |
5. SharePoint List fields
This is quite similar as working with Site columns.
5.A. Get field into SharePoint List
In this example, I am going to get information from the List field named “My text field” into Documents Library:
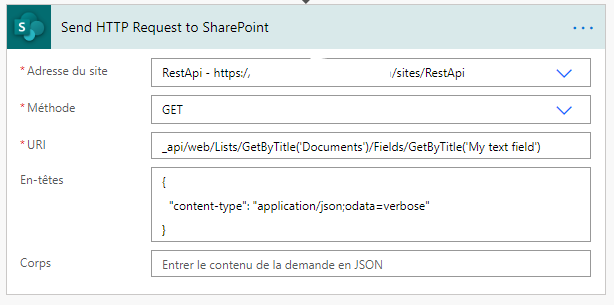
Need a copy/paste ?
| Entry | Value |
|---|---|
| URI | _api/web/lists/GetByTitle(‘[MY LIST OR LIBRARY TITLE]’)/GetByTitle(‘[MY FIELD TITLE]’) |
| content-type | application/json;odata=verbose |
| Header JSON | { “content-type”: “application/json;odata=verbose” } |
To parse the result as JSON and play around with the field value returned, have a look to Get Site column info. The way to parse JSON is exactly the same.
5.B. Create field into SharePoint List
In this example, I am going to use a schema XML to create a Multiline field named “Document Comments” into the Documents library.
You can find a lot of schema xml example into the Create Site columns. Schema XML works the same way no matter if it is a Site or a List field.
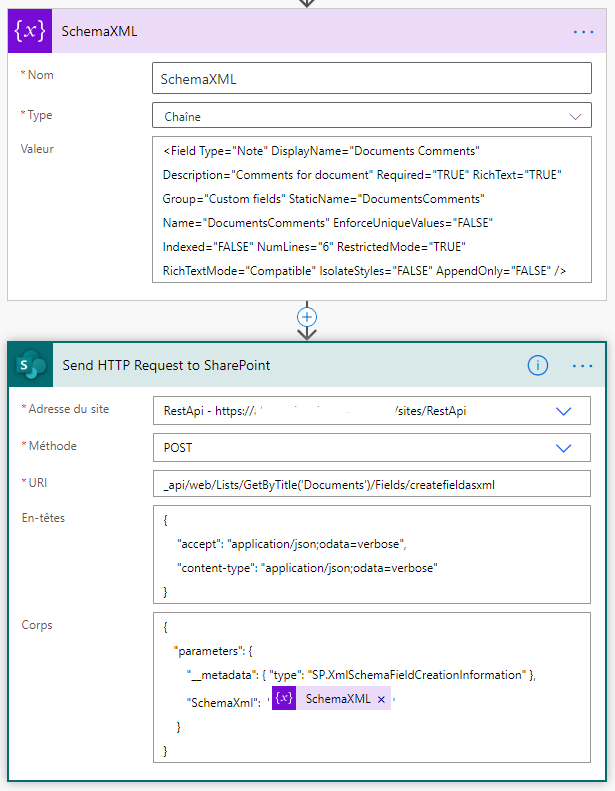
Need a copy/paste ?
| Entry | Value |
|---|---|
| URI | _api/web/lists/GetByTitle(‘[MY LIST OR LIBRARY TITLE]’)/GetByTitle(‘[MY FIELD TITLE]’) |
| accept | application/json;odata=verbose |
| content-type | application/json;odata=verbose |
| Header JSON | { “accept”: “application/json;odata=verbose”, “content-type”: “application/json;odata=verbose” } |
| Body | { “parameters”: { “__metadata”: { “type”: “SP.XmlSchemaFieldCreationInformation” }, “SchemaXml”: ‘@{variables(‘SchemaXML’)}’ } } |
5.C. Update field into SharePoint List
In this example, I am going to update a multiline field named “Documents Comments” in the Documents Libray. I am going to change its title, its Description and if turn the field into not required.
Also as you can see, I have added a type into metadata, if you are updating other field, change the value with one of these:
https://docs.microsoft.com/en-us/previous-versions/office/sharepoint-visio/jj246597(v%3Doffice.15)
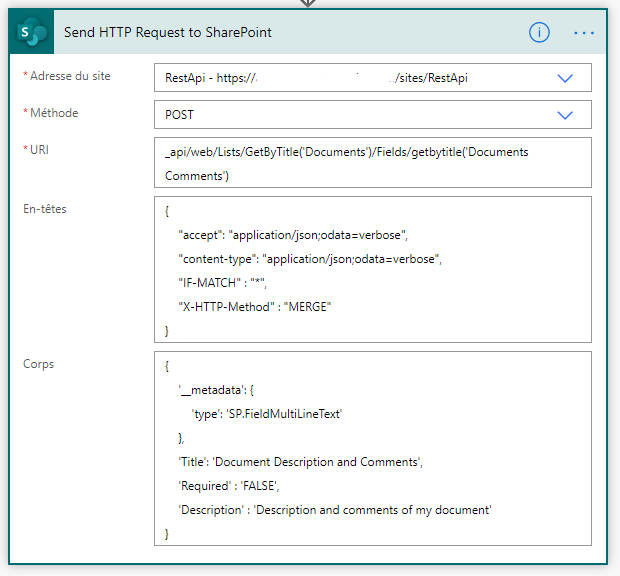
Need a copy/paste ?
| Entry | Value |
|---|---|
| URI | _api/web/lists/GetByTitle(‘[MY LIST OR LIBRARY TITLE]’)/Fields/getbytitle(‘[MY FIELD DISPLAY NAME TO CHANGE]’) |
| accept | application/json;odata=verbose |
| content-type | application/json;odata=verbose |
| IF-MATCH | * |
| X-HTTP-Method | MERGE |
| Header JSON | { “accept”: “application/json;odata=verbose”, “content-type”: “application/json;odata=verbose”, “IF-MATCH” : “*”, “X-HTTP-Method” : “MERGE” } |
| Body | { ‘__metadata’: { ‘type’: ‘SP.FieldMultiLineText’ }, ‘Title’: ‘New Display Name’, ‘Required’ : ‘FALSE’, ‘Description’ : ‘New description’ } |
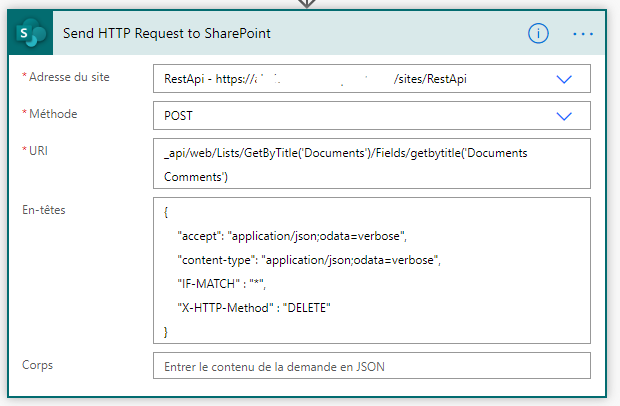
5.D. Remove field into SharePoint List
In this example, I am going to remove the field “Documents Comments” from the Documents Library.
| Entry | Value |
|---|---|
| URI | _api/web/lists/GetByTitle(‘[MY LIST OR LIBRARY TITLE]’)/Fields/getbytitle(‘[MY FIELD DISPLAY NAME TO DELETE]’) |
| accept | application/json;odata=verbose |
| content-type | application/json;odata=verbose |
| IF-MATCH | * |
| X-HTTP-Method | DELETE |
| Header JSON | { “accept”: “application/json;odata=verbose”, “content-type”: “application/json;odata=verbose”, “IF-MATCH” : “*”, “X-HTTP-Method” : “DELETE” } |
6. SharePoint List Views
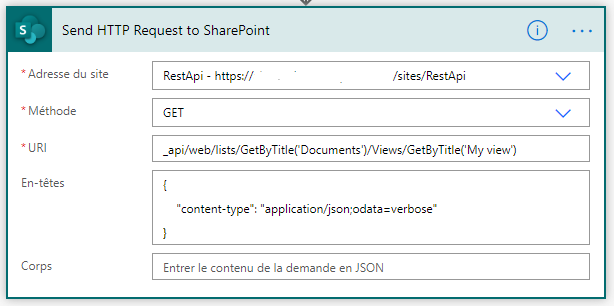
6.A. Get List View
In this example, I am going to get a view called “My view” into the Documents Library, of course it works the same with lists.
Need a copy/paste?
| Entry | Value |
|---|---|
| URI | _api/web/lists/GetByTitle(‘[MY LIST OR LIBRARY TITLE]’)/Views/GetByTitle(‘[MY VIEW TITLE]’) |
| content-type | application/json;odata=verbose |
| Header JSON | { “content-type”: “application/json;odata=verbose” } |
Now the idea is to check if the view exist or not and to use the result of the view returned.
To check if it exists or not, you just need to play with the run after as following:
Here I am going to add two scope steps in parallel, one if the view exist and one if it doesn’t exist. I am going to try with a view named “My view” which exist and a view named “My viewwww” which doesn’t exist. By advance, sorry as it is in French, I have renamed the steps in English.

And to use the result returned, just start once your flow, get the output of send http request to sharepoint and use it to generate a schema into the parse JSON step.
6.B. Create List View
In this example I am going to create a view named ‘View added with flow’ into my Documents Library ordred by last created first, and it will be not the default view and not a personal view.
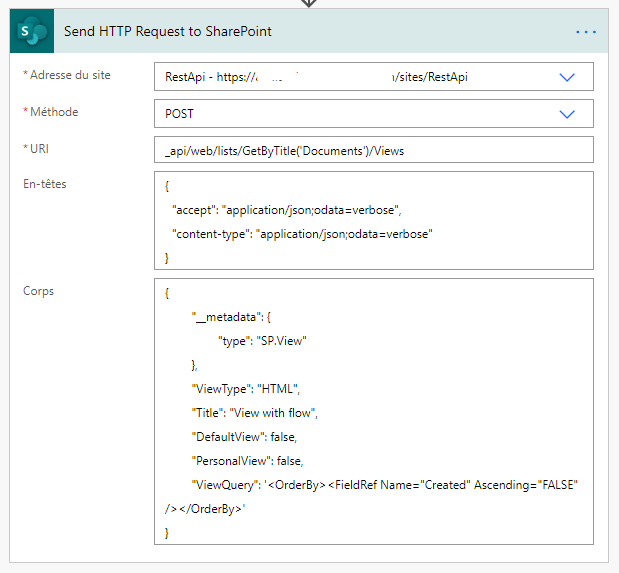
Need a copy/paste?
| Entry | Value |
|---|---|
| URI | _api/web/lists/GetByTitle(‘[MY LIST OR LIBRARY TITLE]’)/Views |
| content-type | application/json;odata=verbose |
| accept | application/json;odata=verbose |
| Header JSON | { “accept”: “application/json;odata=verbose”, “content-type”: “application/json;odata=verbose” } |
| Body | { “__metadata”: { “type”: “SP.View” }, “ViewType”: “HTML”, “Title”: “[MY VIEW TITLE]”, “DefaultView”: false, “PersonalView”: false, “ViewQuery”: ‘[MY CAML QUERY]’ } |
Let’s have a quick look at the option here.
- ViewType: Represent the type of the view, the standard one is HTML, possible values are
- HTML
- GRID
- CALENDAR
- RECURRENCE
- CHART
- GANTT
- DefaultView: can be true or false, specifies whether the view is the default list view.
- PersonalView: can be true or false, specifies whether the list view is a personal view.
- ViewQuery: Represent the query use to filter or order the list view. It use CAML Query.
You can find all the properties here: https://docs.microsoft.com/en-us/previous-versions/office/developer/sharepoint-2010/ee547623%28v%3doffice.14%29.
If you want to go further with CAML Query: https://docs.microsoft.com/en-us/previous-versions/office/developer/sharepoint-2010/ms467521(v%3Doffice.14).
TIPS: If you are not familiar with CAML Query, I advise you to create the list you want, and in a flow build for testing to get the view, as the result of your request, you will be able to see the view query parameter. Copy it and reuse it to create the view in your dedicated flow.
6.C. Delete List View
In this example, I am going to delete the view named “View with flow” in the documents library.
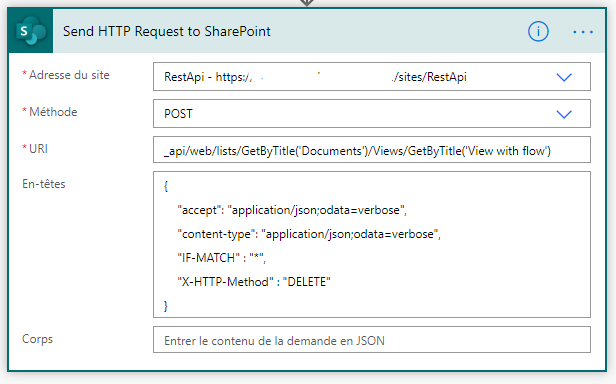
| Entry | Value |
|---|---|
| URI | _api/web/lists/GetByTitle(‘[MY LIST OR LIBRARY TITLE WHERE THE VIEW TO DELETE IS]’)/Views/GetByTitle(‘[MY VIEW TITLE]’) |
| accept | application/json;odata=verbose |
| content-type | application/json;odata=verbose |
| IF-MATCH | * |
| X-HTTP-Method | DELETE |
| Header JSON | { “accept”: “application/json;odata=verbose”, “content-type”: “application/json;odata=verbose”, “IF-MATCH” : “*”, “X-HTTP-Method” : “DELETE” } |
6.D. Add field to List View
In this example I am going to add the field which has for internal name “My_x0020_text_x0020_field” into the view named “Test” in Documents library.
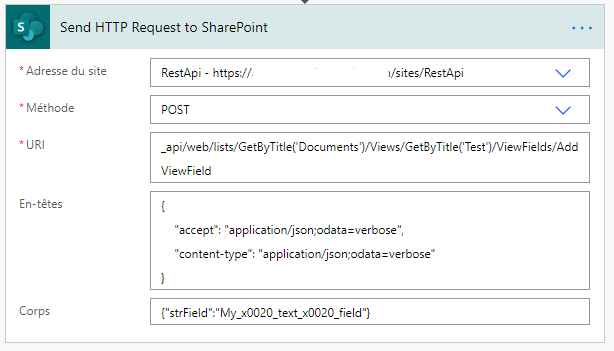
Need a copy/paste?
| Entry | Value |
|---|---|
| URI | _api/web/lists/GetByTitle(‘[MY LIST OR LIBRARY TITLE]’)/Views/GetByTitle(‘[MY VIEW TITLE]’)/AddViewField |
| content-type | application/json;odata=verbose |
| accept | application/json;odata=verbose |
| Header JSON | { “accept”: “application/json;odata=verbose”, “content-type”: “application/json;odata=verbose” } |
| Body | {“strField”:”[MY_FIELD_INTENRAL_NAME]”} |
In this case we are using internal name, it is actually the Name attribute in the schema XML while creating a field.
6.E. Remove field to List View
In this example, I am going to remove the field with Internal name “My_x0020_text_x0020_field” in the view named “Test” in the Documents Library.
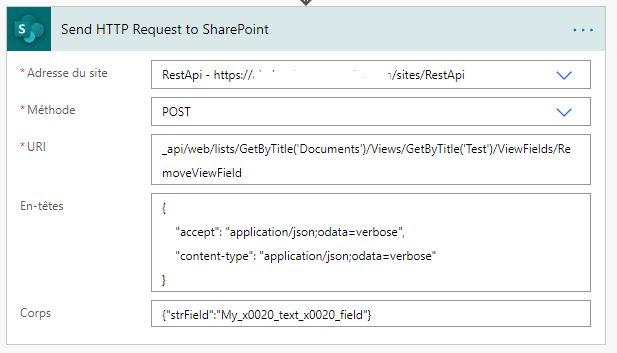
Need a copy/paste?
| Entry | Value |
|---|---|
| URI | _api/web/lists/GetByTitle(‘[MY LIST OR LIBRARY TITLE]’)/Views/GetByTitle(‘[MY VIEW TITLE]’)/RemoveViewField |
| content-type | application/json;odata=verbose |
| accept | application/json;odata=verbose |
| Header JSON | { “accept”: “application/json;odata=verbose”, “content-type”: “application/json;odata=verbose” } |
| Body | {“strField”:”[MY_FIELD_INTENRAL_NAME]”} |
In this case we are using internal name, it is actually the Name attribute in the schema XML while creating a field.
You might want to remove all field at once, in this example, I am going to remove all fields from view named “Test” in Documents library.
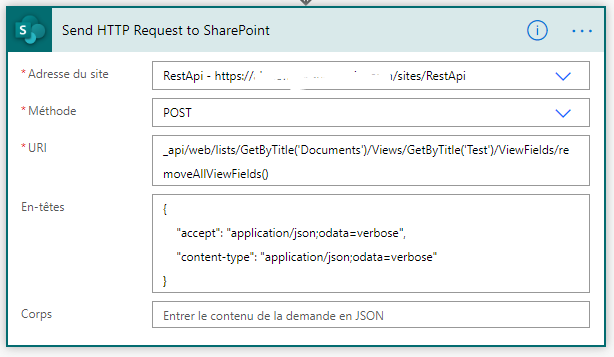
Need a copy/paste?
| Entry | Value |
|---|---|
| URI | _api/web/lists/GetByTitle(‘[MY LIST OR LIBRARY TITLE]’)/Views/GetByTitle(‘[MY VIEW TITLE]’)/removeAllViewFields() |
| content-type | application/json;odata=verbose |
| accept | application/json;odata=verbose |
| Header JSON | { “accept”: “application/json;odata=verbose”, “content-type”: “application/json;odata=verbose” } |
7. Content types
7.A. Warning about Content Types with REST API
This warning comes from the Microsoft Documentation with the Content Types and the rest API:
https://docs.microsoft.com/en-us/previous-versions/office/sharepoint-visio/jj245869(v%3Doffice.15)
- Site Columns cannot be added to a content type using the REST service.
So we will be able to create content types, to create site column, but we won’t be able to add column to content type.
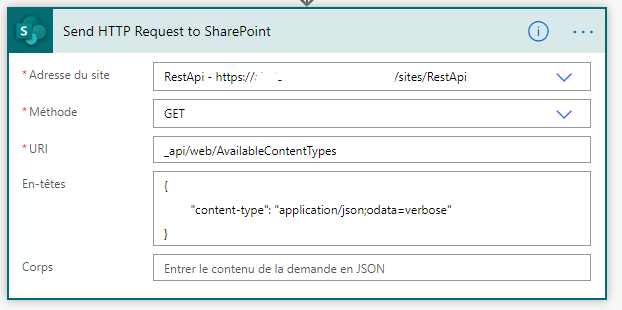
7.B. Get Site Content Type info
To get all the site content-types in your SharePoint site, you can do as following:
And then you can parse the result and do for each content types:
But I never use it this way and I don’t recommend you to do it like this because it is quite heavy to play with all the content types in a SharePoint site, but it was to show you the idea.
Instead of getting all the content types, we are going to filter with the one we want. Below, I will give multiple example for filtering Content Types.
So in the following example I am going to get the Content type with the name “Message”:
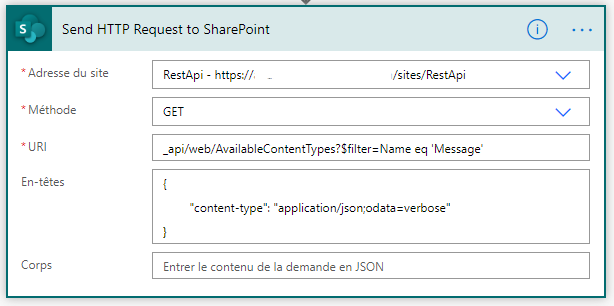
Example of API:
| Description | API |
|---|---|
| Get one content type with Name | _api/web/AvailableContentTypes?$filter=Name eq ‘[NAME OF YOUR CONTENT TYPE]’ |
| Get multiple content type with Name | _api/web/AvailableContentTypes?$filter=Name eq ‘[NAME OF YOUR CONTENT TYPE 1]’ or Name eq ‘[NAME OF YOUR CONTENT TYPE 2]’ |
| Get one content type with Id | _api/web/AvailableContentTypes?$filter=StringId eq ‘[YOUR CONTENT TYPE ID LIKE 0x01000000000000000]’ |
| Get multiple content type with Id | _api/web/AvailableContentTypes?$filter=StringId eq ‘[YOUR CONTENT TYPE ID 1 LIKE 0x01000000000000000]’ or StringId eq ‘[YOUR CONTENT TYPE ID 2 LIKE 0x01000000000000000]’ |
| Get multiple content type with mix Name and Id | _api/web/AvailableContentTypes?$filter=Name eq ‘[NAME OF YOUR CONTENT TYPE]’ or StringId eq ‘[YOU CONTENT TYPE ID LIKE 0x01000000000000000]’ |
Need a copy/paste for the header?
| Entry | Value |
|---|---|
| content-type | application/json;odata=verbose |
| Header JSON | { “content-type”: “application/json;odata=verbose” } |
Now the idea is to check if it exists or not, for that you need to parse the result as JSON and check how many entry you have in results array. If zero, well your content-type(s) doesn’t exist.
Parse the result as JSON:
Then check if the array length of results is not equal to 0.
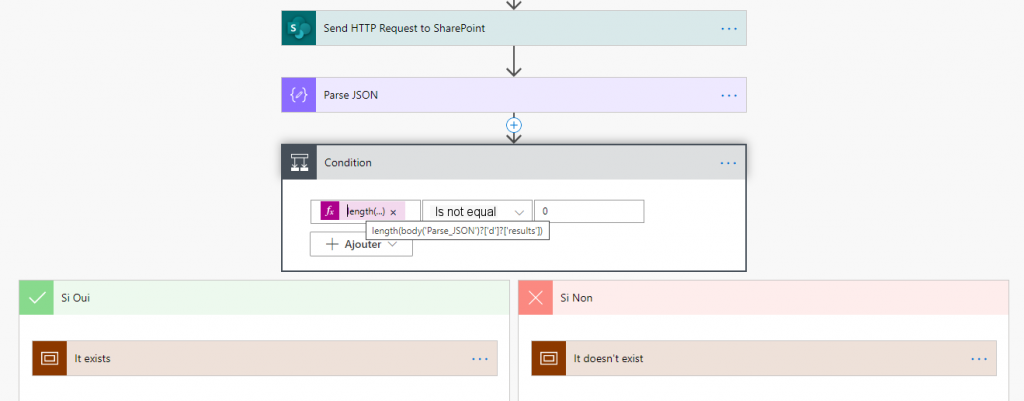
Need a copy/paste?
| Entry | Value |
|---|---|
| Condition | length(body(‘Parse_JSON’)?[‘d’]?[‘results’]) |
7.C. Get List Content Types info
In this example, I am going to get the Content types from my list named “My List”.
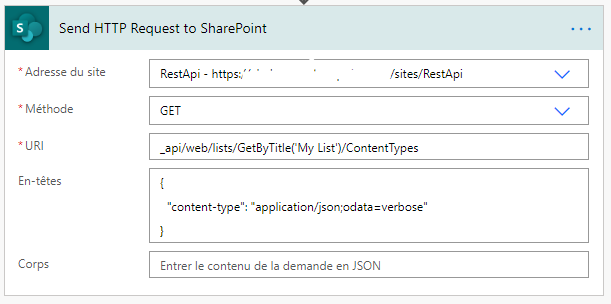
Need a copy/paste?
| Entry | Value |
|---|---|
| URI | _api/web/lists/GetByTitle(‘[MY LIST OR LIBRARY TITLE]’)/ContentTypes |
| content-type | application/json;odata=verbose |
| Header JSON | { “content-type”: “application/json;odata=verbose” } |
You can parse the results as JSON and do a for each on all the results. To do so, run the Send HTTP Request once, copy the output, it will be use to generate the schema of the parse JSON step:
7.D. Get Content Types ID (useful for the next calls)
To get the ID of a content type, you need to go to the Site Settings page, click on Site Content Types, then click on the content type you want to get the ID. The ID is going to be in the URL at ctype=ID:
7.E. Create Content Types
In the following example, I am going to create a Content type named “My new contenttype” in the group named “Custom group” which will be a child of the content type which has for ID 0x01 (Content type Item).
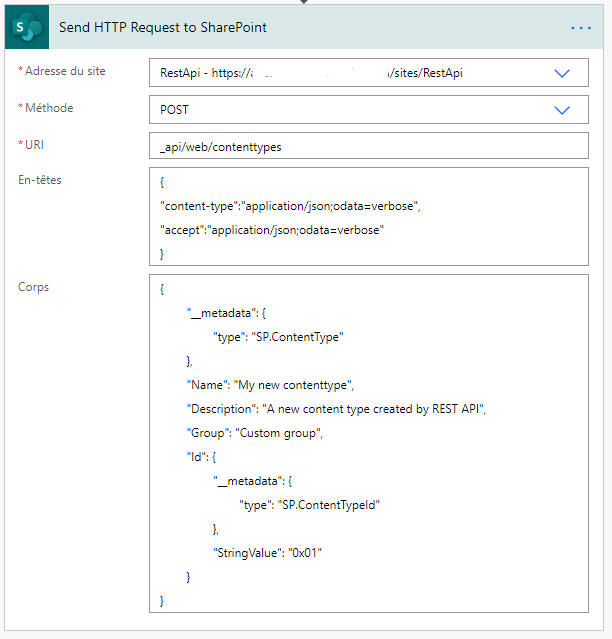
For this one you are going to need the Content type ID.
Need a copy/paste?
| Entry | Value |
|---|---|
| URI | _api/web/contenttypes |
| content-type | application/json;odata=verbose |
| accept | application/json;odata=verbose |
| Header JSON | { “content-type”:”application/json;odata=verbose”, “accept”:”application/json;odata=verbose” } |
| Body | { “__metadata”: { “type”: “SP.ContentType” }, “Name”: “[NAME OF MY NEW CONTENT TYPE]”, “Description”: “[DESCRIPTION OF MY NEW CONTENT TYPE]”, “Group”: “[GROUP OF MY NEW CONTENT TYPE]”, “Id”: { “__metadata”: { “type”: “SP.ContentTypeId” }, “StringValue”: “[ID OF THE CONTENT TYPE PARENT]” } } |
7.F. Add Content Types to List
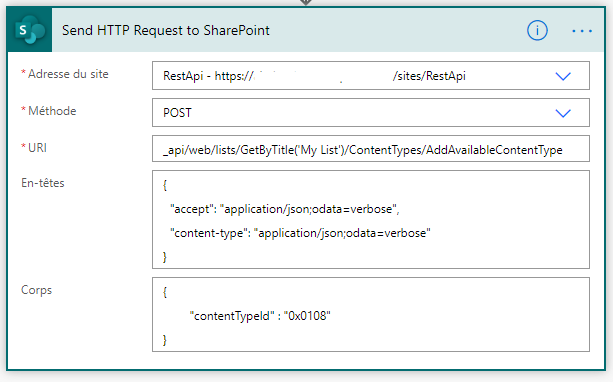
In the following example, I am going to add the content type with ID “0x0108” to list named “My List”.
For this one you need to know how to get Content type ID.
Need a copy/paste?
| Entry | Value |
|---|---|
| URI | _api/web/lists/GetByTitle(‘[LIST OR LIBRARY TITLE WHERE TO ADD CONTENT TYPE]’)/ContentTypes/AddAvailableContentType |
| content-type | application/json;odata=verbose |
| accept | application/json;odata=verbose |
| Header JSON | { “content-type”:”application/json;odata=verbose”, “accept”:”application/json;odata=verbose” } |
| Body | { “contentTypeId” : “[ID OF THE CONTENT TYPE TO ADD]” } |
7.G. Remove Content Types from List
For this one you need the content id in list, it is quite similar to the one describe in Content type ID, except you need to click on the content type in list setting.
In this example, I am going to remove from my list named “My List” the content type with ID 0x0108005BFD111CF646B54B834E99715139278E.
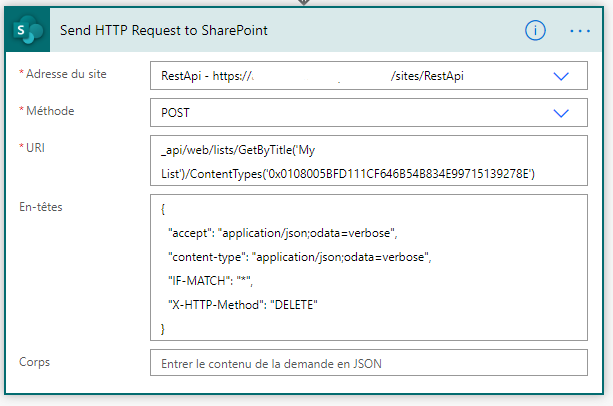
Need a copy/paste?
| Entry | Value |
|---|---|
| URI | _api/web/lists/GetByTitle(‘[TITLE OF LIST OR LIBRARY]’)/ContentTypes(‘[ID OF CONTENT TYPE TO REMOVE]’) |
| content-type | application/json;odata=verbose |
| accept | application/json;odata=verbose |
| IF-MATCH | * |
| X-HTTP-Method | DELETE |
| Header JSON | { “accept”: “application/json;odata=verbose”, “content-type”: “application/json;odata=verbose”, “IF-MATCH”: “*”, “X-HTTP-Method”: “DELETE” } |
8. Navigation – Quick launch
8.A. Get quick launch navigation
To get the quick launch navigation:
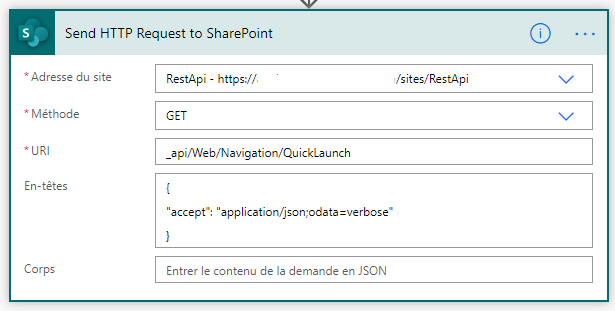
Need a copy/paste?
| Entry | Value |
|---|---|
| URI | _api/Web/Navigation/QuickLaunch |
| accept | application/json;odata=verbose |
| Header JSON | { “accept”: “application/json;odata=verbose” } |
And if you want to use the result, the best way is to run once, copy the output of the send http request to SharePoint and copy it into a parse json to generate the schema:

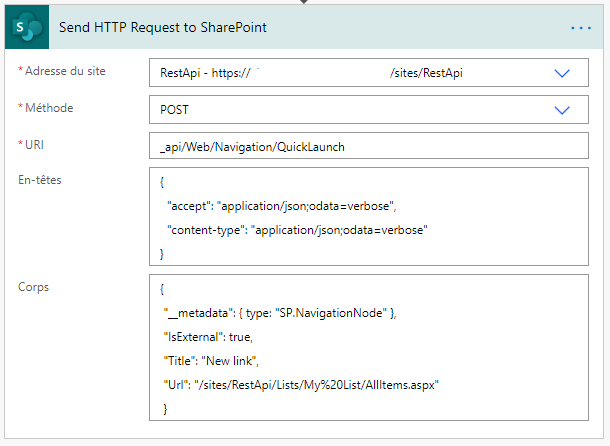
8.B. Create navigation link
In the following example, I am going to create a link in Quick launch named “New Link” with for URL, the relative path to my view All items from my List named “My List”.
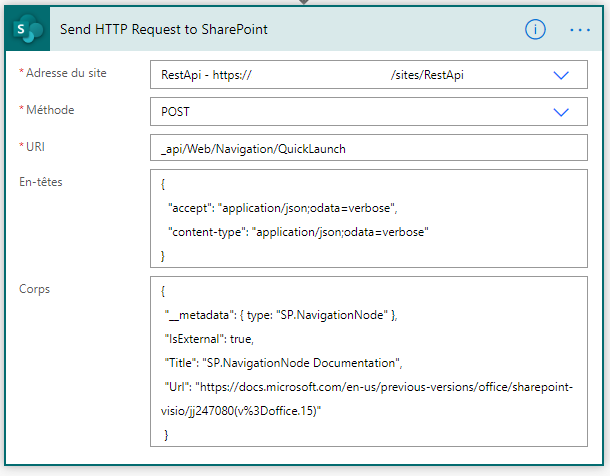
In the next example, I am going to create a link named “SP.NavigationNode Documentation” with a full url to Microsoft documentation:
Need a copy/paste?
| Entry | Value |
|---|---|
| URI | _api/Web/Navigation/QuickLaunch |
| content-type | application/json;odata=verbose |
| accept | application/json;odata=verbose |
| Header JSON | { “accept”: “application/json;odata=verbose”, “content-type”: “application/json;odata=verbose” } |
| Body | { “__metadata”: { type: “SP.NavigationNode” }, “IsExternal”: true, “Title”: “[NAME OF MY LINK IN NAVIGATION]”, “Url”: “[FULL OR RELATIVE PATH OF NAVIGATION]” } |
8.C. Create navigation under a parent node
This one is a bit more complicated, the idea is to get the parent node ID and use it to create a new link under this parent node ID.
In the following example I am going to get my link named “New link” and parse the result to get the ID from this link then create a link named “Children link”.
So first, get the link you want for parent:

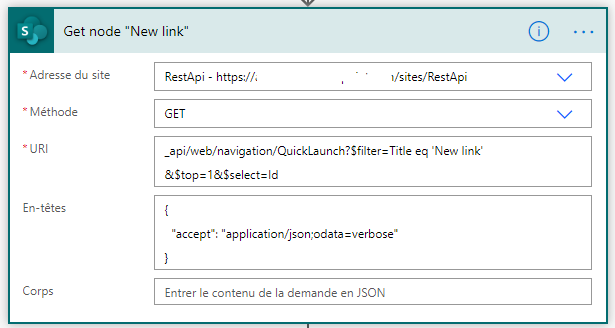
Need a copy/paste?
| Entry | Value |
|---|---|
| URI | _api/web/navigation/QuickLaunch?$filter=Title eq ‘[PARENT LINK TITLE]’ &$top=1&$select=Id |
| accept | application/json;odata=verbose |
| Header JSON | { “accept”: “application/json;odata=verbose” } |
Then we are going to parse the result as JSON, but as we are getting only the first link (in URL $top=1), let’s parse only the first result:
Need a copy and paste:
| Entry | Value |
|---|---|
| Expression | outputs(‘[NAME OF THE STEP TO GET PARENT NODE WITH UNDERSCORES INSTEAD OF SPACES]’)?[‘body’]?[‘d’]?[‘results’]?[0] |
| Expression Example | outputs(‘Get_node_”New_link”‘)?[‘body’]?[‘d’]?[‘results’]?[0] |
| Schema JSON | { “type”: “object”, “properties”: { “__metadata”: { “type”: “object”, “properties”: { “id”: { “type”: “string” }, “uri”: { “type”: “string” }, “type”: { “type”: “string” } } }, “Id”: { “type”: “integer” } } } |
Then use the parent ID to create the children link:
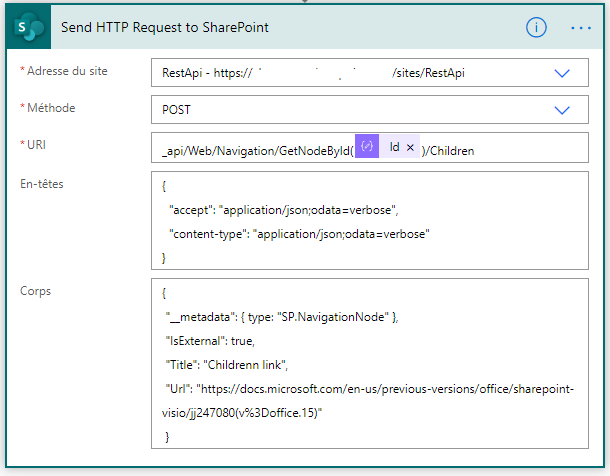
Need a copy/paste?
| Entry | Value |
|---|---|
| URI | _api/Web/Navigation/GetNodeById([PARENT NODE ID])/Children |
| accept | application/json;odata=verbose |
| content-type | application/json;odata=verbose |
| Header JSON | { “accept”: “application/json;odata=verbose”, “content-type”: “application/json;odata=verbose” } |
| Body | { “__metadata”: { type: “SP.NavigationNode” }, “IsExternal”: true, “Title”: “[MY LINK NAME]”, “Url”: “[RELATIVE OR FULL URL]” } |
8.D. Remove navigation link
As Create navigation under a parent node we are going to need a navigation node ID.
See the part above how to get it.
In this example, I am going to delete the navigation node with ID 2007:
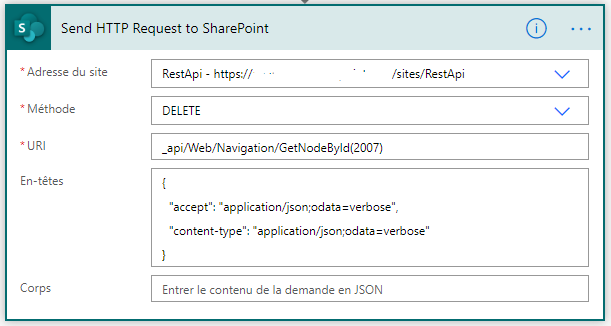
Need a copy/paste?
Note that the method is DELETE for this one
| Entry | Value |
|---|---|
| URI | _api/Web/Navigation/GetNodeById([PARENT NODE ID]) |
| accept | application/json;odata=verbose |
| content-type | application/json;odata=verbose |
| Header JSON | { “accept”: “application/json;odata=verbose”, “content-type”: “application/json;odata=verbose” } |