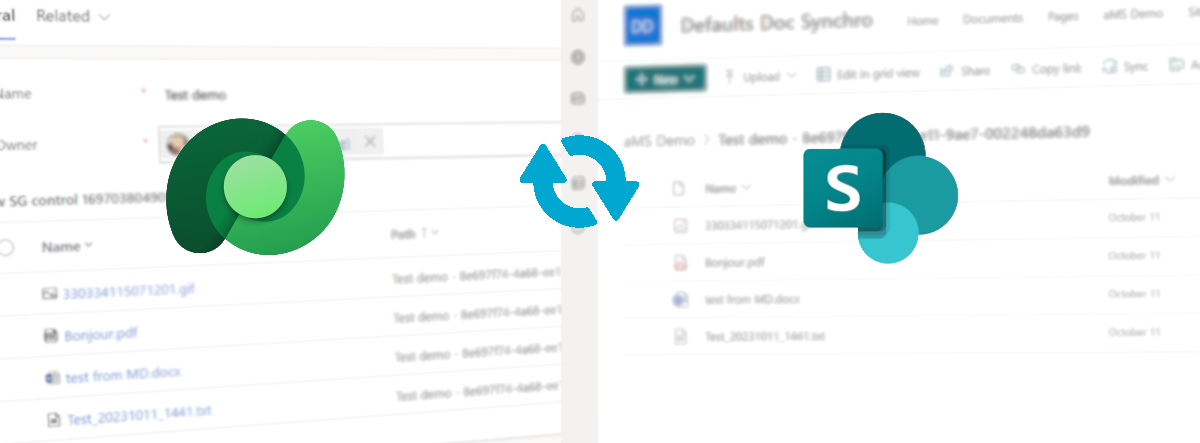
Won’t it be great to automatically syncrhonise documents in between Dataverse and SharePoint? Well it is possible. Let’s find out how.
- SharePoint Documents and Dataverse, Why?
- Understand what’s going on Dataverse Side
- Initialize the synchronization
- Switch the default location for shared environments
- Get documents from Canvas
- Upload documents from Canvas
- Download demo Un-managed solution
1. SharePoint Documents and Dataverse, Why?
These are the questions I often hear while talking about synchronisation in-between SharePoint and Dataverse :
- I have payed a Dataverse prenium Licence, why should I go back to SharePoint?
- Why should I use SharePoint? We have a file column in Dataverse, right?
So here are some advantage vs inconvenient of both solutions regarding files.
| Subject | SharePoint | Dataverse | Points goes for |
|---|---|---|---|
| File upload limitation | 250 GB | 32 MB | SharePoint |
| Storage Capacity | 1 TB plus 10 GB per license of eligible plan purchased | Also depends of the licences purchased but : The default environment has the following included storage capacity: 3GB Dataverse database capacity, 3GB Dataverse file capacity, and 1GB Dataverse log capacity. | SharePoint |
| Co-edition | Native | No | SharePoint |
| Permissions | Not Synchronized with Dataverse | Dataverse permissions | Dataverse |
| Synchronized items with files | Native | Need to create lookup and managing it | SharePoint |
Also, do not forget that SharePoint is used in other Microsoft Tools (such as Teams for example).
Let’s have a look at a real case scenarion, I have a company named which build multiple building. Depending on what you are building, and regarding to the French administration, you need to get building construction permits.
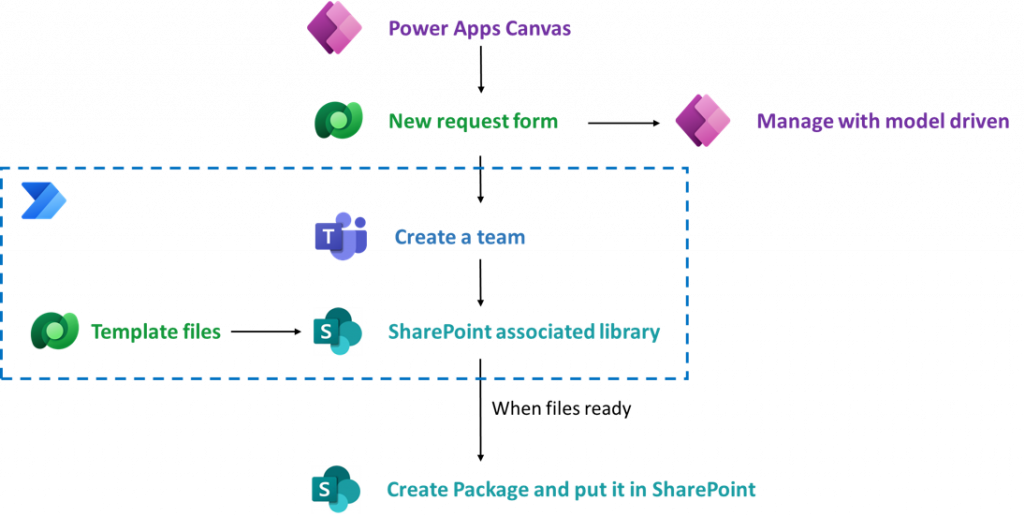
So I need a form, which will give me the right paper to fill for the french administration depending of my building project. Then we will define who are going to work on this project, create a team with all the people who are going to work on these papers, for at the end send these files to the french administration.
So the form is going to be a canvas, my database are going to be dataverse. Administrators of the app are going to manage everything through a model driven. On a new request we are going to run a flow, which is going to create the Teams and copy my template file (from a dataverse table) into my new created Teams.
In my model driven, the teams library will be associated with my Dataverse item, like this administrator will also have access from the model driven to the documents.
2. Understand what’s going on Dataverse Side
Native dataverse tables are going to be used:
| Display Name | Schema Name | Description |
|---|---|---|
| SharePoint Site | sharepointsite | Contains all synchronised SharePoint sites |
| Document Location | sharepointdocumentlocation | Contains an item per Folder/Library related to our Dataverse item where documents are going to be store |
| SharePoint Document | sharepointdocument | Contains all synchronised documents |
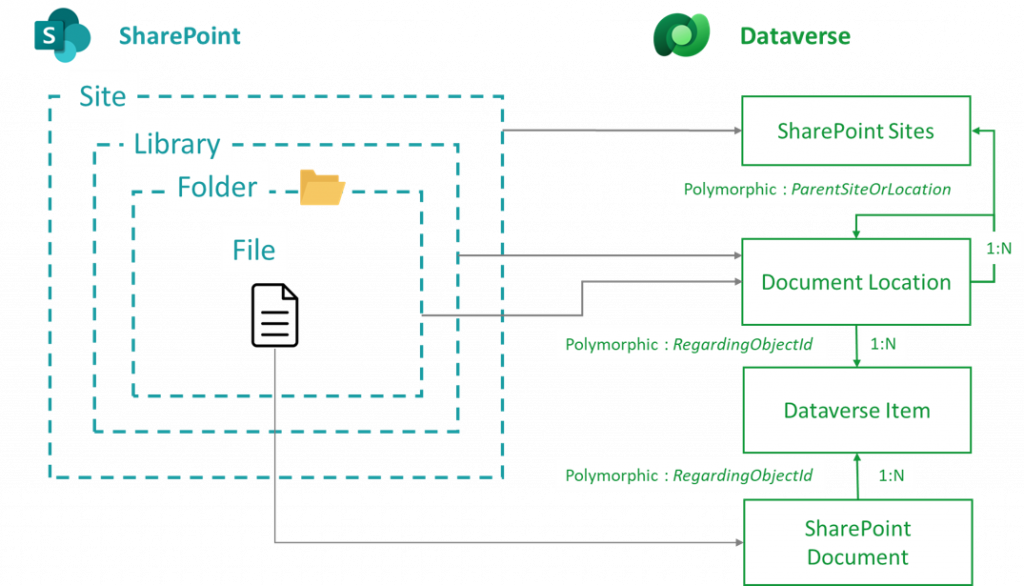
My synchronized SharePoint is going to have a reference/related Dataverse item into my SharePoint Sites Dataverse Table.
Then the SharePoint document library, where are the documents, is going to have a reference/related Dataverse item into the Document Location Dataverse Table. This Document Location is going to be linked to my item from the Sharepoint Sites table through a polymorphic lookup column named ParentSiteOrLocation.
Each folder in this SharePoint document library are going to have a reference/related Dataverse item into the Document Location Dataverse Table. Folders are going to be linked to the document library item in document location through a polymorphic lookup column named ParentSiteOrLocation.
In the Document Location Dataverse table, there is a polymorphic lookup column named RegardingObjectId. It is going to contains the lookup to the Dataverse item I want to synchronize with. So all the documents regarding my Dataverse item are going to be uploaded and managed inside the related SharePoint Library/Folder of my document location Dataverse item.
The Document itself is going to have a reference/related Dataverse item into the SharePoint Document Dataverse Table. It is going to be linked to the Dataverse synchronized item through a polymorphic lookup column named RegardingObjectId
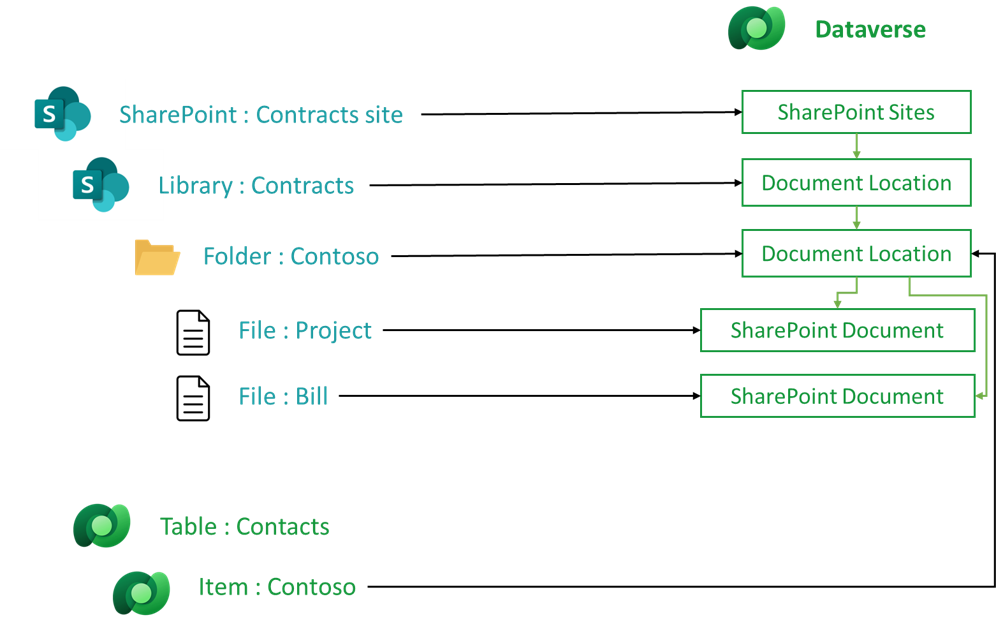
Let’s take the following scenario. I want to manage the contracts in a Dataverse application. Contrats (documents) are going to be stored into SharePoint.
So I have a Dataverse Table named Contracts, and let’s say I have an item with the contract I make for a company named Contoso. On SharePoint side, I have a site for my contracts, I am going to create a Document Library, and in this Library I am going to have a Folder per company. The Contoso Dataverse item is going to be linked to the folder Contotso into SharePoint.
3. Initialize the synchronization
3.1. Enable document management settings
It all start with this video from Darren Lutchner : PowerApps Embedding SharePoint Document Library.
With this Synchronization, you are going to set all the defaults parameters:
- A default Sharepoint site
- A default Document Location
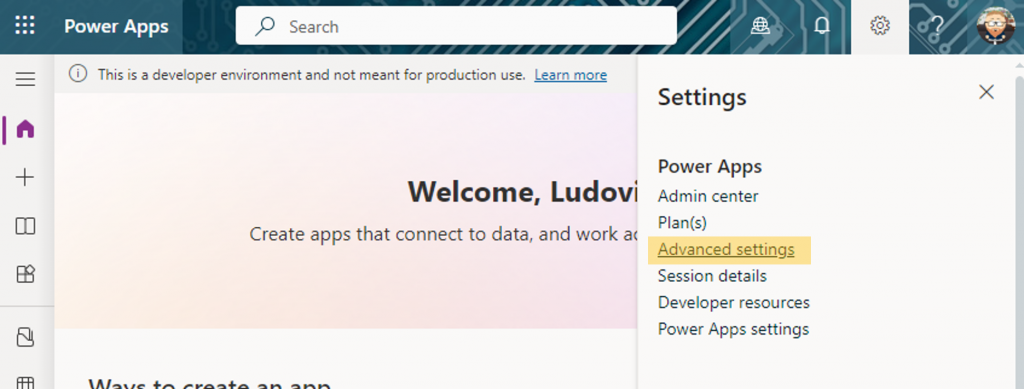
Go to Power Apps > Click on the Gear Wheel > Click on Advanced Setting.
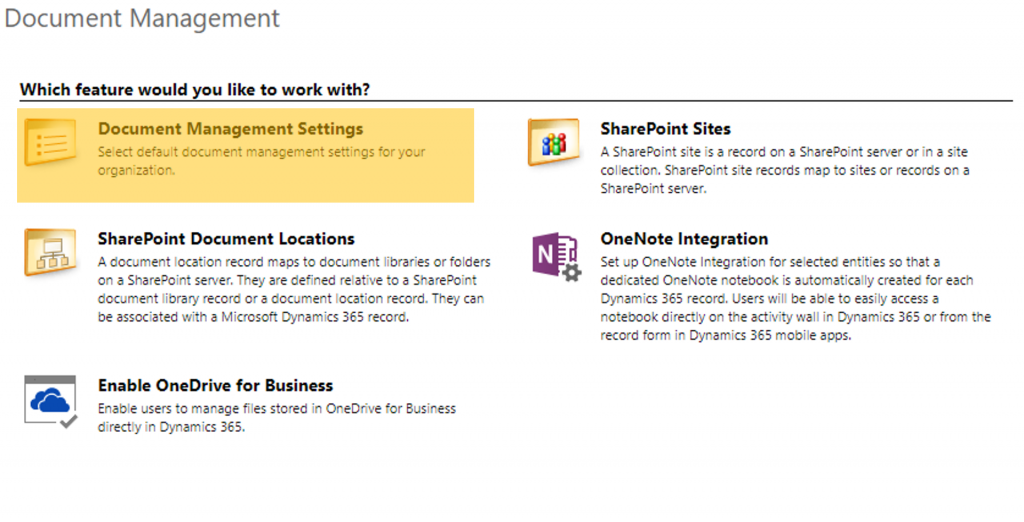
Then click on Settings > Document Management
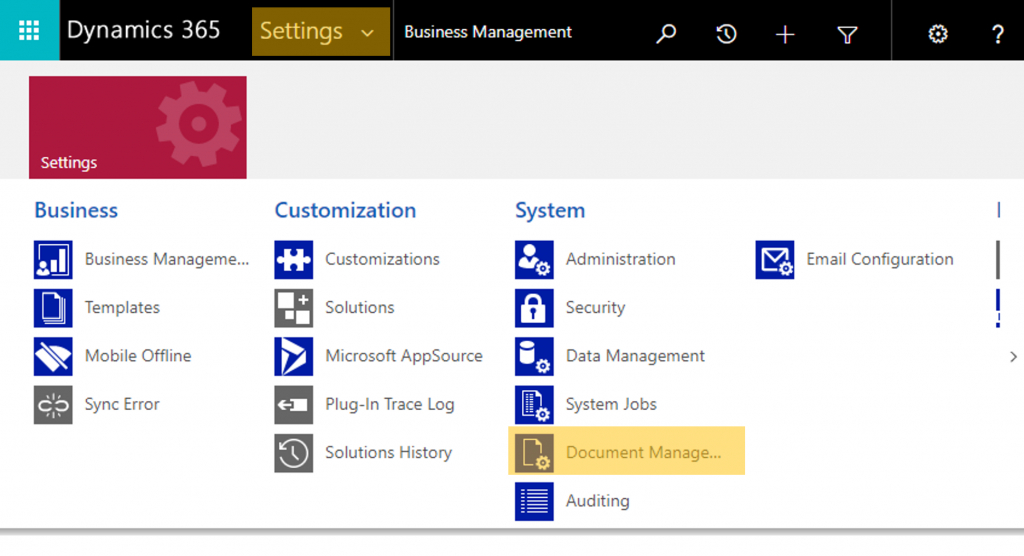
Click on Enable Server-based SharePoint Integration (This menu is going to disappear once the process accomplished).

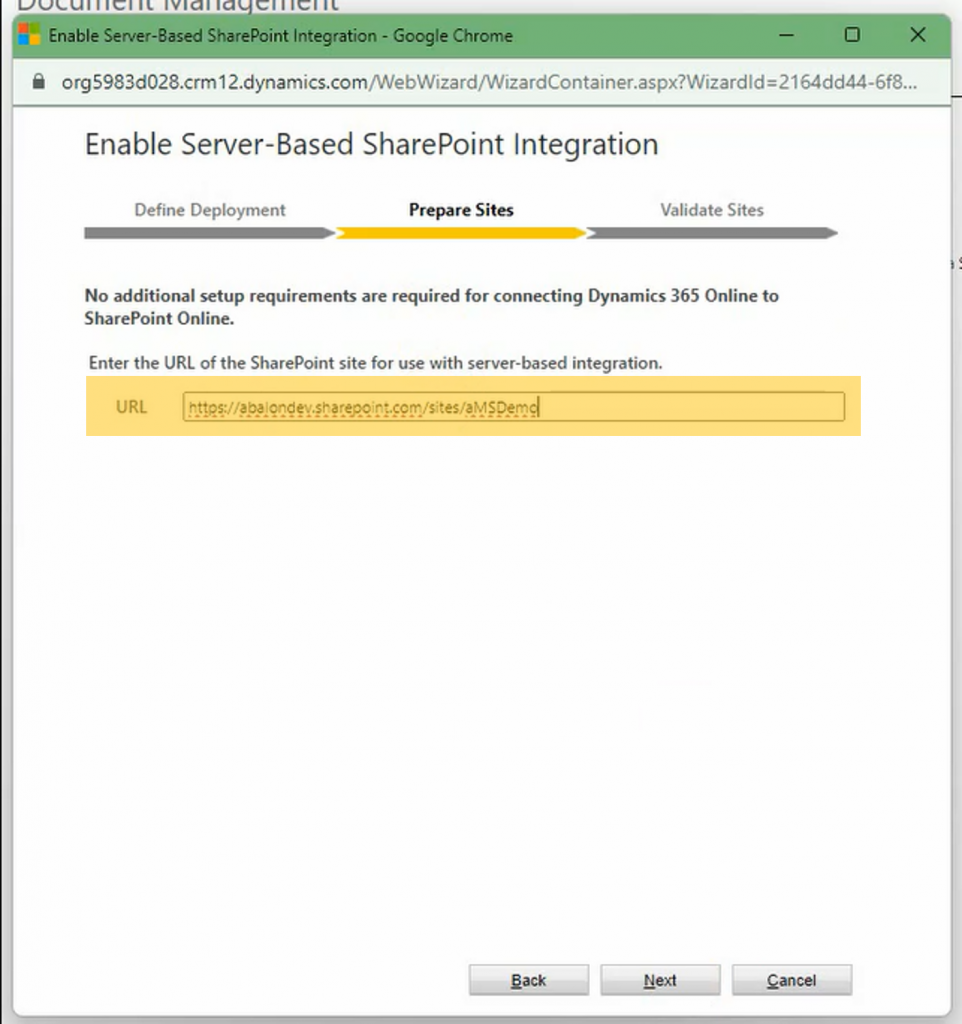
A new window is going to be prompted. Click on Next until you arrive at the Prepare Sites part. Here enter the Default SharePoint url where your document is going to be stored.
By default all the documents are going to be in this site. We are going to see how to switch to another site later.
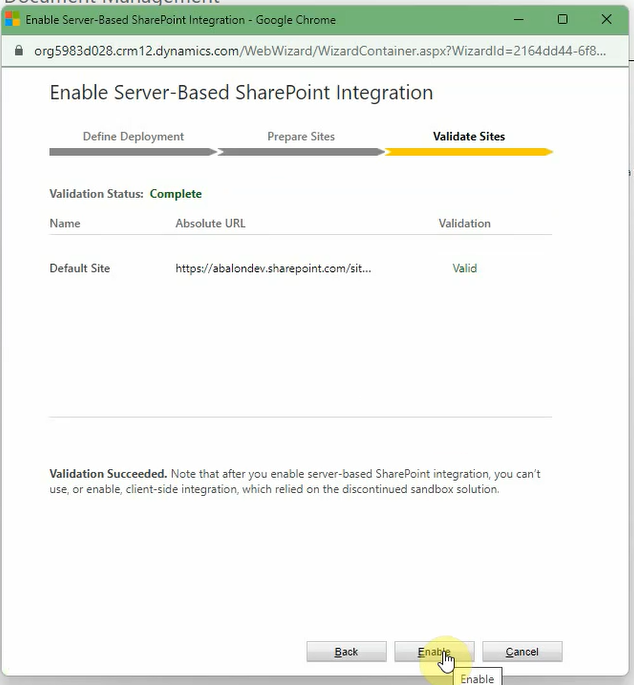
And then, click on Enable.
So now you have to be patient. You are going to have the feeling that nothing is happening, but it is not the case. After few times, the menu Enable Server-Based SharePoint Integration is going to dissapear and be replaced by OneNote Integration.
Once it is ok, click on Document Management Settings.
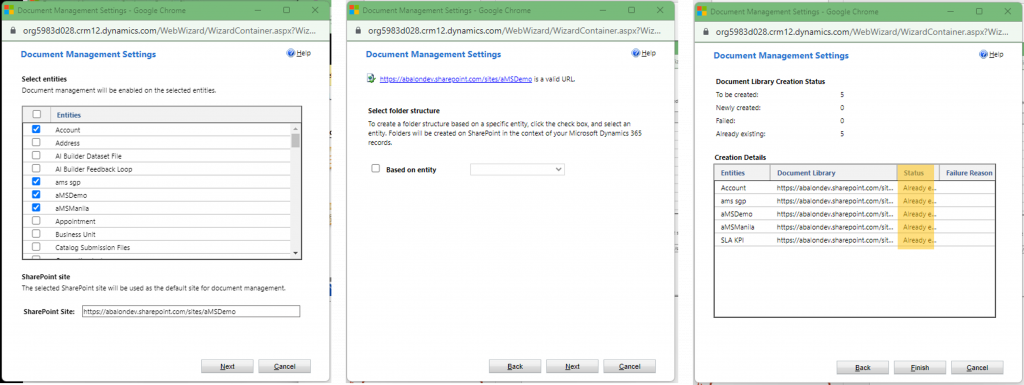
Select the Dataverse Table you want to synchronize document with and click on Next.
The next window, just click on Next, it is related to Dynamics, it doesn’t concern us at this point.
And it is going to finish with the status of the synchronization, make sure nothing is failed. If it is the case, make sure the whole previous process has been done correctly and try again.
3.2. Display documents in Model Driven forms
Now I have intialized the document synchronization, I just need to go to edit the forms of my Dataverse Table I have just choosen at the step before.
Add a Subgrid component, filter by Show related records and choose Documents (Regarding)
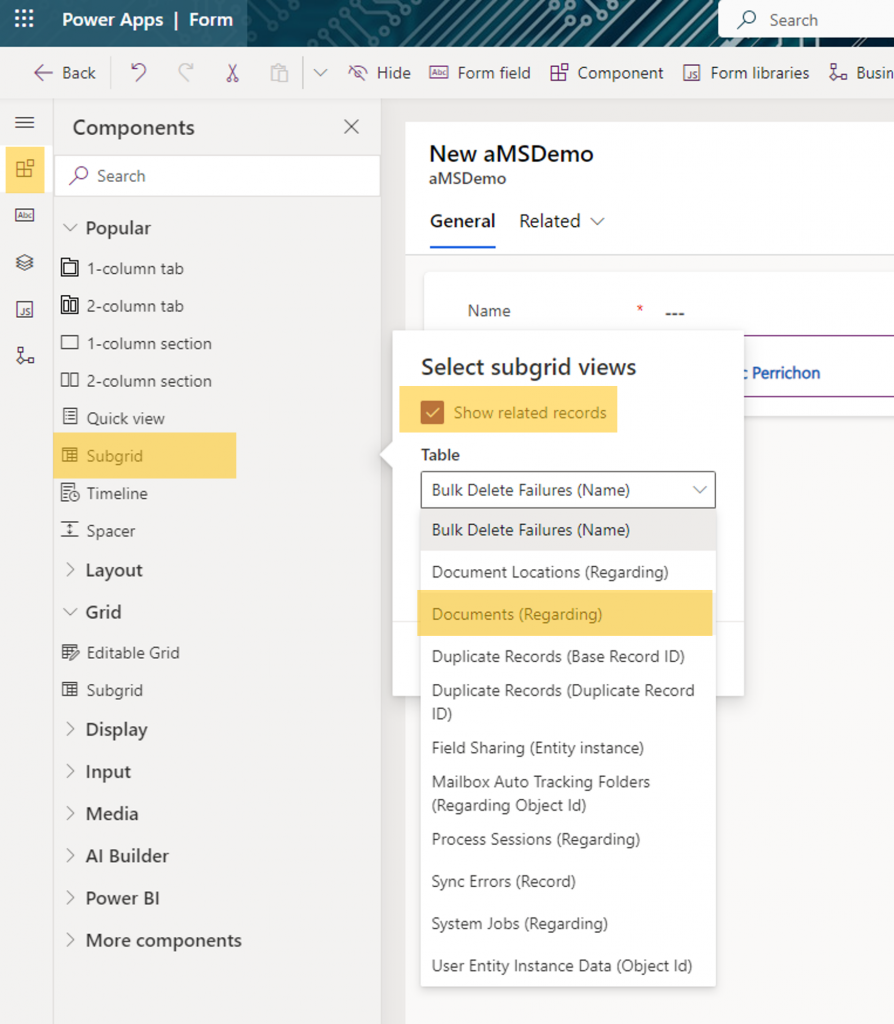
It is going to tell you An error has occured while loading documents. which is normal because while editing you are on a new item, which means the dataverse item doesn’t exist yet so you can’t synchronized document with something which this item so far.

Non you can click on Save and Publish, and play around with your synchronization.
4. Switch the default location for shared environments
So you have one environment, for one project and one SharePoint site, you don’t need the following step.
But if you have a shared environnement with multiple project and multiple SharePoint, it might intesrest you.
The main idea is for each new Dataverse item, we are going to replace the default Document Location to make sure it is synchronized with the right SharePoint.
4.1. Prerequisite
- A Dataverse Table
- A SharePoint site
- To add the Table to the default site, using the step just above. Do not change the default SharePoint site Url.
Why do we need to synchronize with the default SharePoint site if we don’t want to be in it? Because by going through the procees it is going to implement the polymorphic columns with our new table. And don’t worry the following step is going to overwrite the default SharePoint location (and document location) only for our new table.
So for the following example, I have a SharePoint Site named Blog Demo :
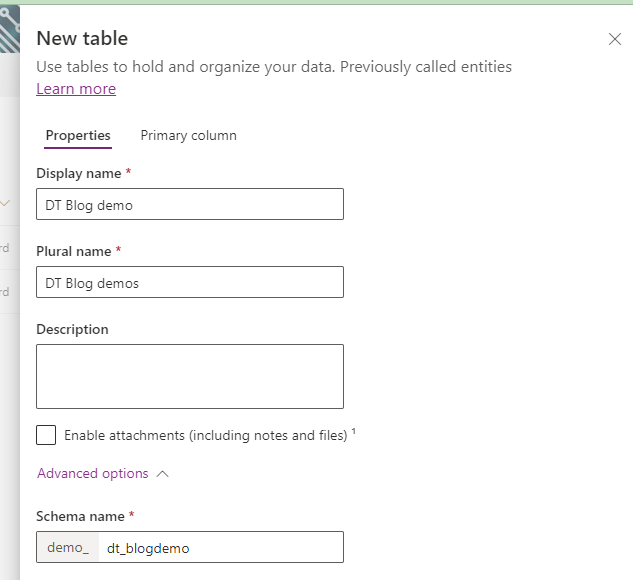
And a Dataverse table named DT Blog Demo :
The idea is, when I create a new DT Blog demo item, to create a document location and change the default SharePoint site with blog demo. And of course be able to store my documents into Blog Demo.
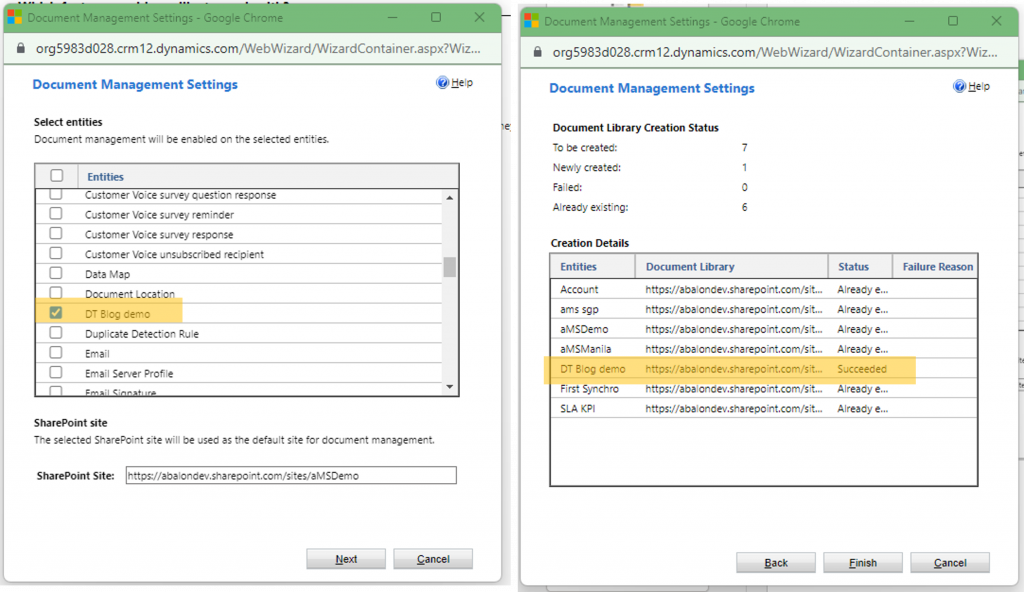
The first thing I need to do is to update the polymorphic columns with my new Dataverse Table. To do so, I just need to go to the Document Management settings and select my new table (such as mentionned above).
Leave the default SharePoint url for the moment, otherwise it will change the document location for all tables selected.
4.2. Initialize your new SharePoint site with the Document library
It is going to be a one shot action. The main idea is to declare our new SharePoint site and Document Library into Dataverse.
It means we are going to create an entry into the SharePoint site and the document location Dataverse Tables. Once created, we are going to store the GUID of these items into Environment variable.
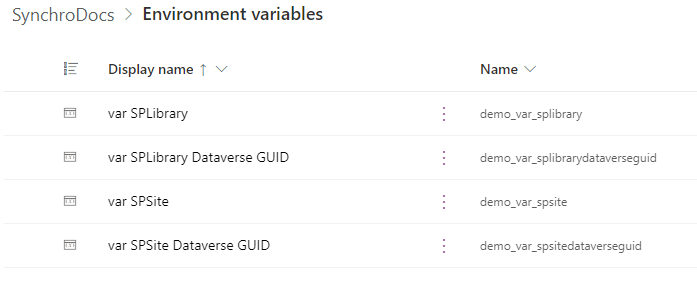
Let’s create our Environment variables:
| Name | Type | Description |
|---|---|---|
| var SPSite | Datasource > Site | It is the SharePoint site where you want to store your documents. It has to be different from the default SharePoint site. In our case it is going to be Blog Demo. |
| var SPLibrary | Datasource > List | It is the SharePoint Library you want to store your document in. In our case it is going to be the Shared Document library from Blog Demo. |
| var SPSite Dataverse GUID | Text | It is the guid of the item from SharePoint site Dataverse table, matching the site into var SPSite. |
| var SPLibrary Dataverse GUID | Text | It is the guid of the item from Document Location Dataverse table, matching the library into var SPLibrary. |
- We declare our variables
- We are checking if the SharePoint site is already into our SharePoint Site Dataverse Table.
- If so, we are getting the GUID of the SharePoint site Dataverse item
- If not, we are creating the item into the SharePoint site Dataverse Table, then getting the GUID of this new item.
- We are putting this GUID into a array, for at the end of the flow updating the environment variables.
- Then we are getting information through SharePoint Rest API to get the Folder path of the Document Library.
- We are checking if it exists into the Document Location Dataverse Table
- If so, we are getting the GUID of the Document Location Dataverse item
- If not, we are creating the item into the Document Location Dataverse Table, then getting the GUID of this new item.
- We are putting this GUID into a array, for at the end of the flow updating the environment variables.
- We are updating our environment variables (You can check this post to understand how to do so).

Please note : If in the creation of the Document Location, you don’t see Regarding(Your Dataverse table), it means you have missed the Prerequisites.

Once the flow has run, you must have an items into Dataverse SharePoint sites and Document Location tables, and the environment variables should have been updated.
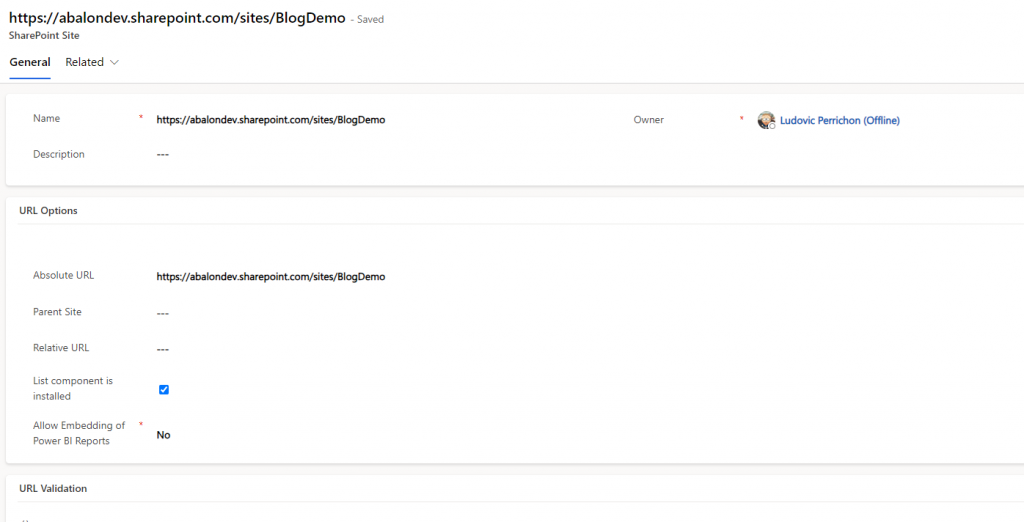
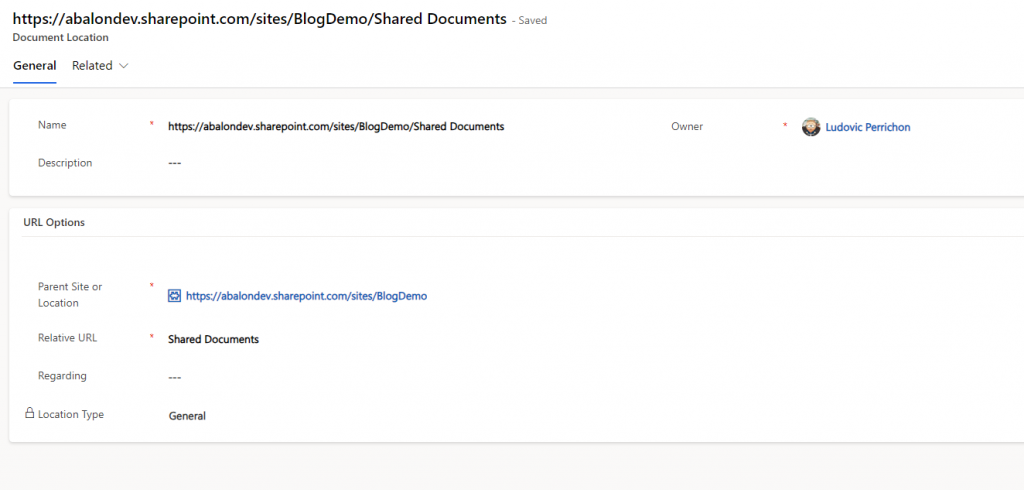
Please note that I have put the url in the Name column, but the name column doesn’t have any impact, so you can’t put anything you want in the flow while creating, but I advise to put something revelant.
4.3. Manage document location for a new item
The idea now, is to connect each new DT Blog Demo (Dataverse) item to the Library for document synchronization.
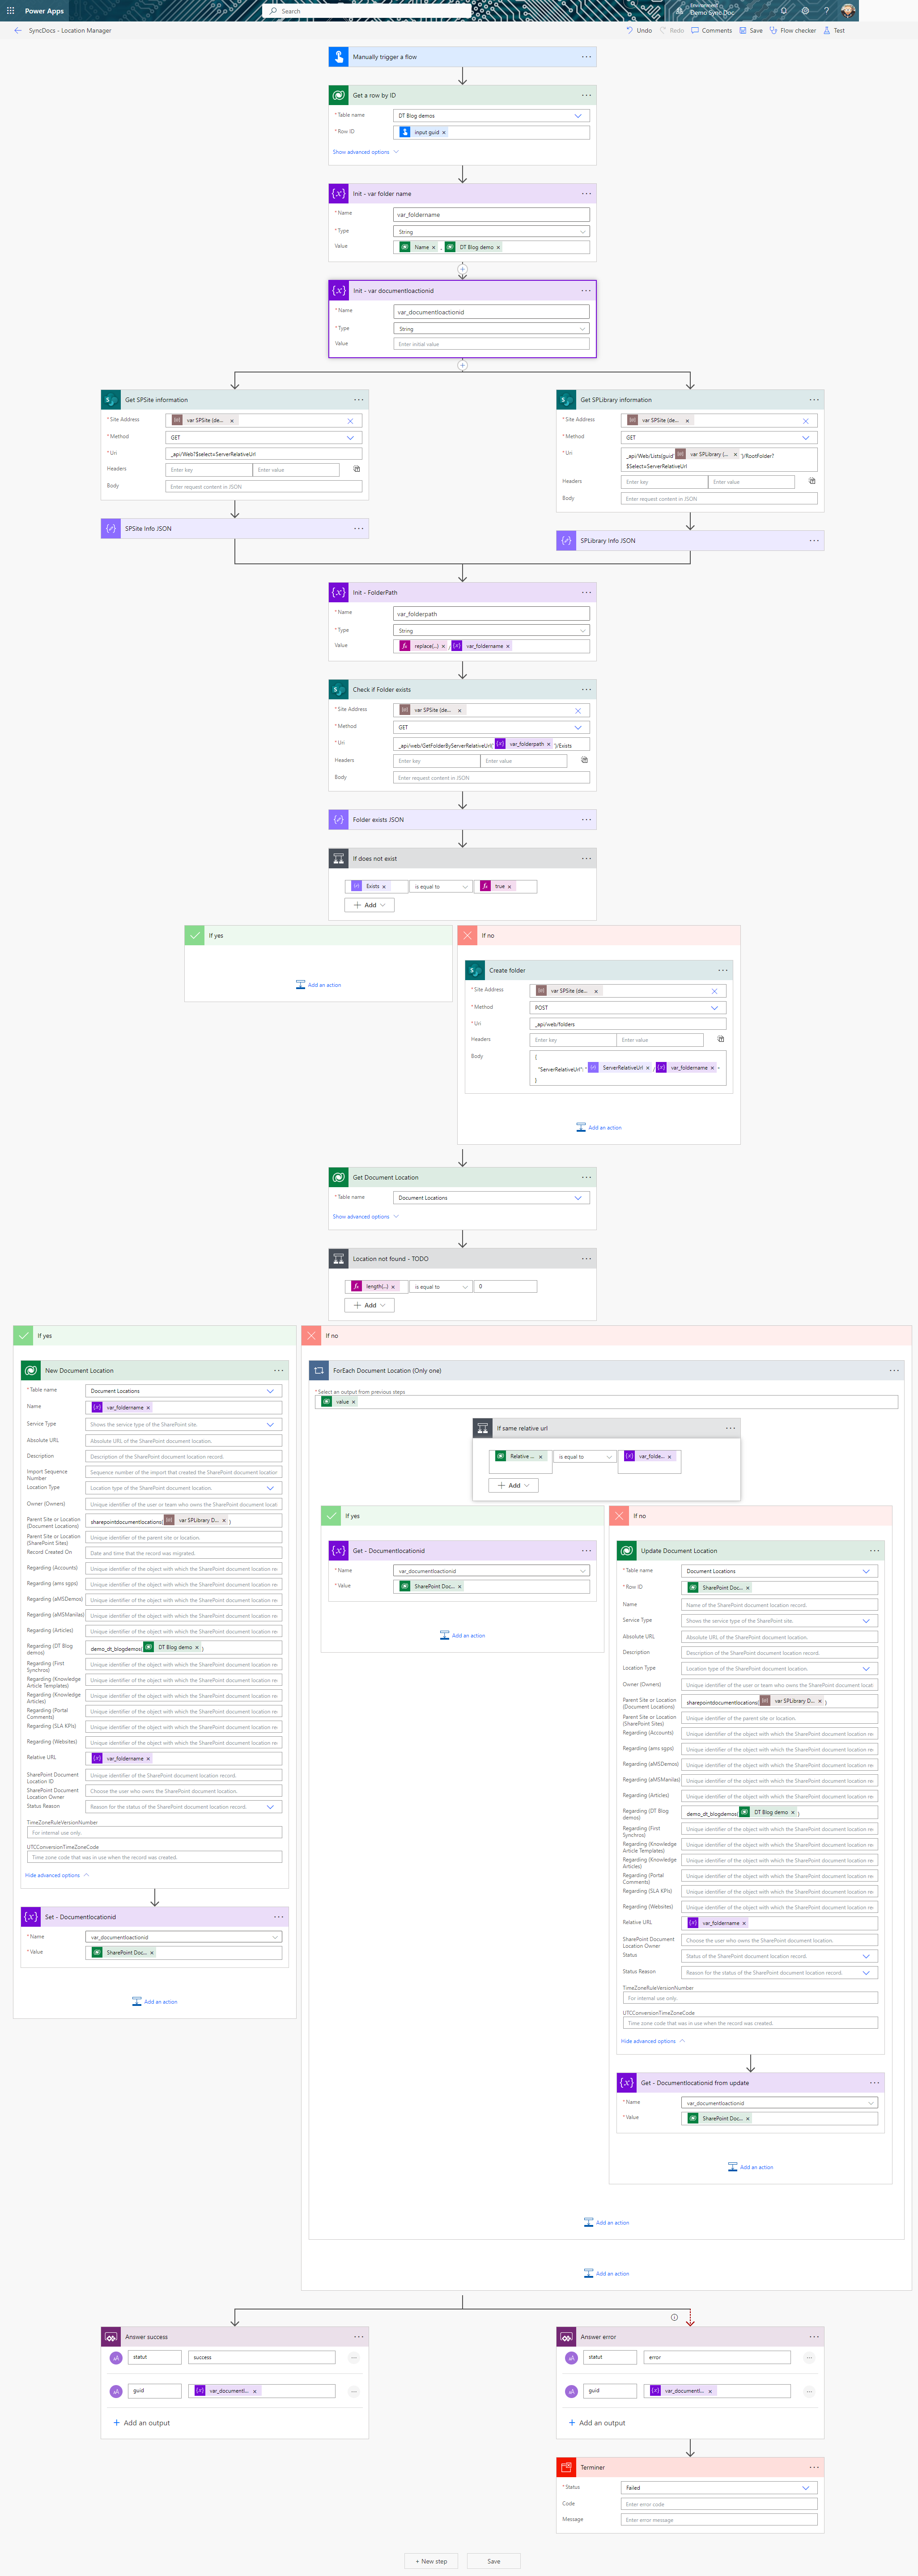
The following flow will acheive this for us:
- Initialise my value and declare my folder name (as it is going to appears into SharePoint)
- Build a FolderPath to this folder from SharePoint information
- Check if the folder exist in SharePoint
- If it doesn’t create the folder
- Check if we have a Document Location in Dataverse for the regarding the created dataverse item
- If we have, check and change the folderpath of Document Location and store the GUID
- If we don’t have, create a new document location (don’t forget the regarding column) and store the GUID
- I am returning success or failed with the Document Location GUID
I am using a manual trigger, in case of at a moment it failed or you loose the synchronization, I can re-execute my flow.
Before to keep going, let’s have a look at Document Location:
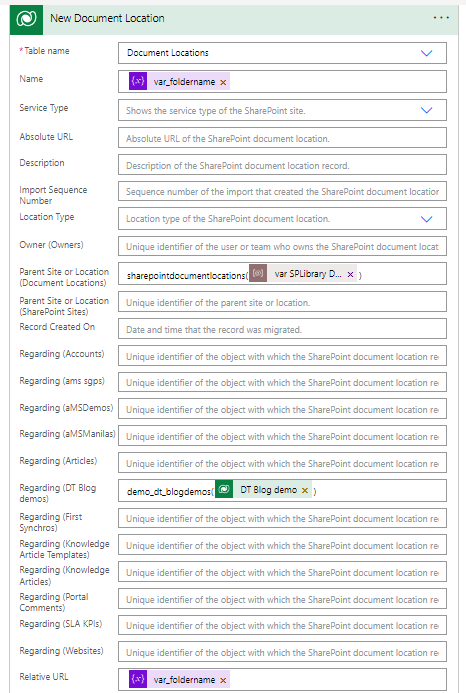
Name: It is the name you are going to find in Dataverse Document Location Table. The only purpose of this one is to easely identify your item into Document Location table if needed.
Parent Site or Location: If you Understand what’s going on Dataverse Side, you know that your folder should be related to a document library. In Dataverse means your Parent Document Location. Here is where you identify it.
Regarding(Dataverse Table): If you don’t see your table here, it means you have missed the prerequisites. In this column, you identify which Dataverse item is linked to this document location (and so on to which SharePoint folder).
Reative Url: It speaks for itself. The relatrive URL of the folder from the parent.
And finnaly, when a new item is created, I am going to override the document location, by calling my child flow.

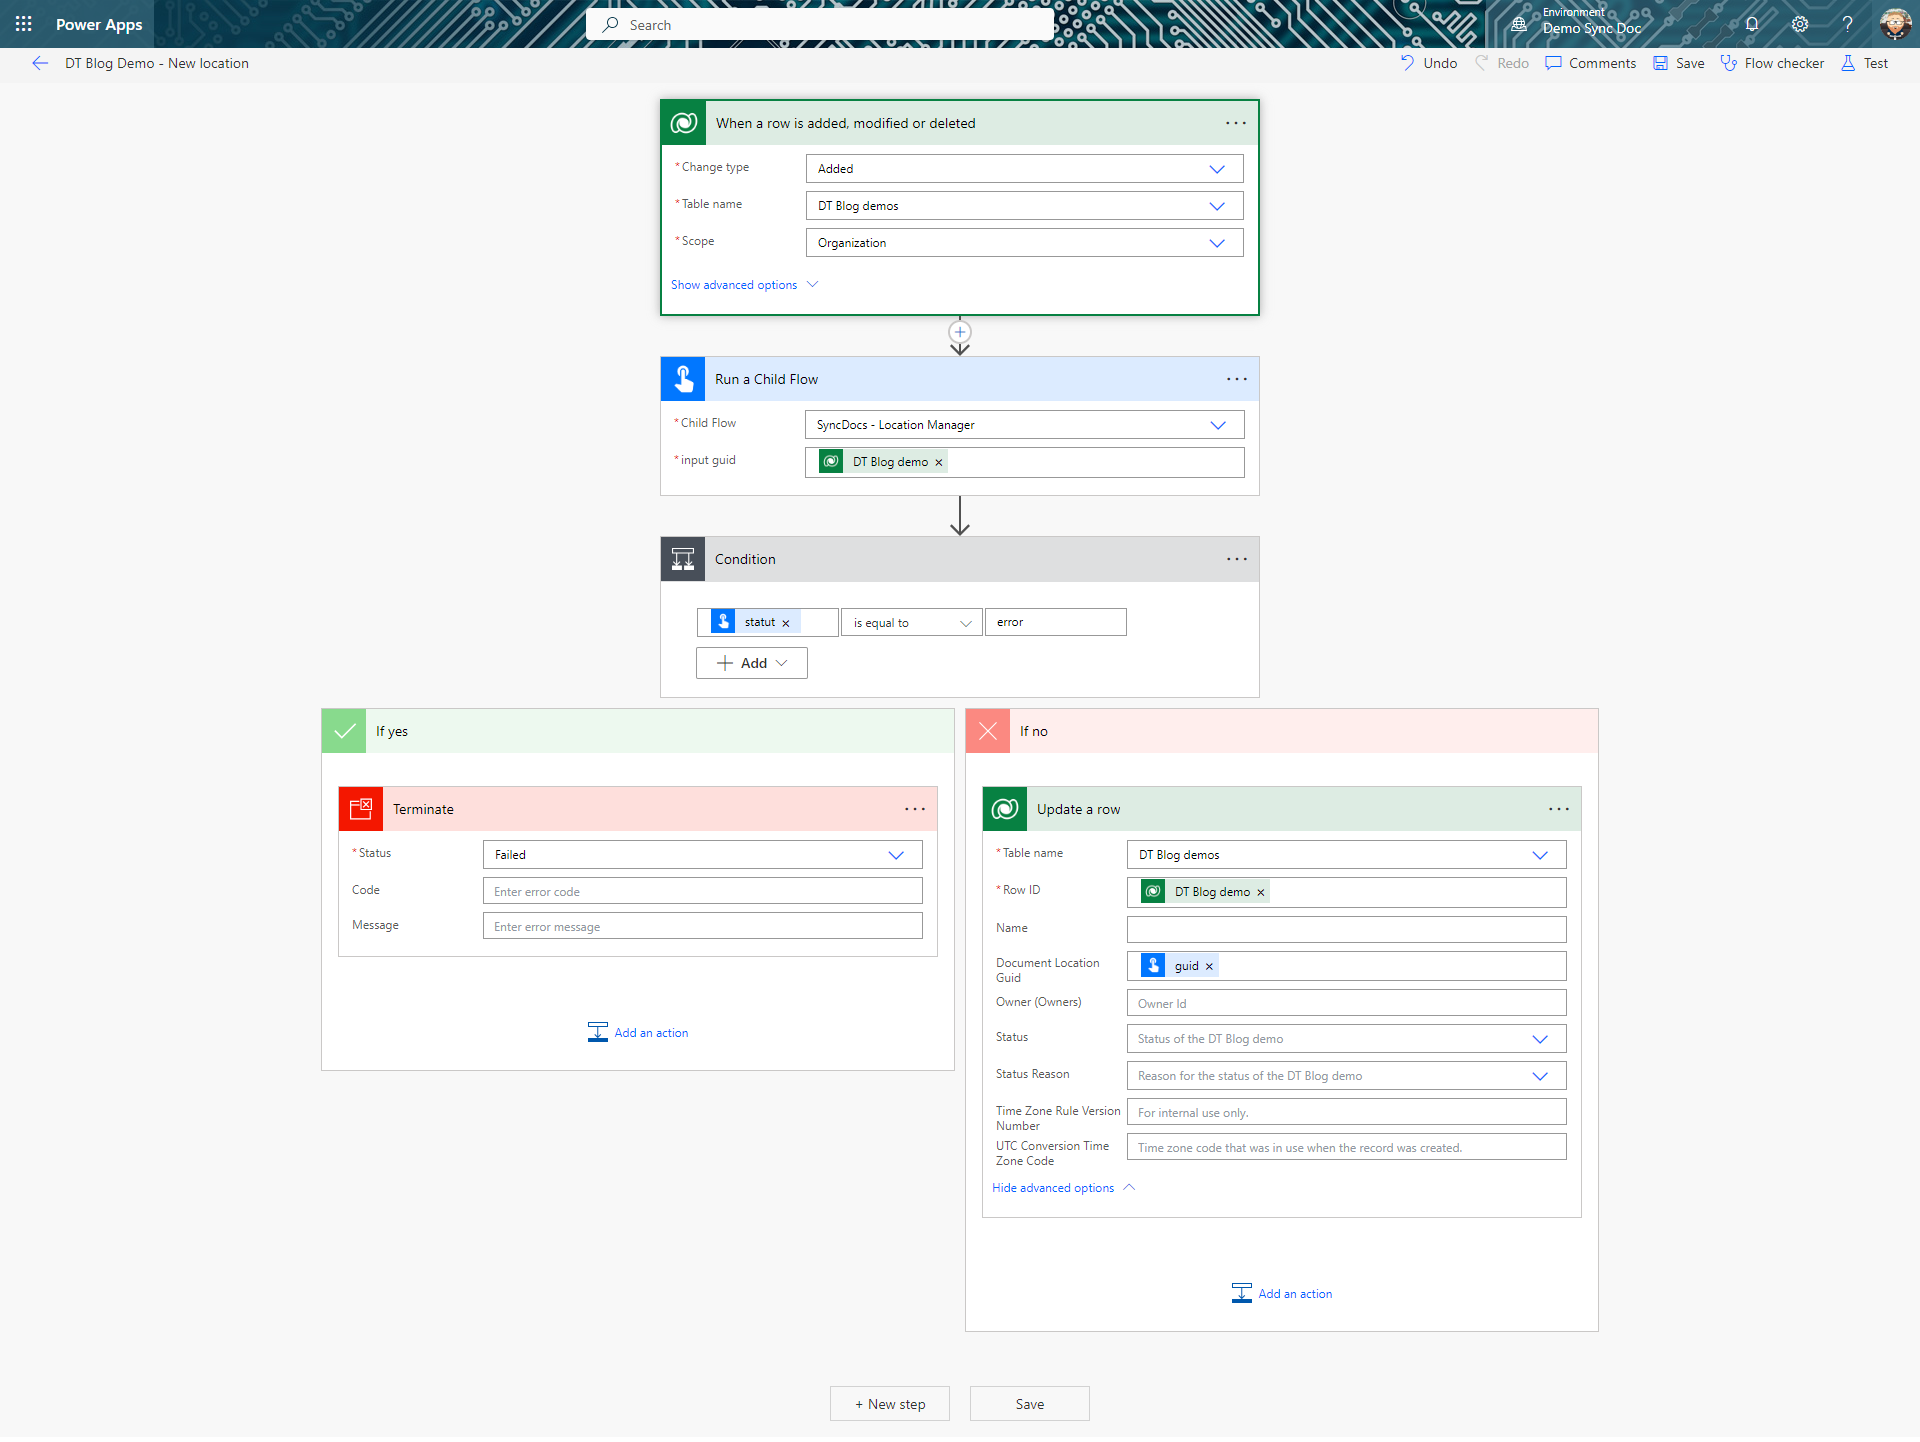
I am storing the GUID of my document location in a variable because I use to save it in a column of my synchronized Dataverse item. Like this I can easely identify which one has been syncrhonized and which one failed (column will be empty).
Let’s try it out.
5. Get documents from Canvas
5.1. What’s happening Model driven side
You can, of course, always do directly a request to SharePoint, but you need to find out the site, the library, the folder then make a request. Regarding performance, it is not the best.
But can’t I be as fast as the model driven is? When you load your page, documents appears straight away.
Also, if you are trying to see sharepointdocuments table items in a model driven, you see nothing, and canvas side, you can’t find this datasource
So if you are catching what’s going on while loading your model driven page, you are going to find this api request:
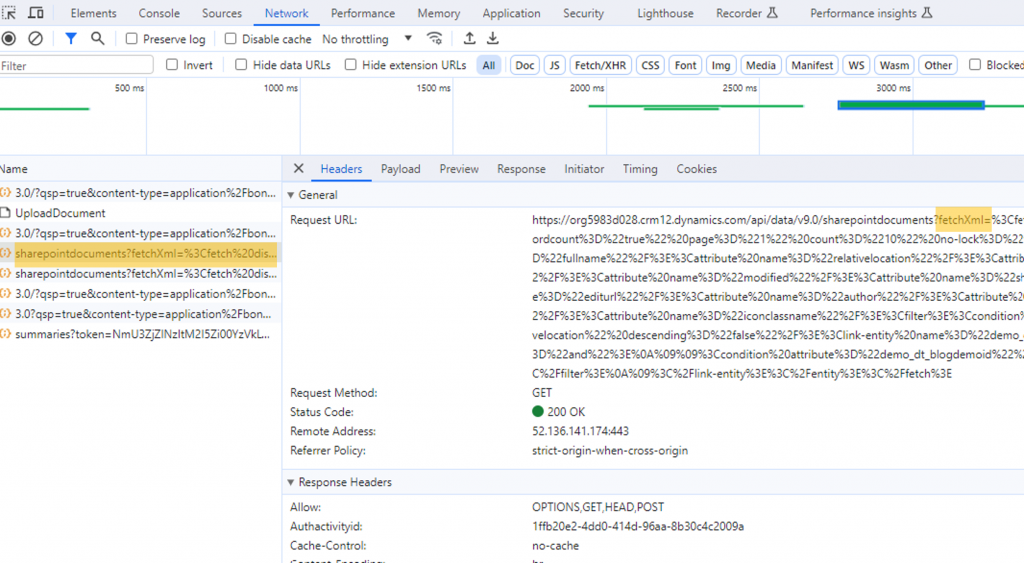
So model driven is calling the SharePointDocuments dataverse table with a Fetch Xml request.
<fetch distinct="false" mapping="logical" savedqueryid="a5b008ac-07d9-4554-8509-2c05767bff51" returntotalrecordcount="true" page="1" count="10" no-lock="false">
	<entity name="sharepointdocument">
		<attribute name="documentid"/>
		<attribute name="fullname"/>
		<attribute name="relativelocation"/>
		<attribute name="sharepointcreatedon"/>
		<attribute name="filetype"/>
		<attribute name="absoluteurl"/>
		<attribute name="modified"/>
		<attribute name="sharepointmodifiedby"/>
		<attribute name="title"/>
		<attribute name="readurl"/>
		<attribute name="editurl"/>
		<attribute name="author"/>
		<attribute name="sharepointdocumentid"/>
		<attribute name="ischeckedout"/>
		<attribute name="locationid"/>
		<attribute name="iconclassname"/>
		<filter>
			<condition attribute="isrecursivefetch" operator="eq" value="1"/>
		</filter>
		<order attribute="relativelocation" descending="false"/>
		<link-entity name="demo_dt_blogdemo" from="demo_dt_blogdemoid" to="regardingobjectid" alias="bb">
			<filter type="and">
				<condition attribute="demo_dt_blogdemoid" operator="eq" uitype="demo_dt_blogdemo" value="9d77a7f0-0b94-ee11-be37-002248da63d9"/>
			</filter>
		</link-entity>
	</entity>
</fetch>
So now, the main idea is to reproduce this behavior through a Power Automate, and call it from our Canvas app.
5.2. Integrate it with a Canvas
We are going to create a flow, which will make this Fetch Xml Request to the SharePoint Documents Dataverse table.
Then the flow is going to select some data and build a string which is going to be returned to Power Apps. Power Apps will have to parse this string to display document information.
Please note that I use a string and not a JSON, due to the fact that in this post, I won’t go through the process of parsing a JSON with Power Apps Canvas App.
Documents are going to be separate by | and attributes by ;
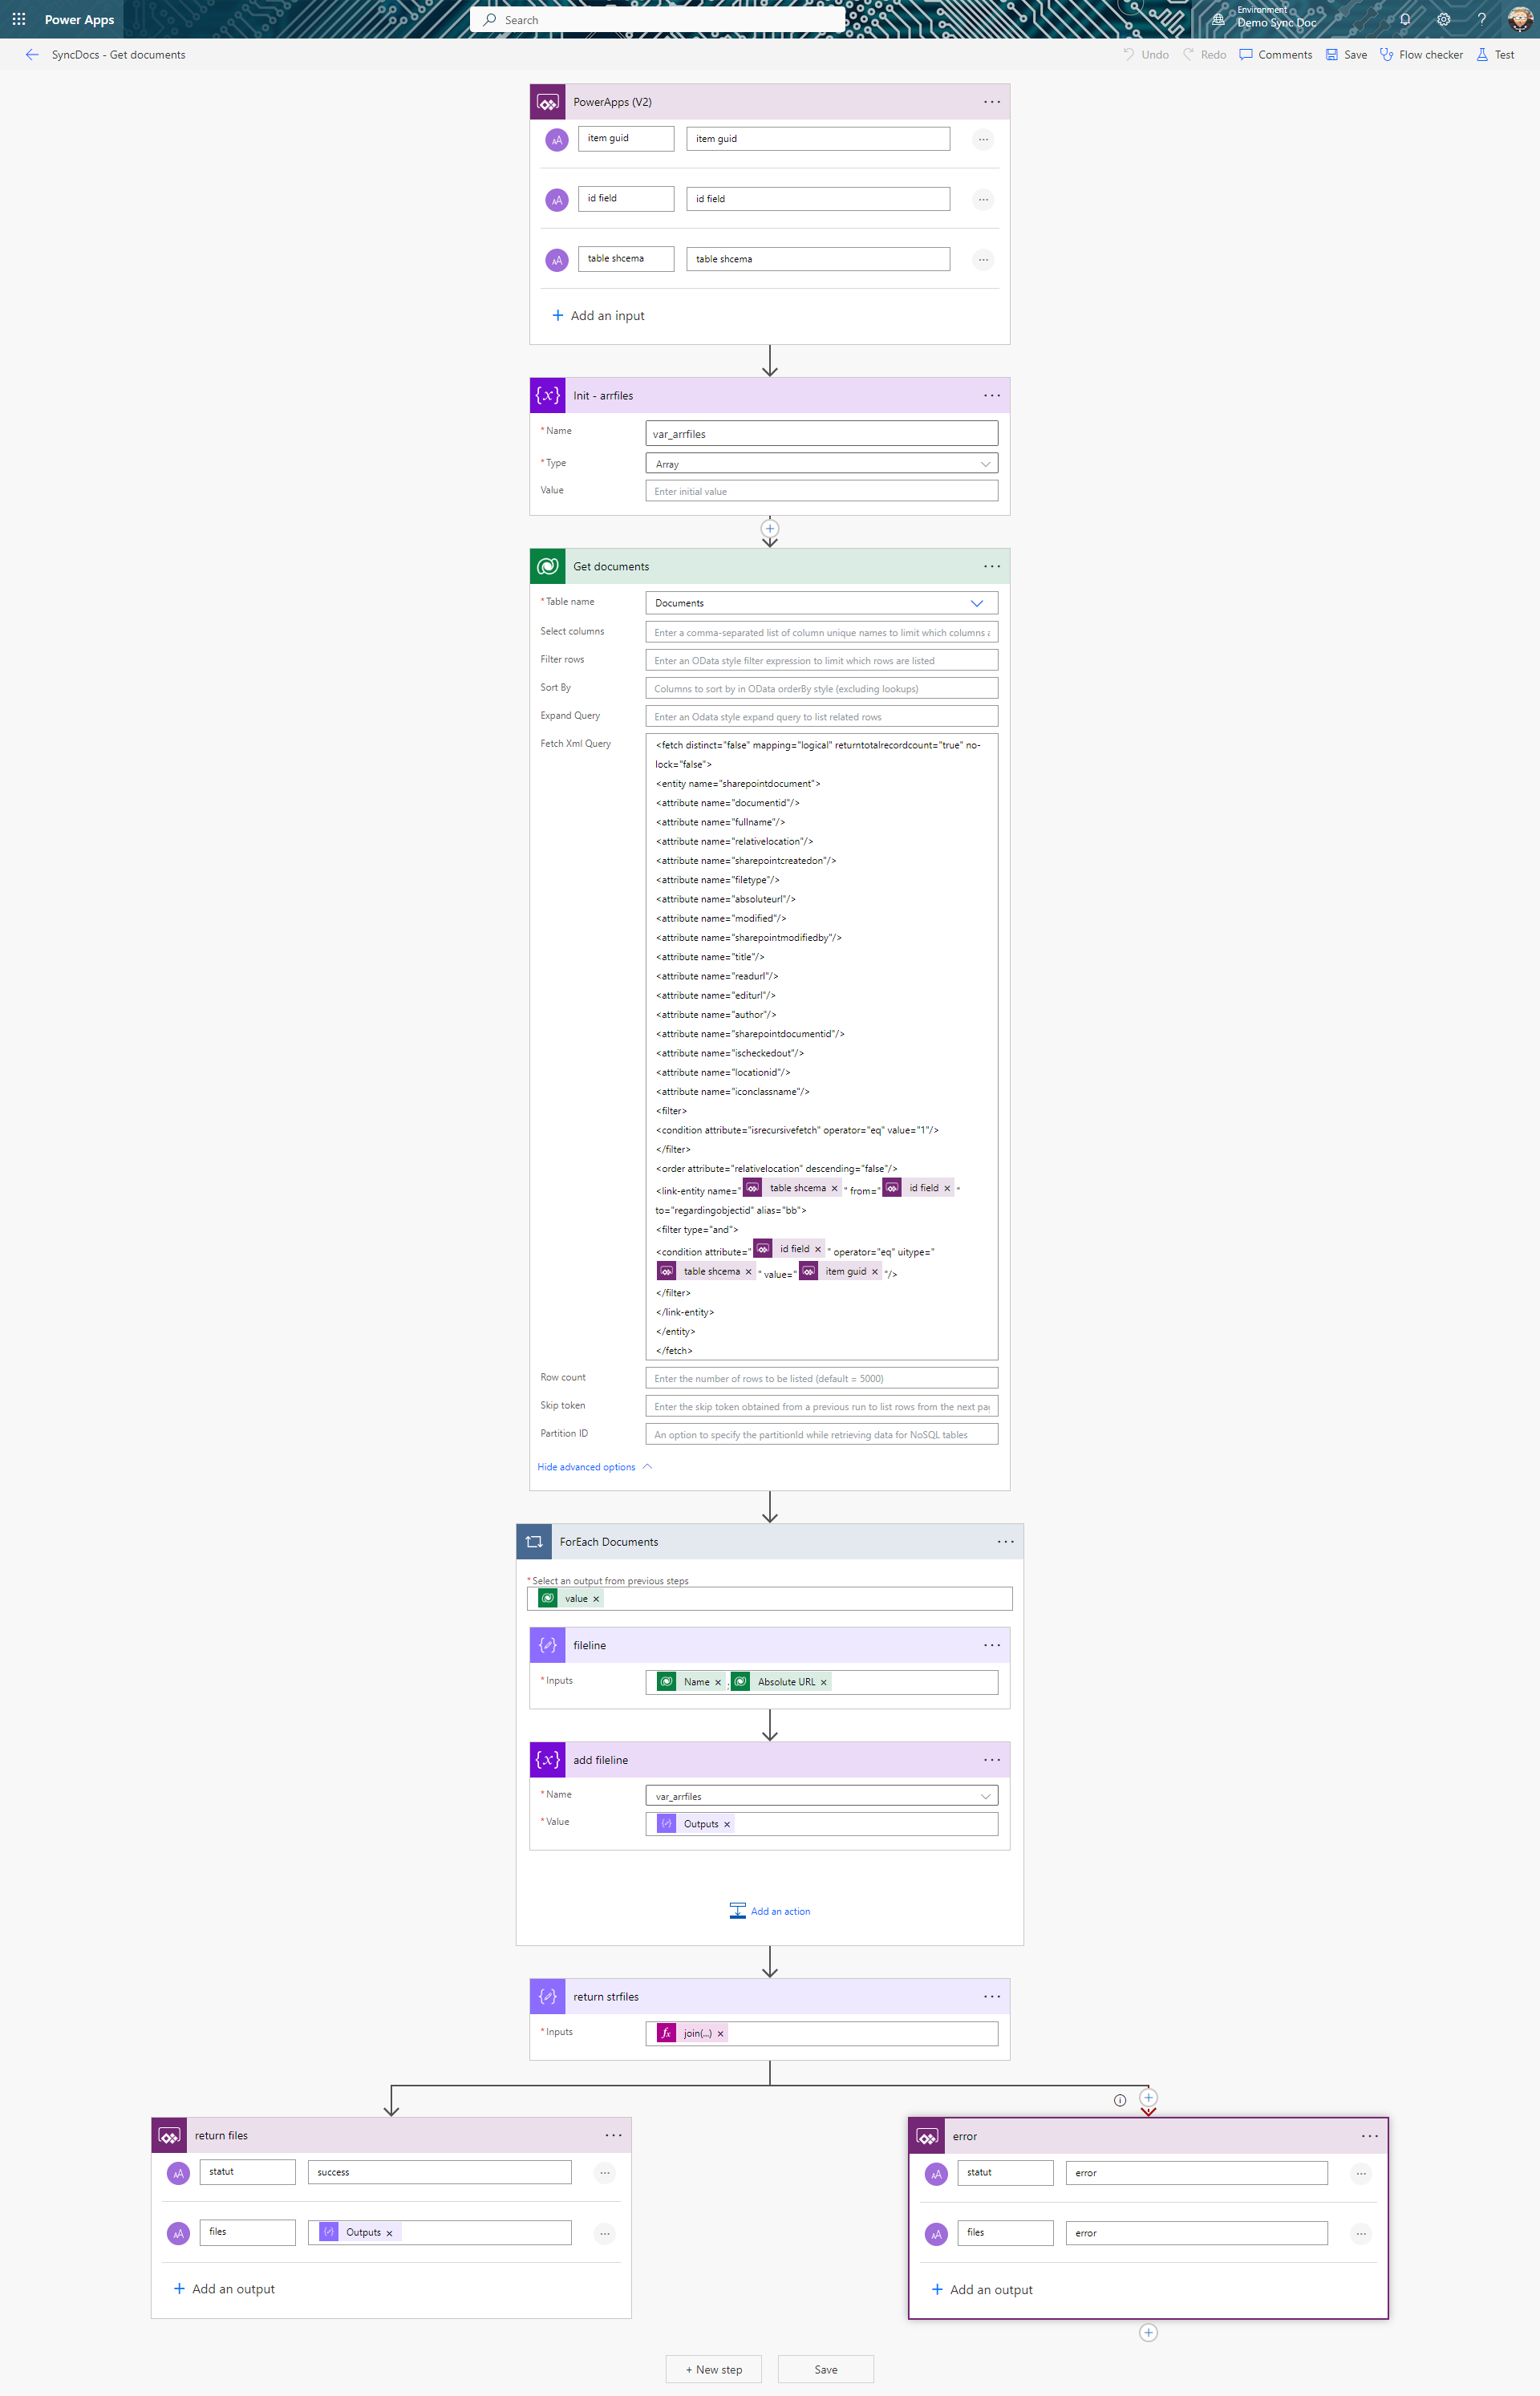
Here is the updated Fetch Xml for the request:
<fetch distinct="false" mapping="logical" returntotalrecordcount="true" no-lock="false">
	<entity name="sharepointdocument">
		<attribute name="documentid"/>
		<attribute name="fullname"/>
		<attribute name="relativelocation"/>
		<attribute name="sharepointcreatedon"/>
		<attribute name="filetype"/>
		<attribute name="absoluteurl"/>
		<attribute name="modified"/>
		<attribute name="sharepointmodifiedby"/>
		<attribute name="title"/>
		<attribute name="readurl"/>
		<attribute name="editurl"/>
		<attribute name="author"/>
		<attribute name="sharepointdocumentid"/>
		<attribute name="ischeckedout"/>
		<attribute name="locationid"/>
		<attribute name="iconclassname"/>
		<filter>
			<condition attribute="isrecursivefetch" operator="eq" value="1"/>
		</filter>
		<order attribute="relativelocation" descending="false"/>
		<link-entity name="@{triggerBody()['text_2']}" from="@{triggerBody()['text_1']}" to="regardingobjectid" alias="bb">
			<filter type="and">
				<condition attribute="@{triggerBody()['text_1']}" operator="eq" uitype="@{triggerBody()['text_2']}" value="@{triggerBody()['text']}"/>
			</filter>
		</link-entity>
	</entity>
</fetch>
In the canvas, I am adding the flow, and I am getting my document the following way:
Collect(
    coldocs,
    {
        itemguid: ThisItem.'DT Blog demo',
        strdocs: 'SyncDocs-Getdocuments'.Run(
            ThisItem.'DT Blog demo',
            "demo_dt_blogdemoid",
            "demo_dt_blogdemo"
        )
    }
)
Then I display my documents into a Gallery:
ForAll(
    Split(
        LookUp(
            coldocs,
            itemguid = ThisItem.'DT Blog demo',
            strdocs
        ).files,
        "|"
    ),
    {Result: ThisRecord.Value}
).Result
Inside the gallery, I am keeping parsing the result to get the date (example with Document name):
First(
    ForAll(Split(
        ThisItem.Result,
        ";"
    ), {Result: ThisRecord.Value}).Result
).Result
I highly recommand to work with JSON. It is a longer process to implement with Canvas, but it is easier at the end to debug or parse. However parsing text still working fine.
Demo:
6. Upload documents from Canvas
6.1. Should I use the Dataverse API such as Model Driven?
So if you are having a look about what’s going on Dataverse side, you are going to find out that it is calling UploadDocument from the API.
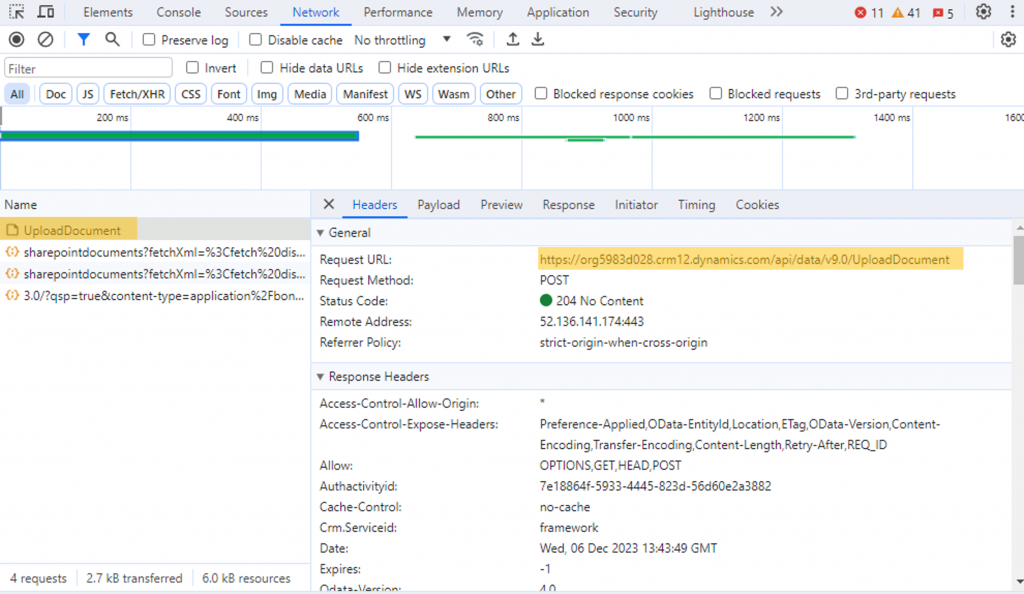
I am not using it to upload my documents from Canvas, because calling Dataverse API from Power Automate, require to use the HTTP connector and manage the OAuth identification.
Look at this post from Dennis Goedegebuure.
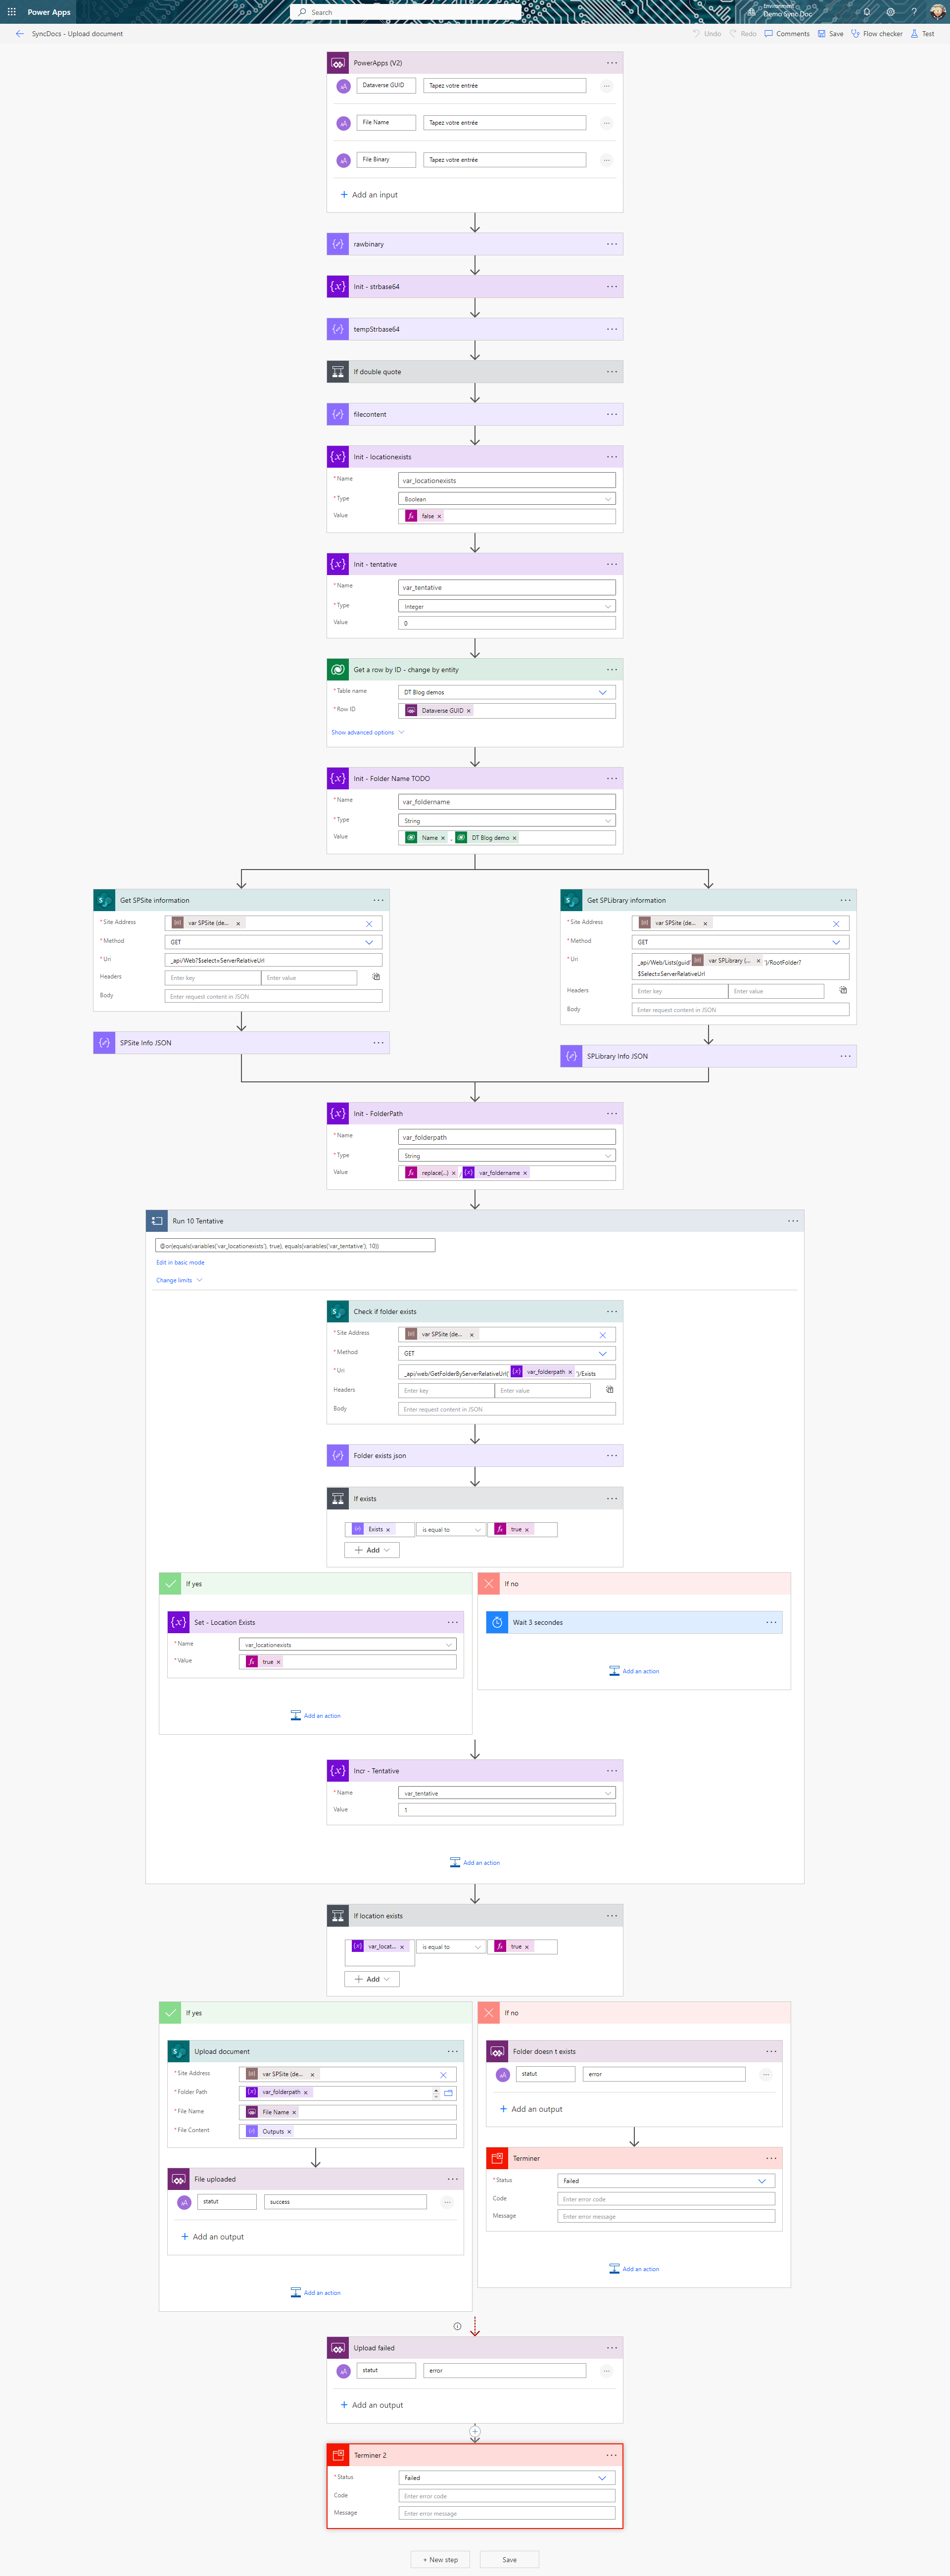
6.2. Using SharePoint connector
So first, we need a component to select a file from Canvas, the tips is open a SharePoint form with Power Apps, then copy and paste the attachement upload document into a component.
Then from the component, I am going to get the binary of file, which I will send to a flow and create the file at the right place in SharePoint.
Due to the fact that sometimes, in my Canavs app, I allow user to create dataverse item and add related document at the same time, it means you can send the request to upload the document right before the dataverse item is created (and so its synchronized folder). So to avoid “Folder not found” error, every 3 secondes I am checking if the folder exists. Folder created with the document location flow.
Then in Power Apps to call the flow:
UpdateContext({locicon: Icon.Clock});
UpdateContext(
    {
        locupload: 'SyncDocs-Uploaddocument'.Run(
            locselecteditemguid,
            Self.AddedFile.Name,
            Self.AddedFile.BinaryData
        )
    }
);
If(
    locupload.statut = "error",
    UpdateContext({locicon: Icon.CancelBadge}),
    UpdateContext({locicon: Icon.CheckBadge})
)
Demo:
7. Download demo Un-managed solution
If needed, you can download the un-managed solution of the flows and apps used to make this post.